Canon PIXMA MP140 MP140 series Quick Start Guide - Page 6
Before Using the Machine, Operation Panel - ink
 |
View all Canon PIXMA MP140 manuals
Add to My Manuals
Save this manual to your list of manuals |
Page 6 highlights
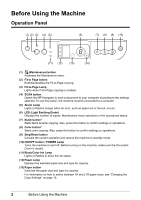
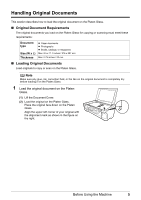
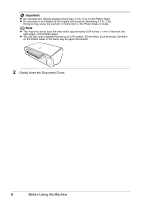
Before Using the Machine Operation Panel (1) (2) (3) (4) (5) (6) (7) (8) (9) (10) (11) (12) (13) (14) (1) (Maintenance) button Accesses the Maintenance menu. (2) Fit to Page button Enables/disables the Fit-to-Page copying. (3) Fit-to-Page Lamp Lights when Fit-to-Page copying is enabled. (4) SCAN button Opens the MP Navigator to scan a document to your computer according to the settings selected. To use this button, the machine must be connected to a computer. (5) Alarm Lamp Lights or flashes orange when an error, such as paper-out or ink-out, occurs. (6) LED (Light Emitting Diode) Displays the number of copies, Maintenance menu selections or the operational status. (7) Black button* Starts black & white copying. Also, press this button to confirm settings or operations. (8) Color button* Starts color copying. Also, press this button to confirm settings or operations. (9) Stop/Reset button Cancels the current operation and returns the machine to standby mode. (10) ON/OFF button / POWER Lamp Turns the machine on and off. Before turning on the machine, make sure the Document Cover is closed. (11) Black/Color Ink Lamp Lights or flashes to show the ink status. (12) Paper Lamp Displays the selected paper size and type for copying. (13) Paper button Switches the paper size and type for copying. For information on how to switch between A4 and LTR paper sizes, see "Changing the Copy Settings" on page 13. 2 Before Using the Machine
-
 1
1 -
 2
2 -
 3
3 -
 4
4 -
 5
5 -
 6
6 -
 7
7 -
 8
8 -
 9
9 -
 10
10 -
 11
11 -
 12
12 -
13
-
14
-
15
-
16
-
17
-
18
-
19
-
20
-
21
-
22
-
23
-
24
-
25
-
26
-
27
-
28
-
29
-
30
-
31
-
32
-
33
-
34
-
35
-
36
-
37
-
38
-
39
-
40
-
41
-
42
-
43
-
44
-
45
-
46
-
47
-
48
-
49
-
50
-
51
-
52
-
53
-
54
-
55
-
56
-
57
-
58
-
59
-
60
-
61
-
62
-
63
-
64
-
65
-
66
-
67
-
68
-
69
-
70
-
71
-
72
 |
 |
