Canon PIXMA MP960 Quick Start Guide - Page 45
Printing Scanned Photographs, Select and print, Easy-Scroll Wheel
 |
View all Canon PIXMA MP960 manuals
Add to My Manuals
Save this manual to your list of manuals |
Page 45 highlights
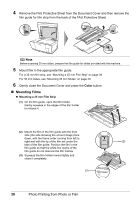
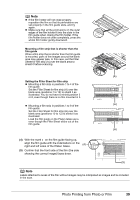
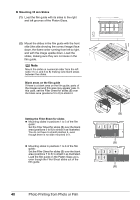
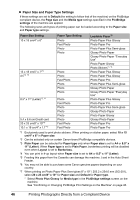
Note z Film is scanned in the order from left to right. z Mount the slides in the film guide with the upper edge of the photograph towards you to prevent the scanned photographs from being displayed upside down on the LCD. Depending on the model or brand of your camera, the scanning order may differ from the frame order of the film. scanning order *1 *2 *1 35 mm film strip *2 35 mm slide Printing Scanned Photographs 1 Prepare for printing. (1) Load paper. See "Loading Printing Paper" on page 8. (2) Scan a photo. See "Scanning a Photo" on page 37 or "Scanning a Film" on page 37. (3) Make sure that the proper paper source is selected. See "Changing the Paper Source" on page 15. 2 Select the print menu. (1) Select Select and print, then press the OK button. (2) Confirm the paper size, media type, and other settings, then select Next, and then press the OK button. To change the settings, select the item and press the OK button. 3 Select the photo to print and specify the number of copies for each photo. (1) Use the Easy-Scroll Wheel or the [ or ] button to display a photo to print. (2) Use the + or - button to specify the number of copies. (3) Repeat steps (1) and (2) to specify the number of copies for each photo. (4) Press the OK button. Photo Printing from Photo or Film 41
-
 1
1 -
2
-
3
-
4
-
5
-
6
-
7
-
8
-
9
-
10
-
11
-
12
-
13
-
14
-
15
-
16
-
17
-
18
-
19
-
20
-
21
-
22
-
23
-
24
-
25
-
26
-
27
-
28
-
29
-
30
-
31
-
32
-
33
-
34
-
35
-
36
-
37
-
38
-
39
-
 40
40 -
 41
41 -
 42
42 -
 43
43 -
 44
44 -
 45
45 -
 46
46 -
 47
47 -
 48
48 -
 49
49 -
 50
50 -
51
-
52
-
53
-
54
-
55
-
56
-
57
-
58
-
59
-
60
-
61
-
62
-
63
-
64
-
65
-
66
-
67
-
68
-
69
-
70
-
71
-
72
-
73
-
74
-
75
-
76
-
77
-
78
-
79
-
80
-
81
-
82
-
83
-
84
-
85
-
86
-
87
-
88
-
89
-
90
-
91
-
92
-
93
-
94
-
95
-
96
-
97
-
98
-
99
-
100
-
101
-
102
-
103
-
104
-
105
-
106
-
107
-
108
-
109
-
110
-
111
-
112
-
113
-
114
-
115
-
116
 |
 |
