Canon XF100 XF100 / XF105 Instruction Manual - Page 132
Installing and Uninstalling Canon XF Utility Windows
 |
View all Canon XF100 manuals
Add to My Manuals
Save this manual to your list of manuals |
Page 132 highlights
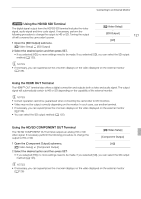
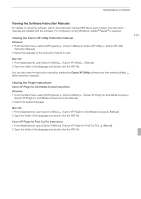
Saving Clips to a Computer Installing and Uninstalling Canon XF Utility (Windows) 132 Installing Canon XF Utility Perform the following procedure to install the Canon XF Utility software. Note that the language displayed during installation will be in English, French or Spanish but the rest of the application's menus and messages will be in English only. 1 Insert the Canon XF Utilities CD-ROM into the computer. • The installation screen appears. If it does not, follow the steps below. - Windows Vista and Windows 7: When the AutoPlay window appears, select [Run SETUP.EXE]. - Windows Vista, Windows 7 and Windows XP: Open [Computer] (Windows Vista and Windows 7) or [My Computer] (Windows XP) and double-click the icon of the drive that contains the CD-ROM. 2 Select your region. • If you selected [Asia] or [Oceania], skip to step 4. 3 Select the language to be displayed during installation.
-
 1
1 -
2
-
3
-
4
-
5
-
6
-
7
-
8
-
9
-
10
-
11
-
12
-
13
-
14
-
15
-
16
-
17
-
18
-
19
-
20
-
21
-
22
-
23
-
24
-
25
-
26
-
27
-
28
-
29
-
30
-
31
-
32
-
33
-
34
-
35
-
36
-
37
-
38
-
39
-
40
-
41
-
42
-
43
-
44
-
45
-
46
-
47
-
48
-
49
-
50
-
51
-
52
-
53
-
54
-
55
-
56
-
57
-
58
-
59
-
60
-
61
-
62
-
63
-
64
-
65
-
66
-
67
-
68
-
69
-
70
-
71
-
72
-
73
-
74
-
75
-
76
-
77
-
78
-
79
-
80
-
81
-
82
-
83
-
84
-
85
-
86
-
87
-
88
-
89
-
90
-
91
-
92
-
93
-
94
-
95
-
96
-
97
-
98
-
99
-
100
-
101
-
102
-
103
-
104
-
105
-
106
-
107
-
108
-
109
-
110
-
111
-
112
-
113
-
114
-
115
-
116
-
117
-
118
-
119
-
120
-
121
-
122
-
123
-
124
-
125
-
126
-
 127
127 -
 128
128 -
 129
129 -
 130
130 -
 131
131 -
 132
132 -
 133
133 -
 134
134 -
 135
135 -
 136
136 -
 137
137 -
138
-
139
-
140
-
141
-
142
-
143
-
144
-
145
-
146
-
147
-
148
-
149
-
150
-
151
-
152
-
153
-
154
-
155
-
156
-
157
-
158
-
159
-
160
-
161
-
162
-
163
-
164
-
165
-
166
-
167
-
168
-
169
-
170
-
171
-
172
-
173
-
174
-
175
-
176
-
177
-
178
-
179
-
180
-
181
-
182
-
183
-
184
-
185
-
186
 |
 |
