Canon XF100 XF100 / XF105 Instruction Manual - Page 78
Using Line Input or an External Microphone Connected to an XLR Terminal - audio
 |
View all Canon XF100 manuals
Add to My Manuals
Save this manual to your list of manuals |
Page 78 highlights
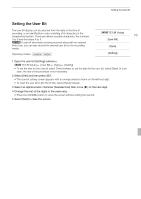
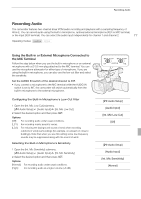
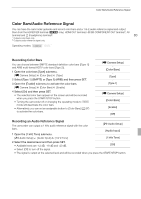
Recording Audio Activating the Microphone Attenuator If the audio level is too high and the sound sounds distorted when recording with the built-in microphone or a microphone connected to the 78 MIC terminal, activate the microphone attenuator (12 dB for the built-in microphone, 20 dB for an external microphone). 1 Open the [Int. Mic Att.] submenu. [m Audio Setup] [Audio Input] 2 Select [On] and then press SET. [Int. Mic Att.] [m Audio Setup] [Audio Input] [Int. Mic Att.] [Off] Using Line Input or an External Microphone Connected to an XLR Terminal Connecting an External Microphone to an XLR Terminal Follow the procedure below to attach an external microphone to an XLR terminal (refer also to the following illustration). 1 Loosen the microphone lock screw (ቢ), open the microphone holder unit and insert the microphone (ባ). 2 Tighten the lock screw and put the microphone cable through the microphone cable clamp under the microphone holder unit (ቤ). 3 Plug the microphone cable into the desired XLR terminal (ብ). Microphone lock screw Cable clamp XLR terminals
-
 1
1 -
2
-
3
-
4
-
5
-
6
-
7
-
8
-
9
-
10
-
11
-
12
-
13
-
14
-
15
-
16
-
17
-
18
-
19
-
20
-
21
-
22
-
23
-
24
-
25
-
26
-
27
-
28
-
29
-
30
-
31
-
32
-
33
-
34
-
35
-
36
-
37
-
38
-
39
-
40
-
41
-
42
-
43
-
44
-
45
-
46
-
47
-
48
-
49
-
50
-
51
-
52
-
53
-
54
-
55
-
56
-
57
-
58
-
59
-
60
-
61
-
62
-
63
-
64
-
65
-
66
-
67
-
68
-
69
-
70
-
71
-
72
-
 73
73 -
 74
74 -
 75
75 -
 76
76 -
 77
77 -
 78
78 -
 79
79 -
 80
80 -
 81
81 -
 82
82 -
 83
83 -
84
-
85
-
86
-
87
-
88
-
89
-
90
-
91
-
92
-
93
-
94
-
95
-
96
-
97
-
98
-
99
-
100
-
101
-
102
-
103
-
104
-
105
-
106
-
107
-
108
-
109
-
110
-
111
-
112
-
113
-
114
-
115
-
116
-
117
-
118
-
119
-
120
-
121
-
122
-
123
-
124
-
125
-
126
-
127
-
128
-
129
-
130
-
131
-
132
-
133
-
134
-
135
-
136
-
137
-
138
-
139
-
140
-
141
-
142
-
143
-
144
-
145
-
146
-
147
-
148
-
149
-
150
-
151
-
152
-
153
-
154
-
155
-
156
-
157
-
158
-
159
-
160
-
161
-
162
-
163
-
164
-
165
-
166
-
167
-
168
-
169
-
170
-
171
-
172
-
173
-
174
-
175
-
176
-
177
-
178
-
179
-
180
-
181
-
182
-
183
-
184
-
185
-
186
 |
 |