Canon XF100 XF100 / XF105 Instruction Manual - Page 71
Selecting Drop or Non-Drop Frame, Putting the Time Code Display on Hold
 |
View all Canon XF100 manuals
Add to My Manuals
Save this manual to your list of manuals |
Page 71 highlights
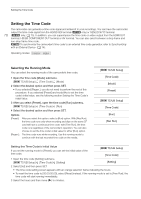
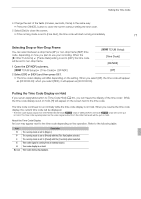
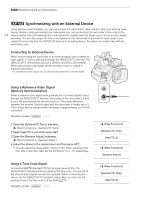
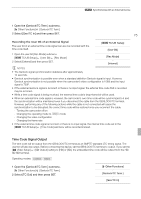
Setting the Time Code 4 Change the rest of the fields (minutes, seconds, frame) in the same way. • Press the CANCEL button to close the screen without setting the time code. 5 Select [Set] to close the screen. • If the running mode is set to [Free Run], the time code will start running immediately. 71 Selecting Drop or Non-Drop Frame You can select between a drop frame (DF) or non-drop frame (NDF) time code, depending on how you plan to use your recording. When the [J Other Functions] [Frame Rate] setting is set to [24P], the time code will be set to non-drop frame. 1 Open the [DF/NDF] submenu. [L TC/UB Setup] [Time Code] [DF/NDF] [L TC/UB Setup] [Time Code] [DF/NDF] [DF] 2 Select [DF] or [NDF] and then press SET. • The time code's display will differ depending on the setting. When you select [DF], the time code will appear as [00:00:00.00]; when you select [NDF], it will appear as [00:00:00:00]. Putting the Time Code Display on Hold If you set an assignable button to [Time Code Hold] (0 97), you can freeze the display of the time code*. While the time code display is put on hold, [H] will appear on the screen next to the time code. The time code continues to run normally while the time code display is on hold. When you resume the time code display, the current time code will be displayed. * The time code signal output from the HD/SD SDI terminal (b only) or GENLOCK/TC terminal (b only) will not be put on hold. The time code superimposed on the video signal output from the other terminals will be put on hold. About the Time Code Display An icon may appear next to the time code depending on the operation. Refer to the following table. Icon R P F E H No icon Description The running mode is set to [Regen.]. The running mode is set to [Preset] with the [Rec Run] option selected. The running mode is set to [Preset] with the [Free Run] option selected. Time code signal is coming from an external source. Time code display is on hold. Time code during clip playback.
-
 1
1 -
2
-
3
-
4
-
5
-
6
-
7
-
8
-
9
-
10
-
11
-
12
-
13
-
14
-
15
-
16
-
17
-
18
-
19
-
20
-
21
-
22
-
23
-
24
-
25
-
26
-
27
-
28
-
29
-
30
-
31
-
32
-
33
-
34
-
35
-
36
-
37
-
38
-
39
-
40
-
41
-
42
-
43
-
44
-
45
-
46
-
47
-
48
-
49
-
50
-
51
-
52
-
53
-
54
-
55
-
56
-
57
-
58
-
59
-
60
-
61
-
62
-
63
-
64
-
65
-
 66
66 -
 67
67 -
 68
68 -
 69
69 -
 70
70 -
 71
71 -
 72
72 -
 73
73 -
 74
74 -
 75
75 -
 76
76 -
77
-
78
-
79
-
80
-
81
-
82
-
83
-
84
-
85
-
86
-
87
-
88
-
89
-
90
-
91
-
92
-
93
-
94
-
95
-
96
-
97
-
98
-
99
-
100
-
101
-
102
-
103
-
104
-
105
-
106
-
107
-
108
-
109
-
110
-
111
-
112
-
113
-
114
-
115
-
116
-
117
-
118
-
119
-
120
-
121
-
122
-
123
-
124
-
125
-
126
-
127
-
128
-
129
-
130
-
131
-
132
-
133
-
134
-
135
-
136
-
137
-
138
-
139
-
140
-
141
-
142
-
143
-
144
-
145
-
146
-
147
-
148
-
149
-
150
-
151
-
152
-
153
-
154
-
155
-
156
-
157
-
158
-
159
-
160
-
161
-
162
-
163
-
164
-
165
-
166
-
167
-
168
-
169
-
170
-
171
-
172
-
173
-
174
-
175
-
176
-
177
-
178
-
179
-
180
-
181
-
182
-
183
-
184
-
185
-
186
 |
 |
