Canon i80 i80 Quick Start Guide - Page 68
Cannot Print Properly from the Digital Camera - waste ink full
 |
View all Canon i80 manuals
Add to My Manuals
Save this manual to your list of manuals |
Page 68 highlights
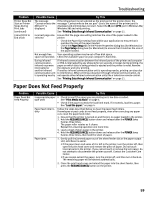
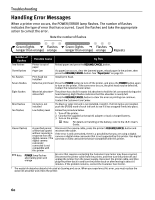
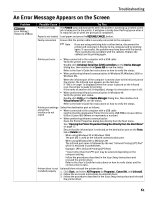
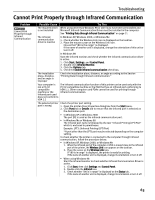
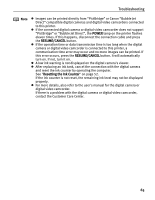
Troubleshooting Cannot Print Properly from the Digital Camera The following messages may be displayed on the digital camera or digital video camcorder when images are printed directly from them. Correct the error according to the procedure below. This section describes error messages displayed when you are using a "Bubble Jet Direct" compatible digital camera or a digital video camcorder. Refer to "Direct Printing from PictBridge-compatible Digital Cameras" for more information about "PictBridge". Camera Error Message Printer in use Printer warming up No Paper Paper Jam Printer cover open No print head Waste tank (Waste ink absorber) full No Ink Printer error Possible Cause Images are printed from the computer. The printer is warning up. No paper is loaded. A paper jam occurrs in the printer. The print head cover is open. No print head is installed. (The POWER lamp on the printer flashes six times.) The print head is defective. (The POWER lamp on the printer flashes seven times.) The waste ink absorber is nearly full. An ink tank is not installed. The battery level is low. (The POWER lamp on the printer flashes ten times.) A printing error has occurred. (The POWER lamp on the printer flashes alternately orange and green.) Try This Wait until printing ends. The printer automatically starts printing the images from the camera after completing the current printing. Wait until warm-up ends. When it is ready, the printer starts printing automatically. Load the paper in the printer and press the RESUME/CANCEL button on the printer. Remove the jammed paper, load new media, and press the RESUME/CANCEL button. Close the front cover. Install a print head according to the Easy Setup Instructions. Contact the Customer Care Center. Press the RESUME/CANCEL button on the printer to recover from the error. Contact the Customer Care Center as soon as possible. Install an ink tank. Be sure to press on the [PUSH] of the ink tank to ensure it is firmly seated. Follow the procedure below. 1. Turn off the printer. 2. Connect the supplied universal AC adapter or load a charged battery. 3. Turn on the printer. Turn the printer off and on again. If the error persists, contact the Customer Care Center. 64
-
 1
1 -
2
-
3
-
4
-
5
-
6
-
7
-
8
-
9
-
10
-
11
-
12
-
13
-
14
-
15
-
16
-
17
-
18
-
19
-
20
-
21
-
22
-
23
-
24
-
25
-
26
-
27
-
28
-
29
-
30
-
31
-
32
-
33
-
34
-
35
-
36
-
37
-
38
-
39
-
40
-
41
-
42
-
43
-
44
-
45
-
46
-
47
-
48
-
49
-
50
-
51
-
52
-
53
-
54
-
55
-
56
-
57
-
58
-
59
-
60
-
61
-
62
-
 63
63 -
 64
64 -
 65
65 -
 66
66 -
 67
67 -
 68
68 -
 69
69 -
 70
70 -
 71
71 -
 72
72 -
 73
73 -
74
-
75
-
76
-
77
-
78
-
79
-
80
-
81
-
82
-
83
-
84
 |
 |
