Cisco 5510 Getting Started Guide - Page 67
Connecting to the SSM Management Port, Step 1
 |
UPC - 882658094767
View all Cisco 5510 manuals
Add to My Manuals
Save this manual to your list of manuals |
Page 67 highlights
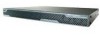
Chapter 6 Connecting Interface Cables on the ASA 5500, ASA 5510, ASA 5520, and ASA 5540 Platforms Connecting to SSMs Note This procedure does not apply to the 4GE SSM. See Connecting to a 4GE SSM, page 6-6 for information about connecting to the 4GE SSM. To connect to an SSM, perform the following steps: Step 1 Step 2 Connect one RJ-45 connector to the management port on the SSM, as shown in Figure 6-3. Connect the other end of the RJ-45 cable to your network devices. Figure 6-3 Connecting to the SSM Management Port MMGGMMTT UUSSBB22 USB1 USB1 LINK?ACT POWER STATUS SPEED 1 2 143149 1 SSM management port 2 RJ-45 to RJ-45 cable Step 3 Connect to Ethernet ports to be used for network connections. a. Connect the RJ-45 connector to the Ethernet port. b. Connect the other end of the Ethernet cable to your network device, such as a router, switch or hub. 78-19186-01 Cisco ASA 5500 Series Getting Started Guide 6-5
-
 1
1 -
2
-
3
-
4
-
5
-
6
-
7
-
8
-
9
-
10
-
11
-
12
-
13
-
14
-
15
-
16
-
17
-
18
-
19
-
20
-
21
-
22
-
23
-
24
-
25
-
26
-
27
-
28
-
29
-
30
-
31
-
32
-
33
-
34
-
35
-
36
-
37
-
38
-
39
-
40
-
41
-
42
-
43
-
44
-
45
-
46
-
47
-
48
-
49
-
50
-
51
-
52
-
53
-
54
-
55
-
56
-
57
-
58
-
59
-
60
-
61
-
 62
62 -
 63
63 -
 64
64 -
 65
65 -
 66
66 -
 67
67 -
 68
68 -
 69
69 -
 70
70 -
 71
71 -
 72
72 -
73
-
74
-
75
-
76
-
77
-
78
-
79
-
80
-
81
-
82
-
83
-
84
-
85
-
86
-
87
-
88
-
89
-
90
-
91
-
92
-
93
-
94
-
95
-
96
-
97
-
98
-
99
-
100
-
101
-
102
-
103
-
104
-
105
-
106
-
107
-
108
-
109
-
110
-
111
-
112
-
113
-
114
-
115
-
116
-
117
-
118
-
119
-
120
-
121
-
122
-
123
-
124
-
125
-
126
-
127
-
128
-
129
-
130
-
131
-
132
-
133
-
134
-
135
-
136
-
137
-
138
-
139
-
140
-
141
-
142
-
143
-
144
-
145
-
146
-
147
-
148
-
149
-
150
-
151
-
152
-
153
-
154
-
155
-
156
-
157
-
158
-
159
-
160
-
161
-
162
-
163
-
164
-
165
-
166
-
167
-
168
-
169
-
170
-
171
-
172
-
173
-
174
-
175
-
176
-
177
-
178
-
179
-
180
-
181
-
182
-
183
-
184
-
185
-
186
-
187
-
188
-
189
-
190
-
191
-
192
-
193
-
194
-
195
-
196
-
197
-
198
-
199
-
200
-
201
-
202
-
203
-
204
-
205
-
206
-
207
-
208
 |
 |
