Cisco 7609-S Installation Guide - Page 48
Required Tools, Installing the Shelf and Crossbar Brackets
 |
View all Cisco 7609-S manuals
Add to My Manuals
Save this manual to your list of manuals |
Page 48 highlights
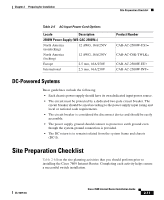
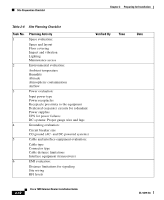
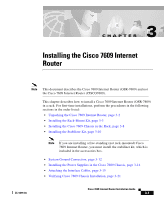
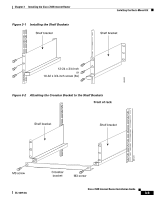
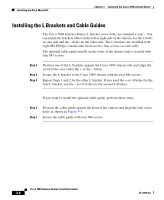
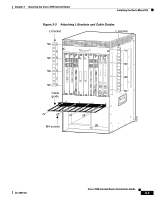
Installing the Rack-Mount Kit Chapter 3 Installing the Cisco 7609 Internet Router Note Chassis height is measured in rack units (RU). Caution If the rack is on wheels, ensure that the brakes are engaged or that the rack is otherwise stabilized. This kit is not suitable for use with racks with obstructions (such as a power strip) that could impair access to field-replaceable units (FRUs). Required Tools These tools and equipment are required to install the rack-mount kit: • Number 1 and number 2 Phillips-head screwdrivers • 3/16-inch flat-blade screwdriver • Tape measure and level Installing the Shelf and Crossbar Brackets To install the shelf and crossbar brackets, perform these steps: Step 1 Step 2 Step 3 Step 4 Position one of the two shelf brackets in the rack as shown in Figure 3-1. Secure the shelf bracket to the rack by using three 12-24 x 3/4-inch or 10-32 x 3/4-inch screws. Repeat Steps 1 and 2 for the second shelf bracket. Make sure that the second shelf bracket is level with the first bracket. Attach the crossbar bracket to the back of the shelf brackets using two M3 screws as shown in Figure 3-2. Cisco 7609 Internet Router Installation Guide 3-4 OL-5079-04
-
 1
1 -
2
-
3
-
4
-
5
-
6
-
7
-
8
-
9
-
10
-
11
-
12
-
13
-
14
-
15
-
16
-
17
-
18
-
19
-
20
-
21
-
22
-
23
-
24
-
25
-
26
-
27
-
28
-
29
-
30
-
31
-
32
-
33
-
34
-
35
-
36
-
37
-
38
-
39
-
40
-
41
-
42
-
 43
43 -
 44
44 -
 45
45 -
 46
46 -
 47
47 -
 48
48 -
 49
49 -
 50
50 -
 51
51 -
 52
52 -
 53
53 -
54
-
55
-
56
-
57
-
58
-
59
-
60
-
61
-
62
-
63
-
64
-
65
-
66
-
67
-
68
-
69
-
70
-
71
-
72
-
73
-
74
-
75
-
76
-
77
-
78
-
79
-
80
-
81
-
82
-
83
-
84
-
85
-
86
-
87
-
88
-
89
-
90
-
91
-
92
-
93
-
94
-
95
-
96
-
97
-
98
-
99
-
100
-
101
-
102
-
103
-
104
-
105
-
106
-
107
-
108
-
109
-
110
-
111
-
112
-
113
-
114
-
115
-
116
-
117
-
118
-
119
-
120
 |
 |
