Cisco 7609-S Installation Guide - Page 79
Installing an AC-Input Power Supply
 |
View all Cisco 7609-S manuals
Add to My Manuals
Save this manual to your list of manuals |
Page 79 highlights
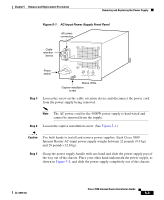
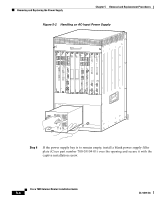
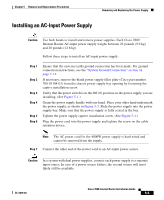
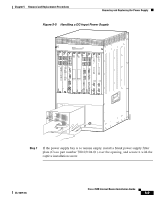
Chapter 5 Removal and Replacement Procedures Removing and Replacing the Power Supply Installing an AC-Input Power Supply Caution Use both hands to install and remove power supplies. Each Cisco 7609 Internet Router AC-input power supply weighs between 22 pounds (9.9 kg) and 28 pounds (12.6 kg). Follow these steps to install an AC-input power supply: Step 1 Step 2 Step 3 Step 4 Step 5 Step 6 Ensure that the system (earth) ground connection has been made. For ground connection instructions, see the "System Ground Connection" section on page 3-12. If necessary, remove the blank power supply filler plate (Cisco part number 700-03104-01) from the chassis power supply bay opening by loosening the captive installation screw. Verify that the power switch is in the Off (0) position on the power supply you are installing. (See Figure 5-1.) Grasp the power supply handle with one hand. Place your other hand underneath the power supply, as shown in Figure 5-2. Slide the power supply into the power supply bay. Make sure that the power supply is fully seated in the bay. Tighten the power supply captive installation screw. (See Figure 5-1.) Plug the power cord into the power supply and tighten the screw on the cable retention device. Note The AC power cord for the 4000W power supply is hard wired and cannot be removed from the supply. Step 7 Connect the other end of the power cord to an AC-input power source. Caution In a system with dual power supplies, connect each power supply to a separate input source. In case of a power source failure, the second source will most likely still be available. OL-5079-04 Cisco 7609 Internet Router Installation Guide 5-5
-
 1
1 -
2
-
3
-
4
-
5
-
6
-
7
-
8
-
9
-
10
-
11
-
12
-
13
-
14
-
15
-
16
-
17
-
18
-
19
-
20
-
21
-
22
-
23
-
24
-
25
-
26
-
27
-
28
-
29
-
30
-
31
-
32
-
33
-
34
-
35
-
36
-
37
-
38
-
39
-
40
-
41
-
42
-
43
-
44
-
45
-
46
-
47
-
48
-
49
-
50
-
51
-
52
-
53
-
54
-
55
-
56
-
57
-
58
-
59
-
60
-
61
-
62
-
63
-
64
-
65
-
66
-
67
-
68
-
69
-
70
-
71
-
72
-
73
-
 74
74 -
 75
75 -
 76
76 -
 77
77 -
 78
78 -
 79
79 -
 80
80 -
 81
81 -
 82
82 -
 83
83 -
 84
84 -
85
-
86
-
87
-
88
-
89
-
90
-
91
-
92
-
93
-
94
-
95
-
96
-
97
-
98
-
99
-
100
-
101
-
102
-
103
-
104
-
105
-
106
-
107
-
108
-
109
-
110
-
111
-
112
-
113
-
114
-
115
-
116
-
117
-
118
-
119
-
120
 |
 |
