Cisco 7609-S Installation Guide - Page 52
Installing the Cisco 7609 Chassis in the Rack - line cards
 |
View all Cisco 7609-S manuals
Add to My Manuals
Save this manual to your list of manuals |
Page 52 highlights
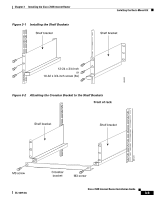
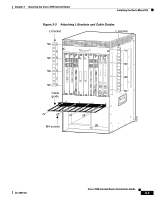
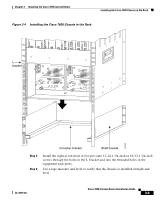
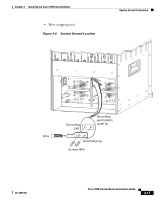
Installing the Cisco 7609 Chassis in the Rack Chapter 3 Installing the Cisco 7609 Internet Router Installing the Cisco 7609 Chassis in the Rack Note If you are not installing the Cisco 7609 Internet Router in the rack, you must install the stabilizer kit. See "Installing the Stabilizer Kit" section on page 3-10. Caution Mount the chassis in the rack before installing the power supplies or line cards. You are now ready to install the Cisco 7609 chassis in the rack. Tip We recommend that you have a third person to assist in this procedure. Warning Two people are required to lift the empty chassis. Grasp the chassis underneath the lower edge and lift with both hands. To prevent injury, keep your back straight and lift with your legs, not your back. To install the Cisco 7609 chassis in the equipment rack, perform these steps: Step 1 Step 2 Step 3 Step 4 With a person standing at each side of the chassis, grasp the chassis handle with one hand and use the other hand near the back of the chassis for balance. Slowly lift the chassis in unison. Avoid sudden twists or moves to prevent injury. Position the chassis in the rack as follows. (See Figure 3-4.) a. If the front of the chassis (front panel) is at the front of the rack, insert the rear of the chassis between the mounting posts. b. If the rear of the chassis is at the front of the rack, insert the front of the chassis between the mounting posts. Rest the chassis on the shelf brackets and crossbar bracket. Align the mounting holes in the L bracket with the mounting holes in the equipment rack. Cisco 7609 Internet Router Installation Guide 3-8 OL-5079-04
-
 1
1 -
2
-
3
-
4
-
5
-
6
-
7
-
8
-
9
-
10
-
11
-
12
-
13
-
14
-
15
-
16
-
17
-
18
-
19
-
20
-
21
-
22
-
23
-
24
-
25
-
26
-
27
-
28
-
29
-
30
-
31
-
32
-
33
-
34
-
35
-
36
-
37
-
38
-
39
-
40
-
41
-
42
-
43
-
44
-
45
-
46
-
 47
47 -
 48
48 -
 49
49 -
 50
50 -
 51
51 -
 52
52 -
 53
53 -
 54
54 -
 55
55 -
 56
56 -
 57
57 -
58
-
59
-
60
-
61
-
62
-
63
-
64
-
65
-
66
-
67
-
68
-
69
-
70
-
71
-
72
-
73
-
74
-
75
-
76
-
77
-
78
-
79
-
80
-
81
-
82
-
83
-
84
-
85
-
86
-
87
-
88
-
89
-
90
-
91
-
92
-
93
-
94
-
95
-
96
-
97
-
98
-
99
-
100
-
101
-
102
-
103
-
104
-
105
-
106
-
107
-
108
-
109
-
110
-
111
-
112
-
113
-
114
-
115
-
116
-
117
-
118
-
119
-
120
 |
 |