Cisco AIR-AP1020 Quick Start Guide - Page 22
Preparing Mounting Locations
 |
UPC - 882658025952
View all Cisco AIR-AP1020 manuals
Add to My Manuals
Save this manual to your list of manuals |
Page 22 highlights
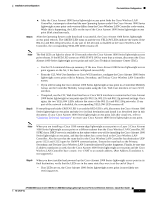
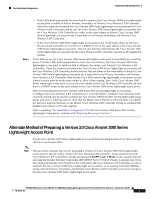
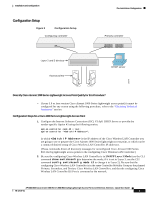
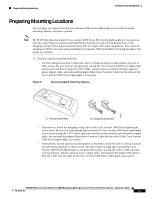
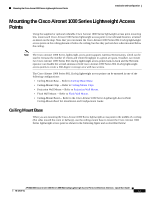
Preparing Mounting Locations Installation and Configuration Preparing Mounting Locations On your map, you should have the Cisco Aironet 1000 Series lightweight access point locations, mounting options, and power options. Note BE SURE that plenum-mounted Cisco Aironet 1000 Series 802.11a/b/g lightweight access points use only the metal Projection-Mount and Flush-Mount brackets (not the Ceiling-Mount Base or the Hanging-Ceiling Clips) and are powered using PoE to comply with safety regulations. Also, external antennas are NOT to be used when installing Cisco Aironet 1000 Series 802.11a/b/g lightweight access points in a plenum. 1. Find the required mounting locations. - Use the ceiling-mount base to mark the wall or ceiling locations for sheet metal, drywall, or other screws. Be sure to leave enough space around the Cisco Aironet 1000 Series lightweight access point and base to plug the CAT-5 cable, optional external antenna cable(s), optional power supply cable, and optional Kensington MicroSaver Security Cable into the sides of the Cisco Aironet 1000 Series lightweight access point. Figure 6 Factory-Supplied Mounting Options 135663 A. Ceiling-mount base B. Hanging-ceiling clips - Alternatively, attach the hanging ceiling clips to the Cisco Aironet 1000 Series lightweight access point. Be sure you leave enough space around the Cisco Aironet 1000 Series lightweight access point to plug the CAT-5 cable, optional external antenna cable(s), optional power supply cable, and optional Kensington MicroSaver Security Cable into the sides of the Cisco Aironet 1000 Series lightweight access point. - Alternatively, use the optional mounting bases or brackets to mark the wall or ceiling locations for sheet metal, drywall, or other screws. Be sure to leave enough space around the Cisco Aironet 1000 Series lightweight access point and brackets to plug the CAT-5 cable, optional external antenna cable(s), optional power supply cable, and optional Kensington MicroSaver Security Cable into the sides of the Cisco Aironet 1000 Series lightweight access point. AP1020/1030 Cisco Aironet 1000 Series IEEE 802.11a/b/g Lightweight Access Points with External Antennas - Quick Start Guide 78-17147-01 12
-
 1
1 -
2
-
3
-
4
-
5
-
6
-
7
-
8
-
9
-
10
-
11
-
12
-
13
-
14
-
15
-
16
-
 17
17 -
 18
18 -
 19
19 -
 20
20 -
 21
21 -
 22
22 -
 23
23 -
 24
24 -
 25
25 -
 26
26 -
 27
27 -
28
-
29
-
30
-
31
-
32
-
33
-
34
-
35
-
36
-
37
-
38
-
39
-
40
-
41
-
42
-
43
-
44
 |
 |