Cisco AIR-AP1210 Hardware Installation Guide - Page 88
Using the Web Browser Interface, Reloading the Access Point Image, Using the MODE button
 |
UPC - 746320804330
View all Cisco AIR-AP1210 manuals
Add to My Manuals
Save this manual to your list of manuals |
Page 88 highlights
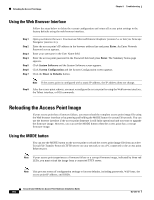
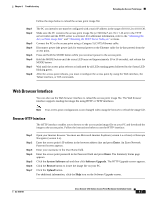
Reloading the Access Point Image Chapter 9 Troubleshooting Using the Web Browser Interface Follow the steps below to delete the current configuration and return all access point settings to the factory defaults using the web browser interface. Step 1 Step 2 Step 3 Step 4 Step 5 Step 6 Step 7 Open your Internet browser. You must use Microsoft Internet Explorer (version 5.x or later) or Netscape Navigator (version 4.x). Enter the access point's IP address in the browser address line and press Enter. An Enter Network Password screen appears. Enter your username in the User Name field. Enter the access point password in the Password field and press Enter. The Summary Status page appears. Click System Software and the System Software screen appears. Click System Configuration and the System Configuration screen appears. Click the Reset to Defaults button. Note If the access point is configured with a static IP address, the IP address does not change. Step 8 After the access point reboots, you must reconfigure the access point by using the Web browser interface, the Telnet interface, or IOS commands. Reloading the Access Point Image If your access point has a firmware failure, you must reload the complete access point image file using the Web browser interface or by pressing and holding the MODE button for around 30 seconds. You can use the browser interface if the access point firmware is still fully operational and you want to upgrade the firmware image. However, you can use the MODE button when the access point has a corrupt firmware image. Using the MODE button You can use the MODE button on the access point to reload the access point image file from an active Trivial File Transfer Protocol (TFTP) server on your network or on a PC connected to the access point Ethernet port. Note If your access point experiences a firmware failure or a corrupt firmware image, indicated by three red LEDs, you must reload the image from a connected TFTP server. Note This process resets all configuration settings to factory defaults, including passwords, WEP keys, the access point IP address, and SSIDs. Cisco Aironet 1200 Series Access Point Hardware Installation Guide 9-6 OL-4310-01
-
 1
1 -
2
-
3
-
4
-
5
-
6
-
7
-
8
-
9
-
10
-
11
-
12
-
13
-
14
-
15
-
16
-
17
-
18
-
19
-
20
-
21
-
22
-
23
-
24
-
25
-
26
-
27
-
28
-
29
-
30
-
31
-
32
-
33
-
34
-
35
-
36
-
37
-
38
-
39
-
40
-
41
-
42
-
43
-
44
-
45
-
46
-
47
-
48
-
49
-
50
-
51
-
52
-
53
-
54
-
55
-
56
-
57
-
58
-
59
-
60
-
61
-
62
-
63
-
64
-
65
-
66
-
67
-
68
-
69
-
70
-
71
-
72
-
73
-
74
-
75
-
76
-
77
-
78
-
79
-
80
-
81
-
82
-
 83
83 -
 84
84 -
 85
85 -
 86
86 -
 87
87 -
 88
88 -
 89
89 -
 90
90 -
 91
91 -
 92
92 -
 93
93 -
94
-
95
-
96
-
97
-
98
-
99
-
100
-
101
-
102
-
103
-
104
-
105
-
106
-
107
-
108
-
109
-
110
-
111
-
112
-
113
-
114
-
115
-
116
-
117
-
118
-
119
-
120
-
121
-
122
-
123
-
124
-
125
-
126
-
127
-
128
 |
 |
