Cisco WBPN User Guide - Page 10
Using the Setup Wizard, Choosing a Username and Password, Configuring Local Area Network Settings - 10
 |
View all Cisco WBPN manuals
Add to My Manuals
Save this manual to your list of manuals |
Page 10 highlights
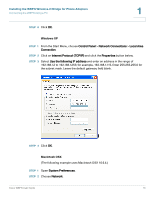
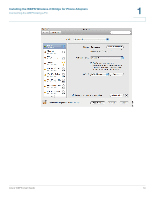
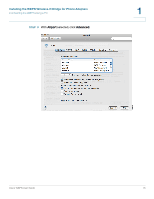
Installing the WBPN Wireless-N Bridge for Phone Adapters Connecting the WBPN Using a PC 1 Using the Setup Wizard The Setup Wizard guides you through configuration of the WBPN. See the following sections for more information. Choosing a Username and Password You must enter a new username and password. The default username and password (cisco) is not allowed. Passwords must be a minimum of one character and a maximum of 30 characters. Configuring Local Area Network Settings Choose Automatic (DHCP) if you want your network router to assign an IP address to the WBPN when it is connected to the network. This IP address can change if the device is disconnected and connected again. Choose Static IP if you want the WBPN to always have the same IP address on the network. Enter the IP address you want to assign to the WBPN, the subnet mask, and the default gateway (the IP address of your network router). TIP If you choose DHCP or you change the IP address to an address that is different from the default IP address, you will need to use that new address if you want to connect your PC to the device later for additional configuration. Configuring the Wireless Connection Choose the type of wireless configuration method: Automatically Using WPS If your wireless device supports Wi-Fi Protected Setup (WPS), you can choose this option to connect the phone your wireless network. Then choose the type of WPS configuration: • PIN Number-Click Start PIN to begin WPS configuration via the PIN number. After clicking Start PIN, on your wireless device, go to the WPS configuration menu and enter the PIN of the WBPN. (The WBPN PIN is displayed above the Start PIN button on the Wireless WPS window.) You must enter the WBPN PIN number in your wireless device's WPS configuration menu within two minutes of clicking the Start PIN button. • Push Button Configuration-Click Start PBC to begin WPS configuration via push button. After clicking PBC, within two minutes, click the WPS push Cisco WBPN User Guide 10
-
 1
1 -
2
-
3
-
4
-
 5
5 -
 6
6 -
 7
7 -
 8
8 -
 9
9 -
 10
10 -
 11
11 -
 12
12 -
 13
13 -
 14
14 -
 15
15 -
16
-
17
-
18
-
19
-
20
-
21
-
22
-
23
-
24
-
25
-
26
-
27
-
28
-
29
-
30
-
31
-
32
-
33
 |
 |