Cisco WBPN User Guide - Page 29
Using Wi-Fi Protected Setup (WPS)
 |
View all Cisco WBPN manuals
Add to My Manuals
Save this manual to your list of manuals |
Page 29 highlights
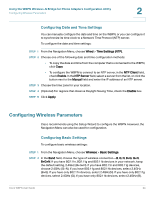
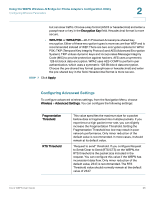
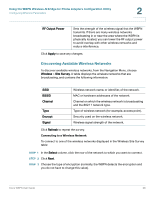
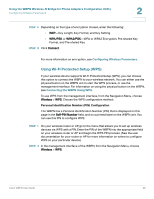
Using the WBPN Wireless-N Bridge for Phone Adapters Configuration Utility Configuring Wireless Parameters 2 STEP 4 Depending on the type of encryption chosen, enter the following: • WEP-Key Length, Key Format, and Key Setting • WPA/PSK or WPA2/PSK-WPA or WPA2 Encryption, Pre-shared Key Format, and Pre-shared Key STEP 5 Click Connect. For more information on encryption, see Configuring Wireless Parameters. Using Wi-Fi Protected Setup (WPS) If your wireless device supports Wi-Fi Protected Setup (WPS), you can choose this option to connect the WBPN to your wireless network. You can either use the physical button on the WBPN unit to start the WPS process, or use the management interface. For information on using the physical button on the WBPN, see Connecting the WBPN Using WPS. To use WPS from the management interface, from the Navigation Menu, choose Wireless > WPS. Choose the WPS configuration method: Personal Identification Number (PIN) Configuration The WBPN has a Personal Identification Number (PIN) that is displayed on this page in the Self-PIN Number field, and on a printed label on the WBPN unit. You can use this PIN to configure WPS: STEP 1 On your wireless router or AP, go to the menu that allows you to set up wireless devices via WPS with a PIN. Enter the PIN of the WBPN into the appropriate field on your wireless router or AP and begin the WPS PIN process. (See the user documentation for your router or AP for more information on where to configure WPS on your particular device.) STEP 2 In the management interface of the WBPN, from the Navigation Menu, choose Wireless > WPS. Cisco WBPN User Guide 29
-
 1
1 -
2
-
3
-
4
-
5
-
6
-
7
-
8
-
9
-
10
-
11
-
12
-
13
-
14
-
15
-
16
-
17
-
18
-
19
-
20
-
21
-
22
-
23
-
 24
24 -
 25
25 -
 26
26 -
 27
27 -
 28
28 -
 29
29 -
 30
30 -
 31
31 -
 32
32 -
 33
33
 |
 |