Cisco WVC80N User Guide - Page 11
My Camera List, Add Camera to my list, Camera Details, Video Recording Options, Button, Function - what is password
 |
View all Cisco WVC80N manuals
Add to My Manuals
Save this manual to your list of manuals |
Page 11 highlights
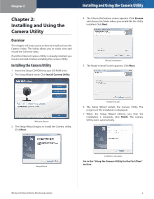
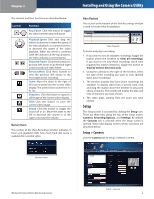
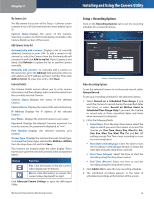
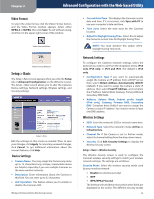
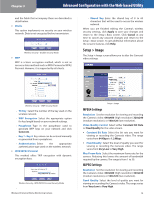
Chapter 2 My Camera List The My camera list section of the Setup > Cameras screen contains a list of all Cameras that have been added (up to 9). Camera Name Displays the name of the Camera. Selecting a Camera on this list will display its details in the Camera Details section of the screen. Add Camera to my list Automatically add cameras Displays a list of currently detected Cameras on your LAN. To add a camera to My camera list, select the Camera from the Automatically add cameras list and click Add to my list. If your Camera is not listed, click Refresh to update the list, or add the Camera manually. Manually add cameras To manually add a Camera to My camera list, go to the Address field and enter either its web address or its IP address with port number. Then click Add to my list. To erase your entry, click Clear. Camera Details The Camera Details section allows you to enter camera information and then displays video and information from the currently selected Camera. Camera Status Displays the status of the selected Camera. Camera Name Displays the name of the selected Camera. IP Address Displays the IP address of the selected Camera. User Name Displays the selected Camera's user name. Password Displays the selected Camera's password. For security reasons, the password is displayed as Port Number Displays the selected Camera's port number. Stream Type Displays the selected Camera's stream type. To change the stream type, select either MJPEG or MPEG4 from the drop down list and click Save. Two buttons are located under the video display. These buttons act upon the selected Camera's video as explained below. Button Function Flip Click this button to flip the current video display top-to-bottom. Mirror Click this button to reverse the current video display left-to-right. Click Advanced Camera Settings to open the Web-based Utility. Wireless-N Internet Home Monitoring Camera Installing and Using the Camera Utility Setup > Recording Options Click on the Recording Options tab to set the recording schedule for a network Camera. Setup > Recording Options Video Recording Options To set the selected Camera to continuously record, select Always Record. To set up a recording schedule for the selected Camera: 1. Select Record on a Scheduled Time Range if you want the Camera to record during the specified dates and times, or select Record on Motion Event in Scheduled Time Range Only if you want the Camera to record only at those (specified) dates and times when movement is detected. 2. Fill in the following fields: •• Select Days From the drop down menu, select the days on which you want the Camera to record. The choices are One Time, Every Day, Mon-Fri, SatSun, Sun, Mon, Tue, Wed, Thu, Fri, and Sat. (All settings except One Time cause recording to occur on a recurring basis.) •• Start Date (mm/dd/yyyy) Enter the date to start the recording, in mm/dd/yyyy format, or select the start date using the drop down calendar. •• Start Time (hh:mm) Select the time to start the recording using the drop down menus. •• End Time (hh:mm) Select the time to end the recording using the drop down menus. 3. Click Add to list to save the new recording schedule. 4. The scheduled recording appears in the table of scheduled recordings at the bottom of the screen. 10
-
 1
1 -
2
-
3
-
4
-
5
-
 6
6 -
 7
7 -
 8
8 -
 9
9 -
 10
10 -
 11
11 -
 12
12 -
 13
13 -
 14
14 -
 15
15 -
 16
16 -
17
-
18
-
19
-
20
-
21
-
22
-
23
-
24
-
25
-
26
-
27
-
28
-
29
-
30
-
31
-
32
-
33
-
34
-
35
-
36
-
37
-
38
-
39
-
40
-
41
-
42
-
43
-
44
-
45
-
46
-
47
-
48
-
49
-
50
-
51
-
52
-
53
-
54
-
55
-
56
-
57
-
58
-
59
-
60
-
61
-
62
-
63
-
64
-
65
-
66
 |
 |