Compaq Presario 1800 Presario 1800XL Series Maintenance and Service Guide
Compaq Presario 1800 - Notebook PC Manual
 |
View all Compaq Presario 1800 manuals
Add to My Manuals
Save this manual to your list of manuals |
Compaq Presario 1800 manual content summary:
- Compaq Presario 1800 | Presario 1800XL Series Maintenance and Service Guide - Page 1
herein may be trademarks and/or registered trademarks of their respective companies. Maintenance and Service Guide Compaq Presario 1800 Series Notebook Computer First Edition (July 2000) Compaq Computer Corporation PRESARIO NOTEBOOK MAINTENANCE AND SERVICE GUIDE 1800 SERIES BEFORE YOU BEGIN 1 - Compaq Presario 1800 | Presario 1800XL Series Maintenance and Service Guide - Page 2
Presario 1800 Series Models: XL180, XL181, XL182, XL183, XL185, and XL190, XL191, XL192 Preface This Maintenance and Service Guide is a troubleshooting guide that is used as a reference guide when servicing the Compaq Presario 1800 Series Notebook Computers. Compaq Computer Corporation reserves the - Compaq Presario 1800 | Presario 1800XL Series Maintenance and Service Guide - Page 3
support this product: • Compaq Presario 1800XL Series Notebook Computer documentation set • Introducing Windows 98 Guide • Introducing Windows 2000 Guide • Service Training Guides • Compaq Service Advisories and Bulletins • Compaq QuickFind • Compaq Service Quick Reference Guide PRESARIO NOTEBOOK - Compaq Presario 1800 | Presario 1800XL Series Maintenance and Service Guide - Page 4
Presario 1800 Series Models: XL180, XL181, XL182, XL183, XL185, and XL190, XL191, XL192 4 BEFORE YOU BEGIN PRESARIO NOTEBOOK MAINTENANCE AND SERVICE GUIDE 1800 SERIES - Compaq Presario 1800 | Presario 1800XL Series Maintenance and Service Guide - Page 5
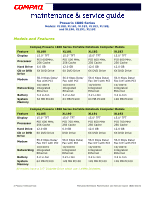
: XL180, XL181, XL182, XL183, XL185, and XL190, XL191, XL192 Product Description This chapter describes the features of each of the Presario 1800XL models. It also provides illustrations of the exterior components unique to these units. PRESARIO NOTEBOOK MAINTENANCE AND SERVICE GUIDE 1800 SERIES - Compaq Presario 1800 | Presario 1800XL Series Maintenance and Service Guide - Page 6
Features Compaq Presario 1800 Series Portable Notebook Computer Models Feature XL180 XL181 XL182 XL183 Display 15.0" TFT 15.0" TFT 15.0" TFT 15.0" TFT Processor PIII 600MHz, 256 Cache PIII 500 MHz, 256 Cache PIII 600 MHz, 256 Cache PIII 600 MHz, 256 Cache Hard Drive CD or DVD Drive - Compaq Presario 1800 | Presario 1800XL Series Maintenance and Service Guide - Page 7
1 Display Release Latches 2 Display 3 Power (On/Off) Button 4 Keyboard 5 TouchPad # Description 6 Integrated Speakers 7 Left TouchPad Button 8 Scroll Up/Down Button 9 Right TouchPad Button - Model Number PRESARIO NOTEBOOK MAINTENANCE AND SERVICE GUIDE 1800 SERIES PRODUCT DESCRIPTION 3 - Compaq Presario 1800 | Presario 1800XL Series Maintenance and Service Guide - Page 8
Presario 1800 Series Models: XL180, XL181, XL182, XL183, XL185, and XL190, XL191, XL192 Internet Zone Buttons and Lights # Description 1 AC Adapter Light 2 Caps Lock Light 3 Instant Internet Access 4 Instant E-mail Access 5 My Presario Instant Access 6 Power Button # Description 7 Instant - Compaq Presario 1800 | Presario 1800XL Series Maintenance and Service Guide - Page 9
Icon 4 Power Status Icon 5 Battery Charging Status Icon 6 DisqPlay Status Icon # Description 7 Battery Gauge 8 DisqPlay On/Off Button 9 Volume Down Button - Volume Up Button q Play/Pause Button w Stop Button PRESARIO NOTEBOOK MAINTENANCE AND SERVICE GUIDE 1800 SERIES PRODUCT DESCRIPTION - Compaq Presario 1800 | Presario 1800XL Series Maintenance and Service Guide - Page 10
XL185, and XL190, XL191, XL192 Right-Side Components # Description 1 Battery Compartment 2 PC Card Eject Button 3 PC Card Slot 4 Headphone Jack # Description 5 Microphone Jack 6 Modem Port 7 Ethernet Port 6 PRODUCT DESCRIPTION PRESARIO NOTEBOOK MAINTENANCE AND SERVICE GUIDE 1800 SERIES - Compaq Presario 1800 | Presario 1800XL Series Maintenance and Service Guide - Page 11
XL190, XL191, XL192 Left-Side Components # Description # Description 1 Security Slot 2 CD or DVD Drive 3 CD/DVD Drive Eject Button 4 CD or DVD Manual Eject Hole 5 Diskette Drive 6 Diskette Drive Eject Button PRESARIO NOTEBOOK MAINTENANCE AND SERVICE GUIDE 1800 SERIES PRODUCT DESCRIPTION 7 - Compaq Presario 1800 | Presario 1800XL Series Maintenance and Service Guide - Page 12
Presario 1800 Series Models: XL180, XL181, XL182, XL183, XL185, and XL190, XL191, XL192 Underneath the Unit # Description 1 Stand Feet 2 Serial Number # Description 3 Memory Compartment 4 Stand Feet 8 PRODUCT DESCRIPTION PRESARIO NOTEBOOK MAINTENANCE AND SERVICE GUIDE 1800 SERIES - Compaq Presario 1800 | Presario 1800XL Series Maintenance and Service Guide - Page 13
# Description 1 Keyboard/Mouse Port 2 AC Adapter Connector 3 Parallel Port 4 QuikDock Connector 5 Fan Vent # Description 6 TV Out Connector 7 External Monitor Port 8 Serial Ports 9 Universal Serial Bus Port PRESARIO NOTEBOOK MAINTENANCE AND SERVICE GUIDE 1800 SERIES PRODUCT DESCRIPTION - Compaq Presario 1800 | Presario 1800XL Series Maintenance and Service Guide - Page 14
3 Power (AC Adapter) Connector 4 Keyboard/Mouse Port 5 Keyboard/Mouse Port 6 Parallel Port 7 Game Port # Description 8 Serial Port 9 External Monitor Port - 10/100TX Ethernet q S Video w (Composite) TV Out e Audio Out 10 PRODUCT DESCRIPTION PRESARIO NOTEBOOK MAINTENANCE AND SERVICE GUIDE - Compaq Presario 1800 | Presario 1800XL Series Maintenance and Service Guide - Page 15
Presario 1800 Series Models: XL180, XL181, XL182, XL183, XL185, and XL190, XL191, XL192 Specifications Physical and Environmental Specification U.S. Metric Height Depth Width Weight with 14.1" TFT Display with 15.0" Display Battery Pack Power Requirements Nominal Operating Maximum Average Peak - Compaq Presario 1800 | Presario 1800XL Series Maintenance and Service Guide - Page 16
FIFO) IRQ9 SCI IRQ used by ACPI Bus System DMA Hardware DMA System Function DMA1 ESS SOLO-1 DOS Emulation DMA2 Standard Floppy Disk Controller DMA3 ECP Printer Port (LPT1) DMA4 Direct memory access Controller 2 SPECIFICATIONS PRESARIO NOTEBOOK MAINTENANCE AND SERVICE GUIDE 1800 SERIES - Compaq Presario 1800 | Presario 1800XL Series Maintenance and Service Guide - Page 17
AGP (English) 03F0h - 03F5h Standard Floppy Disk Controller 03F6h - 03F6h Intel 82371AB/EB PCI Bus Master IDE Controller 03F6h - 03F6h Primary IDE Controller (Dual FIFO) 03F7h - 03F7h Standard Floppy Disk Controller PRESARIO NOTEBOOK MAINTENANCE AND SERVICE GUIDE 1800 SERIES SPECIFICATIONS 3 - Compaq Presario 1800 | Presario 1800XL Series Maintenance and Service Guide - Page 18
Use By Devices 04000000h - 04000FFFh Texas Instruments PCI-1410 CardBus Controller F4000000h - F40000FFh Intel (R) PRO/100 S Mobile LAN on Motherboard F4100000h-F4100FFFh Intel (R) PRO/100 S Mobile LAN on Motherboard 4 SPECIFICATIONS PRESARIO NOTEBOOK MAINTENANCE AND SERVICE GUIDE 1800 SERIES - Compaq Presario 1800 | Presario 1800XL Series Maintenance and Service Guide - Page 19
Presario 1800 Series Models: XL180, XL181, XL182, XL183, XL185, and XL190, XL191, XL192 Memory Bridge FFF80000h - FFFFFFFFh Motherboard Resources Display Information Display Specification Unit Height Unit Width 60 Hz PRESARIO NOTEBOOK MAINTENANCE AND SERVICE GUIDE 1800 SERIES SPECIFICATIONS 5 - Compaq Presario 1800 | Presario 1800XL Series Maintenance and Service Guide - Page 20
Times Track-to-Track (ms) 3 Average (ms) 94 Setting Time (ms) 15 Latency Average (ms) 100 Cylinders (High/Low) 80 Number of Read/Write Heads 2 6 SPECIFICATIONS PRESARIO NOTEBOOK MAINTENANCE AND SERVICE GUIDE 1800 SERIES - Compaq Presario 1800 | Presario 1800XL Series Maintenance and Service Guide - Page 21
Presario 1800 Series Models: XL180, XL181, XL182, XL183, XL185, and XL190, XL191, XL192 Hard Drive Hard Drives Specification 6.0 GB 12.0 GB 18.0 GB Drive or DVD Drive CD or DVD Drive Specification 6x DVD 8x DVD CD- PRESARIO NOTEBOOK MAINTENANCE AND SERVICE GUIDE 1800 SERIES SPECIFICATIONS 7 - Compaq Presario 1800 | Presario 1800XL Series Maintenance and Service Guide - Page 22
Operating Charging 32°F (0-50° C) -20°C - 60° C 5°C - 45° C *The battery discharge/use limit changes depending on the power management settings, system components such as installed PC Cards, and the applications in use. 8 SPECIFICATIONS PRESARIO NOTEBOOK MAINTENANCE AND SERVICE GUIDE 1800 SERIES - Compaq Presario 1800 | Presario 1800XL Series Maintenance and Service Guide - Page 23
Presario 1800 Series Models: XL180, XL181, XL182, XL183, XL185, and XL190, XL191, XL192 Connector Pin Assignments This chapter provides the pin assignments for Presario 1800 Series Notebook In* Signal Ground PRESARIO NOTEBOOK MAINTENANCE AND SERVICE GUIDE 1800 SERIES CONNECTOR PIN ASSIGNMENTS 1 - Compaq Presario 1800 | Presario 1800XL Series Maintenance and Service Guide - Page 24
7 Ready to Send 3 Transmit Data 8 Clear to Send 4 Data Terminal Ready 9 Ring Indicator 5 Signal Ground Keyboard/Mouse Connector Pin Signal 1 Data 1 2 Data 2 3 Ground Pin Signal 4 +5 V 5 Clock 1 6 Clock 2 2 CONNECTOR PIN ASSIGNMENTS PRESARIO NOTEBOOK MAINTENANCE AND SERVICE GUIDE 1800 SERIES - Compaq Presario 1800 | Presario 1800XL Series Maintenance and Service Guide - Page 25
Presario 1800 Series Models: XL180, XL181, XL182, XL183, XL185, and XL190, XL191, XL192 Modem Connector Pin Signal 1 Unused 2 Tip 8 +5V Pin Signal 9 +5V 10 SWC 11 RBTC 12 RMSO 13 RBTD 14 SWD 15 RMSI PRESARIO NOTEBOOK MAINTENANCE AND SERVICE GUIDE 1800 SERIES CONNECTOR PIN ASSIGNMENTS 3 - Compaq Presario 1800 | Presario 1800XL Series Maintenance and Service Guide - Page 26
12 DDC2B Data 5 Ground 13 Horizontal Sync 6 Ground Analog 14 Vertical Sync 7 Ground Analog 15 DDC2B Clock 8 Ground Analog S-Video Connector Pin Signal 1 Ground 2 Ground Pin Signal 3 SYR 4 SCG 4 CONNECTOR PIN ASSIGNMENTS PRESARIO NOTEBOOK MAINTENANCE AND SERVICE GUIDE 1800 SERIES - Compaq Presario 1800 | Presario 1800XL Series Maintenance and Service Guide - Page 27
Presario 1800 Series Models: XL180, XL181, XL182, XL183, XL185, and XL190, XL191, XL192 TV Out Connector Pin Signal 1 Ground 2 Composite Pin Signal 3 Ground Univeral Serial Bus (USB) Pin Signal 1 +5V 2 Data - Pin Signal 3 Data + 4 Ground PRESARIO NOTEBOOK MAINTENANCE AND SERVICE GUIDE - Compaq Presario 1800 | Presario 1800XL Series Maintenance and Service Guide - Page 28
Port RI 40 Line Out Right 61 Switch C 82 Ground 20 Serial Port DTR 41 Line Out Present 62 Switch D 21 Serial Port CTS 42 Power Cycle 63 MIDI Input 6 CONNECTOR PIN ASSIGNMENTS PRESARIO NOTEBOOK MAINTENANCE AND SERVICE GUIDE 1800 SERIES - Compaq Presario 1800 | Presario 1800XL Series Maintenance and Service Guide - Page 29
if a power loss occurs while using the AC adapter. To activate Standby/Sleep mode, press Fn+F4 or click Start, select the Shut Down option, and then Standby. To resume from Standby/Sleep mode, press any key. PRESARIO NOTEBOOK MAINTENANCE AND SERVICE GUIDE 1800 SERIES BATTERY AND POWER MANAGEMENT 1 - Compaq Presario 1800 | Presario 1800XL Series Maintenance and Service Guide - Page 30
display. *The Notebook will not automatically enter Standby or Hibernation mode if using AC power. **Important: The Manual Shutdown procedure is not recommended unless the Standard Shutdown is unsuccessful. 2 BATTERY AND POWER MANAGEMENT PRESARIO NOTEBOOK MAINTENANCE AND SERVICE GUIDE 1800 SERIES - Compaq Presario 1800 | Presario 1800XL Series Maintenance and Service Guide - Page 31
OFF Hard Disks AC Power Never 15 minutes 1 hour Never 3 hours 15 minutes 20 minutes 15 minutes 30 minutes Battery Power 5 minutes 2 minutes 3 minutes 15 minutes Never 10 minutes 1 minute 2 minutes 10 minutes PRESARIO NOTEBOOK MAINTENANCE AND SERVICE GUIDE 1800 SERIES BATTERY AND POWER MANAGEMENT - Compaq Presario 1800 | Presario 1800XL Series Maintenance and Service Guide - Page 32
screen. • Click Start>Settings>Control Panel>Power Options>Intel(R) SpeedStep(TM) technology tab. • Double-click the Flag icon on the Windows taskbar to open the Intel(R) SpeedStep(TM) technology dialog box. 4 BATTERY AND POWER MANAGEMENT PRESARIO NOTEBOOK MAINTENANCE AND SERVICE GUIDE 1800 SERIES - Compaq Presario 1800 | Presario 1800XL Series Maintenance and Service Guide - Page 33
the power cord disconnects while the Notebook is turned on, turn it off until normal service is restored. The next time the Notebook is turned on, ScanDisk may run to check the hard disk for errors caused by improper shutdown. PRESARIO NOTEBOOK MAINTENANCE AND SERVICE GUIDE 1800 SERIES BATTERY AND - Compaq Presario 1800 | Presario 1800XL Series Maintenance and Service Guide - Page 34
performance. • Keep a battery pack in the Notebook when using it with AC power to supply the battery pack with a constant trickle charge. • Store the battery pack in a cool, dry place when not in use. 6 BATTERY AND POWER MANAGEMENT PRESARIO NOTEBOOK MAINTENANCE AND SERVICE GUIDE 1800 SERIES - Compaq Presario 1800 | Presario 1800XL Series Maintenance and Service Guide - Page 35
local regulations. Ä CAUTION: Never attempt to open or service a battery pack. Opening a battery pack not only damages the pack and makes it unusable, but also exposes potentially harmful battery components. PRESARIO NOTEBOOK MAINTENANCE AND SERVICE GUIDE 1800 SERIES BATTERY AND POWER MANAGEMENT 7 - Compaq Presario 1800 | Presario 1800XL Series Maintenance and Service Guide - Page 36
Presario 1800 Series Models: XL180, XL181, XL182, XL183, XL184, XL185, and XL190, XL191, XL192 Troubleshooting This section covers troubleshooting and resolving common problems associated with Compaq Presario 1800 Series Notebook Computers. The basic steps in troubleshooting include: 1. Preparing - Compaq Presario 1800 | Presario 1800XL Series Maintenance and Service Guide - Page 37
. 6. Ensure that the hard drive is installed in the Notebook. 7. Ensure that the battery pack is installed and the Notebook is connected to an external power source. When these preliminary steps are completed, run POST. 2 TROUBLESHOOTING PRESARIO NOTEBOOK MAINTENANCE AND SERVICE GUIDE 1800 SERIES - Compaq Presario 1800 | Presario 1800XL Series Maintenance and Service Guide - Page 38
. 9. Reassemble the Notebook (refer to Removal and Replacement chapter of this MSG). 10. Turn on the Notebook to verify that the power-on-password has been cleared. If it has not been cleared, repeat this procedure. PRESARIO NOTEBOOK MAINTENANCE AND SERVICE GUIDE 1800 SERIES TROUBLESHOOTING 3 - Compaq Presario 1800 | Presario 1800XL Series Maintenance and Service Guide - Page 39
2. Replace the system board. Memory test data error 1. Replace the memory modules. 2. Replace the system board. XX000YZZ RAM failure Replace the system board. How do you start Setup? By pressing F10 during startup? 4 TROUBLESHOOTING PRESARIO NOTEBOOK MAINTENANCE AND SERVICE GUIDE 1800 SERIES - Compaq Presario 1800 | Presario 1800XL Series Maintenance and Service Guide - Page 40
(TEST). 2. Replace the hard drive. 1. Run Checkup (TEST). 2. Replace the hard drive. 1782-Hard Drive Controller Probable Cause Hard drive controller failure Recommended Action 1. Run Setup. 2. Replace the hard drive. PRESARIO NOTEBOOK MAINTENANCE AND SERVICE GUIDE 1800 SERIES TROUBLESHOOTING 5 - Compaq Presario 1800 | Presario 1800XL Series Maintenance and Service Guide - Page 41
or the printed information available when calling for support. How do you start the Compaq Diagnostics that are preinstalled? Do customers have Diagnostic Diskettes? How do you start the Compaq Diagnostics from the disk? 6 TROUBLESHOOTING PRESARIO NOTEBOOK MAINTENANCE AND SERVICE GUIDE 1800 SERIES - Compaq Presario 1800 | Presario 1800XL Series Maintenance and Service Guide - Page 42
Presario 1800 Series Models: XL180, XL181, XL182, XL183, XL184, XL185, and XL190, XL191, XL192 Checkup (TEST) Does the CPQ Diagnostics disk come with each new Notebook? Does Checkup also come pre-installed as mentioned on the previous page? Checkup is included on the Compaq Diagnostics Diskette. - Compaq Presario 1800 | Presario 1800XL Series Maintenance and Service Guide - Page 43
System storage Graphics Memory Audio Operating system System files Windows files 7. Follow the on-screen instructions to cycle through the screens, return to the list and choose another item, or print the information. 8 TROUBLESHOOTING PRESARIO NOTEBOOK MAINTENANCE AND SERVICE GUIDE 1800 SERIES - Compaq Presario 1800 | Presario 1800XL Series Maintenance and Service Guide - Page 44
(pg 15) • 2419 through 2456: Video Test (pg 16) • 2458 through 2480: Video Test (pg 16) • 3206: Audio Test (pg 17) • 3301 through 6623: DVD or CD Test (pg 17) • 8601 through 8602: TouchPad Pointing Device Test (pg 17) PRESARIO NOTEBOOK MAINTENANCE AND SERVICE GUIDE 1800 SERIES TROUBLESHOOTING 9 - Compaq Presario 1800 | Presario 1800XL Series Maintenance and Service Guide - Page 45
Presario 1800 Series Models: XL180 connections to speaker. 3. Replace Replace the system board and retest. 1. Remove the memory module and retest. 2. Install a new memory module and retest. Random address test failed 10 TROUBLESHOOTING PRESARIO NOTEBOOK MAINTENANCE AND SERVICE GUIDE 1800 SERIES - Compaq Presario 1800 | Presario 1800XL Series Maintenance and Service Guide - Page 46
failed Recommended Action 1. Connect the printer. 2. Check power to the printer. 3. Install loop-back connector on printer port and retest. 4. Check port and IRQ configuration. 5. Replace the system board and retest. PRESARIO NOTEBOOK MAINTENANCE AND SERVICE GUIDE 1800 SERIES TROUBLESHOOTING 11 - Compaq Presario 1800 | Presario 1800XL Series Maintenance and Service Guide - Page 47
Run the Configuration and Diagnostics utilities. Error Code 1101-xx Serial Test Error Codes Description Serial port test failed Recommended Action 1. Check port configuration. 2. Replace the system board and retest. 12 TROUBLESHOOTING PRESARIO NOTEBOOK MAINTENANCE AND SERVICE GUIDE 1800 SERIES - Compaq Presario 1800 | Presario 1800XL Series Maintenance and Service Guide - Page 48
format test failed 1717-xx Hard drive ECC* test failed 1719-xx Hard drive power mode test failed 1724-xx Network preparation test failed 1736-xx Drive monitoring test failed *ECC = Error Correction Code PRESARIO NOTEBOOK MAINTENANCE AND SERVICE GUIDE 1800 SERIES TROUBLESHOOTING 13 - Compaq Presario 1800 | Presario 1800XL Series Maintenance and Service Guide - Page 49
failed Video 320 x 200 mode color set 1 test failed Video 640 x 200 mode test failed Video screen memory page test failed Video gray scale test failed Video white screen test failed Video noise pattern test failed 14 TROUBLESHOOTING PRESARIO NOTEBOOK MAINTENANCE AND SERVICE GUIDE 1800 SERIES - Compaq Presario 1800 | Presario 1800XL Series Maintenance and Service Guide - Page 50
color set 1 test failed Video 640 x 200 mode test failed Video screen memory page test failed Video gray scale test failed Video white screen test failed Video noise pattern test failed ECG/VGC memory test failed PRESARIO NOTEBOOK MAINTENANCE AND SERVICE GUIDE 1800 SERIES TROUBLESHOOTING 15 - Compaq Presario 1800 | Presario 1800XL Series Maintenance and Service Guide - Page 51
VGA BitBLT test failed Advanced VGA DAC test failed Recommended Action Replace the system board and retest. Advanced VGA data path test failed Advanced VGA BitBLT test failed Advanced VGA LineDraw test failed 16 TROUBLESHOOTING PRESARIO NOTEBOOK MAINTENANCE AND SERVICE GUIDE 1800 SERIES - Compaq Presario 1800 | Presario 1800XL Series Maintenance and Service Guide - Page 52
Replace the DVD or CD media and retest. 2. Verify that the speakers are connected. 3. Verify that drivers are loaded and properly installed. 4. Replace the CD/DVD drive and retest. 5. Replace the system board and retest. PRESARIO NOTEBOOK MAINTENANCE AND SERVICE GUIDE 1800 SERIES TROUBLESHOOTING - Compaq Presario 1800 | Presario 1800XL Series Maintenance and Service Guide - Page 53
displayed on the screen. The following pages contain troubleshooting information for: Audio Battery CD or DVD Drive Diskette Drive Display Hard Drive Hardware Installation Memory PC Card Power Printer TouchPad Keyboard/Numeric Keypad Carefully match the symptoms against the problem described in - Compaq Presario 1800 | Presario 1800XL Series Maintenance and Service Guide - Page 54
and charge the battery pack. OR • Replace the battery pack with a fully charged battery pack. Check the battery connectors on the system board to verify they are evenly spaced and that they are not bent or broken. PRESARIO NOTEBOOK MAINTENANCE AND SERVICE GUIDE 1800 SERIES TROUBLESHOOTING 19 - Compaq Presario 1800 | Presario 1800XL Series Maintenance and Service Guide - Page 55
operation or storage. • Operating Range: 50°F to 104°F (10°C to 40°C) • Storage Range: -4°F to 86°F (-20°C to 30°C) Recharge the battery pack. Recharge the battery. Discharge the battery completely and then recharge it. 20 TROUBLESHOOTING PRESARIO NOTEBOOK MAINTENANCE AND SERVICE GUIDE 1800 SERIES - Compaq Presario 1800 | Presario 1800XL Series Maintenance and Service Guide - Page 56
rate. Keep the battery pack within the recommended temperature range for operation or storage. • Operating Range: 50°F to 104°F (10°C to 40°C) • Storage Range: -4°F to 86°F (-20°C to 30°C) Recharge the battery pack. PRESARIO NOTEBOOK MAINTENANCE AND SERVICE GUIDE 1800 SERIES TROUBLESHOOTING 21 - Compaq Presario 1800 | Presario 1800XL Series Maintenance and Service Guide - Page 57
the diskette. At the system prompt, enter: FORMAT A: Use the type of diskette required by the drive. Copy files to hard drive or another diskette. Reformat bad floppy. Run Checkup from the Compaq Diagnostics diskette. 22 TROUBLESHOOTING PRESARIO NOTEBOOK MAINTENANCE AND SERVICE GUIDE 1800 SERIES - Compaq Presario 1800 | Presario 1800XL Series Maintenance and Service Guide - Page 58
by using Fn+F7 or Fn+F8. The Notebook display is in direct light. Tilt display or move Notebook. Screen save was initiated by Power Properties due to lack of user activity. Press any key or touch the TouchPad. PRESARIO NOTEBOOK MAINTENANCE AND SERVICE GUIDE 1800 SERIES TROUBLESHOOTING 23 - Compaq Presario 1800 | Presario 1800XL Series Maintenance and Service Guide - Page 59
Presario 1800 Series Models: XL180, XL181, XL182, XL183, XL184, XL185, and XL190, XL191, XL192 Display Problem Screen is blank. Display is blank and the Standby icon is flashing. Notebook display is blank and the screen on an external monitor displays information. Notebook display flashes or has - Compaq Presario 1800 | Presario 1800XL Series Maintenance and Service Guide - Page 60
VGA color or monochrome monitor, the screen should be white. A narrow black border may also appear on the left and right sides of the display. Either of these displays indicates that the monitor is working properly. PRESARIO NOTEBOOK MAINTENANCE AND SERVICE GUIDE 1800 SERIES TROUBLESHOOTING 25 - Compaq Presario 1800 | Presario 1800XL Series Maintenance and Service Guide - Page 61
off and unplug the Notebook, remove the battery pack, and remove and then reinstall the hard drive. Hardware Installation Solutions Some common causes and solutions for hardware installation problems are listed in the following table. Problem A new device is not recognized as part of the system - Compaq Presario 1800 | Presario 1800XL Series Maintenance and Service Guide - Page 62
documentation for memory requirements. If necessary, Install additional memory. Too many TSR (terminateand-stay-resident) applications are running. Remove from memory any TSR applications that you do not need. PRESARIO NOTEBOOK MAINTENANCE AND SERVICE GUIDE 1800 SERIES TROUBLESHOOTING 27 - Compaq Presario 1800 | Presario 1800XL Series Maintenance and Service Guide - Page 63
. Ensure that the card is inserted in the slot in the correct orientation. Check and secure telephone connection. Install drivers. See Specifications to verify the correct COM port. See Specifications to verify address. 28 TROUBLESHOOTING PRESARIO NOTEBOOK MAINTENANCE AND SERVICE GUIDE 1800 SERIES - Compaq Presario 1800 | Presario 1800XL Series Maintenance and Service Guide - Page 64
connection. Install driver(s). Double-click My Computer to verify the drive letter assigned to the card. Contact a Compaq authorized Service Provider for a list of PC Cards tested successfully in Compaq platforms. PRESARIO NOTEBOOK MAINTENANCE AND SERVICE GUIDE 1800 SERIES TROUBLESHOOTING - Compaq Presario 1800 | Presario 1800XL Series Maintenance and Service Guide - Page 65
Replace AC Adapter and restart. Turn on the Notebook. Replace the battery pack with a fully charged battery pack or connect the Notebook to an external power source. Then turn on the Notebook. Replace the system board. 30 TROUBLESHOOTING PRESARIO NOTEBOOK MAINTENANCE AND SERVICE GUIDE 1800 SERIES - Compaq Presario 1800 | Presario 1800XL Series Maintenance and Service Guide - Page 66
the network. Replace the cable. Refer to the printer documentation to install the correct printer driver. Ensure that the printer signal cable is properly connected to the Notebook. Replace the printer cable and retest. PRESARIO NOTEBOOK MAINTENANCE AND SERVICE GUIDE 1800 SERIES TROUBLESHOOTING 31 - Compaq Presario 1800 | Presario 1800XL Series Maintenance and Service Guide - Page 67
the TouchPad board. Replace system board. Install the appropriate device driver in Windows. Clean the TouchPad with a cloth dampened with alcohol or an ammonia-based glass cleaner. Wipe up liquid with a dry cloth. 32 TROUBLESHOOTING PRESARIO NOTEBOOK MAINTENANCE AND SERVICE GUIDE 1800 SERIES - Compaq Presario 1800 | Presario 1800XL Series Maintenance and Service Guide - Page 68
there are no PC Cards in the PC slots. 4. Close the display and all exterior doors of the Notebook. 5. Pack the Notebook with sufficient packing material to protect it. Use the original packing box or similar packaging. PRESARIO NOTEBOOK MAINTENANCE AND SERVICE GUIDE 1800 SERIES TROUBLESHOOTING 33 - Compaq Presario 1800 | Presario 1800XL Series Maintenance and Service Guide - Page 69
7,000 V Packing PCBs in foam-lined box 21,000 V 11,000 V 5,000 V Ä CAUTION: As little as 700 Volts can degrade Notebook components. Be sure to ground yourself before touching the Notebook or its subassemblies. PRESARIO NOTEBOOK MAINTENANCE AND SERVICE GUIDE 1800 SERIES REMOVAL AND REPLACEMENT 1 - Compaq Presario 1800 | Presario 1800XL Series Maintenance and Service Guide - Page 70
Plastic Parts Plastic parts can be damaged by the use of excessive force during disassembly and reassembly. When handling plastic parts, use care. Apply pressure only at the points designated in the instructions. 2 REMOVAL AND REPLACEMENT PRESARIO NOTEBOOK MAINTENANCE AND SERVICE GUIDE 1800 SERIES - Compaq Presario 1800 | Presario 1800XL Series Maintenance and Service Guide - Page 71
with constant light force. Ä CAUTION: When servicing this Notebook, ensure that cables are placed in their proper location during the reassembly process. Improper cable placement can damage the Notebook. PRESARIO NOTEBOOK MAINTENANCE AND SERVICE GUIDE 1800 SERIES REMOVAL AND REPLACEMENT 3 - Compaq Presario 1800 | Presario 1800XL Series Maintenance and Service Guide - Page 72
to the unit. The following illustrations show the proper placement for each cable: • Hard Drive Ribbon Cable • CD/DVD Ribbon Cable • Diskette Drive Ribbon Cable • Speaker Assembly Cable • Keyboard Ribbon Cable 4 REMOVAL AND REPLACEMENT PRESARIO NOTEBOOK MAINTENANCE AND SERVICE GUIDE 1800 SERIES - Compaq Presario 1800 | Presario 1800XL Series Maintenance and Service Guide - Page 73
below. Ä CAUTION: When servicing the Notebook, ensure that cables are placed in their proper location during the reassembly process. Improper cable placement can damage the Notebook. Removing the Hard Drive PRESARIO NOTEBOOK MAINTENANCE AND SERVICE GUIDE 1800 SERIES REMOVAL AND REPLACEMENT 5 - Compaq Presario 1800 | Presario 1800XL Series Maintenance and Service Guide - Page 74
below. Ä CAUTION: When servicing the Notebook, ensure that cables are placed in their proper location during the reassembly process. Improper cable placement can damage the Notebook. Removing the CD/DVD Drive 6 REMOVAL AND REPLACEMENT PRESARIO NOTEBOOK MAINTENANCE AND SERVICE GUIDE 1800 SERIES - Compaq Presario 1800 | Presario 1800XL Series Maintenance and Service Guide - Page 75
below. Ä CAUTION: When servicing the Notebook, ensure that cables are placed in their proper location during the reassembly process. Improper cable placement can damage the Notebook. Removing the Diskette Drive PRESARIO NOTEBOOK MAINTENANCE AND SERVICE GUIDE 1800 SERIES REMOVAL AND REPLACEMENT 7 - Compaq Presario 1800 | Presario 1800XL Series Maintenance and Service Guide - Page 76
. Ä CAUTION: When servicing this Notebook, ensure that cables are placed in their proper location during the reassembly process. Improper cable placement can damage the Notebook. Removing the Speaker Assembly 8 REMOVAL AND REPLACEMENT PRESARIO NOTEBOOK MAINTENANCE AND SERVICE GUIDE 1800 SERIES - Compaq Presario 1800 | Presario 1800XL Series Maintenance and Service Guide - Page 77
is shown below. Ä CAUTION: When servicing the Notebook, ensure that cables are placed in their proper location during the reassembly process. Improper cable placement can damage the Notebook. Removing the Modem PRESARIO NOTEBOOK MAINTENANCE AND SERVICE GUIDE 1800 SERIES REMOVAL AND REPLACEMENT 9 - Compaq Presario 1800 | Presario 1800XL Series Maintenance and Service Guide - Page 78
below. Ä CAUTION: When servicing this Notebook, ensure that cables are placed in their proper location during the reassembly process. Improper cable placement can damage the Notebook. Removing the Keyboard 10 REMOVAL AND REPLACEMENT PRESARIO NOTEBOOK MAINTENANCE AND SERVICE GUIDE 1800 SERIES - Compaq Presario 1800 | Presario 1800XL Series Maintenance and Service Guide - Page 79
Presario 1800 Series Models: XL180, XL181, XL182, XL183, XL185, and XL190, XL191, XL192 Preparing the Notebook for Disassembly Before beginning the removal or replacement of any Notebook components, complete the following steps: 1. Disconnect the AC power source and any external devices. 2. Remove - Compaq Presario 1800 | Presario 1800XL Series Maintenance and Service Guide - Page 80
, and XL190, XL191, XL192 Disconnecting the QuikDock To disconnect the Notebook from the QuikDock, perform the following steps: 1. Lift up the handle 1 on top of the QuikDock. 2. Lift the Notebook 2 straight up. 12 REMOVAL AND REPLACEMENT PRESARIO NOTEBOOK MAINTENANCE AND SERVICE GUIDE 1800 SERIES - Compaq Presario 1800 | Presario 1800XL Series Maintenance and Service Guide - Page 81
the battery pack. Do not open a battery pack; this action damages the pack, makes it unusable, and exposes potentially harmful battery components. No field-serviceable parts are located inside the battery pack. PRESARIO NOTEBOOK MAINTENANCE AND SERVICE GUIDE 1800 SERIES REMOVAL AND REPLACEMENT 13 - Compaq Presario 1800 | Presario 1800XL Series Maintenance and Service Guide - Page 82
following steps: 1. Prepare the Notebook for disassembly (pg 11). 2. Close the display and turn the Notebook upside down. 3. Remove five screws from the underside of the Notebook. Continued on the next page. 14 REMOVAL AND REPLACEMENT PRESARIO NOTEBOOK MAINTENANCE AND SERVICE GUIDE 1800 SERIES - Compaq Presario 1800 | Presario 1800XL Series Maintenance and Service Guide - Page 83
the Notebook over (right side up). 5. Pull the display release latches and open the display. 6. Lift up the front end of the Palmrest cover and remove it from the groove in the chassis. Continued on the next page. PRESARIO NOTEBOOK MAINTENANCE AND SERVICE GUIDE 1800 SERIES REMOVAL AND REPLACEMENT - Compaq Presario 1800 | Presario 1800XL Series Maintenance and Service Guide - Page 84
Presario 1800 Series Models: XL180, XL181, XL182, XL183, XL185, and XL190, XL191, XL192 7. Disconnect the flex cable from the ZIF Connector on the DisqPlay module. To replace the Palmrest cover, reverse these procedures. 16 REMOVAL AND REPLACEMENT PRESARIO NOTEBOOK MAINTENANCE AND SERVICE GUIDE - Compaq Presario 1800 | Presario 1800XL Series Maintenance and Service Guide - Page 85
and remove the keyboard. To replace the keyboard, reverse these procedures. Note: When replacing the keyboard, the Keyboard Ribbon Cable should fold behind the ZIF Connector rather than underneath the keyboard. PRESARIO NOTEBOOK MAINTENANCE AND SERVICE GUIDE 1800 SERIES REMOVAL AND REPLACEMENT 17 - Compaq Presario 1800 | Presario 1800XL Series Maintenance and Service Guide - Page 86
the following steps: 1. Prepare the Notebook for disassembly (pg 11). 2. Open the display and squeeze the sides of the display hinge covers while sliding them off the hinges. Continued on the next page. 18 REMOVAL AND REPLACEMENT PRESARIO NOTEBOOK MAINTENANCE AND SERVICE GUIDE 1800 SERIES - Compaq Presario 1800 | Presario 1800XL Series Maintenance and Service Guide - Page 87
Internet Zone cover to the chassis. 4. Turn the unit upside down and remove the two screws located near the back of the Notebook that secure the Internet Zone cover to the chassis. Continued on the next page. PRESARIO NOTEBOOK MAINTENANCE AND SERVICE GUIDE 1800 SERIES REMOVAL AND REPLACEMENT 19 - Compaq Presario 1800 | Presario 1800XL Series Maintenance and Service Guide - Page 88
Presario 1800 Series Models: XL180, XL181, XL182, XL183, XL185, and XL190, XL191, XL192 5. Turn Internet Zone cover, and 2 remove from the chassis. To replace the status panel assembly, reverse these procedures. 20 REMOVAL AND REPLACEMENT PRESARIO NOTEBOOK MAINTENANCE AND SERVICE GUIDE 1800 SERIES - Compaq Presario 1800 | Presario 1800XL Series Maintenance and Service Guide - Page 89
disassembly (pg 11). 2. Remove the Internet Zone Cover (pg 18). 3. Remove the screw securing the display flex cable bracket and disconnect both the display flex cable and backlight cable from the system board. Continued on the next page. PRESARIO NOTEBOOK MAINTENANCE AND SERVICE GUIDE 1800 SERIES - Compaq Presario 1800 | Presario 1800XL Series Maintenance and Service Guide - Page 90
: XL180, XL181, XL182, XL183, XL185, and XL190, XL191, XL192 4. Remove two screws securing the Internet button board and remove from the chassis. To replace the Internet button board, reverse these procedures. 22 REMOVAL AND REPLACEMENT PRESARIO NOTEBOOK MAINTENANCE AND SERVICE GUIDE 1800 SERIES - Compaq Presario 1800 | Presario 1800XL Series Maintenance and Service Guide - Page 91
should be installed. Important: Before installing a new Heatspreader, remove the plastic covering from the thermal pads. Å WARNING: To prevent damage, do not use excessive force when replacing the screws. PRESARIO NOTEBOOK MAINTENANCE AND SERVICE GUIDE 1800 SERIES REMOVAL AND REPLACEMENT 23 - Compaq Presario 1800 | Presario 1800XL Series Maintenance and Service Guide - Page 92
board, reverse these procedures. Ä CAUTION: When replacing the modem, ensure that the Modem Cable is placed in its proper location during the reassembly process. Improper cable placement can damage the Notebook. 24 REMOVAL AND REPLACEMENT PRESARIO NOTEBOOK MAINTENANCE AND SERVICE GUIDE 1800 SERIES - Compaq Presario 1800 | Presario 1800XL Series Maintenance and Service Guide - Page 93
for disassembly (pg 11). 2. Remove the Palmrest cover with TouchPad (pg 14). 3. Remove three screws from the hard drive mounting bracket. 4. Disconnect the hard drive data cable and lift out the hard drive. Continued on the next page. PRESARIO NOTEBOOK MAINTENANCE AND SERVICE GUIDE 1800 SERIES - Compaq Presario 1800 | Presario 1800XL Series Maintenance and Service Guide - Page 94
the Hard Drive Mounting Brackets To remove the hard drive mounting brackets, remove two screws from each of side of the hard drive. To replace the hard drive and mounting brackets, reverse these procedures. 26 REMOVAL AND REPLACEMENT PRESARIO NOTEBOOK MAINTENANCE AND SERVICE GUIDE 1800 SERIES - Compaq Presario 1800 | Presario 1800XL Series Maintenance and Service Guide - Page 95
the hard drive (pg 25). 4. Lift up the DisqPlay module and disconnect the flex cable from ZIF Connector on the module. 5. Remove the DisqPlay module from the chassis. To replace the DisqPlay module, reverse these procedures. PRESARIO NOTEBOOK MAINTENANCE AND SERVICE GUIDE 1800 SERIES REMOVAL AND - Compaq Presario 1800 | Presario 1800XL Series Maintenance and Service Guide - Page 96
of standard screwdriver in center slot, twist screwdriver toward "Free" until is snaps, and lift processor from the chassis. Continued on the next page. 28 REMOVAL AND REPLACEMENT PRESARIO NOTEBOOK MAINTENANCE AND SERVICE GUIDE 1800 SERIES - Compaq Presario 1800 | Presario 1800XL Series Maintenance and Service Guide - Page 97
the system board connector. 2. Press down carefully on the processor directly over the connectors to seat the processor. 3. Reassemble the remaining subassemblies by reversing their removal procedures. PRESARIO NOTEBOOK MAINTENANCE AND SERVICE GUIDE 1800 SERIES REMOVAL AND REPLACEMENT 29 - Compaq Presario 1800 | Presario 1800XL Series Maintenance and Service Guide - Page 98
14). 3. Remove the keyboard (pg 17). 4. Remove the Heatspreader (pg 23). 5. Turn the Notebook over (upside down) and remove the two screws that secure the CD/DVD drive to the chassis. Continued on the next page. 30 REMOVAL AND REPLACEMENT PRESARIO NOTEBOOK MAINTENANCE AND SERVICE GUIDE 1800 SERIES - Compaq Presario 1800 | Presario 1800XL Series Maintenance and Service Guide - Page 99
DVD drive, reverse these procedures. Ä CAUTION: When replacing the CD/DVD drive, ensure that the CD/DVD Ribbon Cable is placed in its proper location during the reassembly process. Improper cable placement can damage the Notebook. PRESARIO NOTEBOOK MAINTENANCE AND SERVICE GUIDE 1800 SERIES REMOVAL - Compaq Presario 1800 | Presario 1800XL Series Maintenance and Service Guide - Page 100
the Internet Zone cover (pg 18). 3. Remove the screw securing the display flex cable bracket and disconnect the display flex cable and backlight cable from the Internet button board. Continued on the next page. 32 REMOVAL AND REPLACEMENT PRESARIO NOTEBOOK MAINTENANCE AND SERVICE GUIDE 1800 SERIES - Compaq Presario 1800 | Presario 1800XL Series Maintenance and Service Guide - Page 101
, and XL190, XL191, XL192 4. Remove the two outermost screws securing the display panel to the chassis. 5. Remove the display assembly from the chassis. To replace the display panel, reverse these procedures. PRESARIO NOTEBOOK MAINTENANCE AND SERVICE GUIDE 1800 SERIES REMOVAL AND REPLACEMENT 33 - Compaq Presario 1800 | Presario 1800XL Series Maintenance and Service Guide - Page 102
25). 8. Remove the display panel assembly (pg 32). 9. Remove four screws located on the top of the upper CPU cover and lift the cover off the chassis. To replace the upper CPU cover, reverse these procedures. 34 REMOVAL AND REPLACEMENT PRESARIO NOTEBOOK MAINTENANCE AND SERVICE GUIDE 1800 SERIES - Compaq Presario 1800 | Presario 1800XL Series Maintenance and Service Guide - Page 103
Remove the hard drive (pg 25). 9. Remove the upper CPU cover (pg 34). 10. Disconnect the fan cable from the connector on the system board and lift the fan assembly from the chassis slot. Continued on the next page. PRESARIO NOTEBOOK MAINTENANCE AND SERVICE GUIDE 1800 SERIES REMOVAL AND REPLACEMENT - Compaq Presario 1800 | Presario 1800XL Series Maintenance and Service Guide - Page 104
the fan. To replace the fan assembly and gasket, reverse these procedures. Important: When replacing the fan assembly ensure that the arrow (located on the side of the fan near the connector) is pointing inward. 36 REMOVAL AND REPLACEMENT PRESARIO NOTEBOOK MAINTENANCE AND SERVICE GUIDE 1800 SERIES - Compaq Presario 1800 | Presario 1800XL Series Maintenance and Service Guide - Page 105
Heatspreader (pg 23). 5. Remove the Internet Zone cover (pg 18). 6. Remove the Internet button board (pg 21). 7. Remove the hard drive (pg 25). 8. Remove the upper CPU cover (pg 34). Continued on the next page. PRESARIO NOTEBOOK MAINTENANCE AND SERVICE GUIDE 1800 SERIES REMOVAL AND REPLACEMENT 37 - Compaq Presario 1800 | Presario 1800XL Series Maintenance and Service Guide - Page 106
the RTC battery upward and remove it from the battery socket. To replace the RTC battery, press the battery firmly into the socket and reassemble the remaining components by reversing their removal procedures. 38 REMOVAL AND REPLACEMENT PRESARIO NOTEBOOK MAINTENANCE AND SERVICE GUIDE 1800 SERIES - Compaq Presario 1800 | Presario 1800XL Series Maintenance and Service Guide - Page 107
8. Remove the display panel assembly (pg 32). 9. Remove the hard drive (pg 25). 10. Remove the upper CPU cover (pg 34). 11. Remove the screw from the diskette drive retaining bracket. Continued on the next page. PRESARIO NOTEBOOK MAINTENANCE AND SERVICE GUIDE 1800 SERIES REMOVAL AND REPLACEMENT 39 - Compaq Presario 1800 | Presario 1800XL Series Maintenance and Service Guide - Page 108
. Ä CAUTION: When replacing the diskette drive, ensure that the Diskette Drive Ribbon Cable is placed in its proper location during the reassembly process. Improper cable placement can damage the Notebook. 40 REMOVAL AND REPLACEMENT PRESARIO NOTEBOOK MAINTENANCE AND SERVICE GUIDE 1800 SERIES - Compaq Presario 1800 | Presario 1800XL Series Maintenance and Service Guide - Page 109
with replacement battery charger board. To replace the battery charger board, reverse these procedures. Important: When replacing the battery charger board, ensure that the pins are aligned with the connector on the system board. PRESARIO NOTEBOOK MAINTENANCE AND SERVICE GUIDE 1800 SERIES REMOVAL - Compaq Presario 1800 | Presario 1800XL Series Maintenance and Service Guide - Page 110
board (pg 21). 7. Remove the display panel assembly (pg 32). 8. Remove the hard drive (pg 25). 9. Remove the upper CPU cover (pg 34). 10. Remove the battery charger board (pg 41). Continued on the next page. 42 REMOVAL AND REPLACEMENT PRESARIO NOTEBOOK MAINTENANCE AND SERVICE GUIDE 1800 SERIES - Compaq Presario 1800 | Presario 1800XL Series Maintenance and Service Guide - Page 111
assembly, reverse these procedures. Ä CAUTION: When replacing the speaker assembly, ensure that the Speaker Assembly Cable is placed in its proper location. Improper cable placement can damage the Notebook. PRESARIO NOTEBOOK MAINTENANCE AND SERVICE GUIDE 1800 SERIES REMOVAL AND REPLACEMENT 43 - Compaq Presario 1800 | Presario 1800XL Series Maintenance and Service Guide - Page 112
35). 14. Remove the diskette drive cable from the system board. 15. Remove the battery charger board (pg 41). 16. Disconnect the speaker assembly cables from the system board (pg 43). Continued on the next page. 44 REMOVAL AND REPLACEMENT PRESARIO NOTEBOOK MAINTENANCE AND SERVICE GUIDE 1800 SERIES - Compaq Presario 1800 | Presario 1800XL Series Maintenance and Service Guide - Page 113
remaining standoffs located on the system board may be left in place. 18. Remove the two screws from the CD/DVD drive mounting rail and lift the mounting rail from the system board. Continued on the next page. PRESARIO NOTEBOOK MAINTENANCE AND SERVICE GUIDE 1800 SERIES REMOVAL AND REPLACEMENT 45 - Compaq Presario 1800 | Presario 1800XL Series Maintenance and Service Guide - Page 114
Lift up the front and pull forward to remove the system board from the chassis. To replace the system board, reverse these procedures. Important: Before replacing the system board, remove all remaining cables. 46 REMOVAL AND REPLACEMENT PRESARIO NOTEBOOK MAINTENANCE AND SERVICE GUIDE 1800 SERIES - Compaq Presario 1800 | Presario 1800XL Series Maintenance and Service Guide - Page 115
, slide the memory module door to the left and lift. 5. 1 Pull the side levers to release the module and 2 unplug the memory module from the system board. To replace the memory module, reverse these procedures. PRESARIO NOTEBOOK MAINTENANCE AND SERVICE GUIDE 1800 SERIES REMOVAL AND REPLACEMENT 47 - Compaq Presario 1800 | Presario 1800XL Series Maintenance and Service Guide - Page 116
the spare parts for Presario 1800XL Series Notebooks. The Notebook serial number is required when customers request information or order spare parts. The serial number 1 is located on the underside of the unit. PRESARIO NOTEBOOK MAINTENANCE AND SERVICE GUIDE 1800 SERIES ILLUSTRATED PARTS CATALOG 1 - Compaq Presario 1800 | Presario 1800XL Series Maintenance and Service Guide - Page 117
138183-001 4 Speaker Assembly w/Cables 138185-001 5 Enclosure Base (I) Enclosure Base (II) 138182-001 171816-001 6 Battery Pack Li-Ion Enhanced 138184-001 7 Button Board Cover (not shown) 143926-001 2 ILLUSTRATED PARTS CATALOG PRESARIO NOTEBOOK MAINTENANCE AND SERVICE GUIDE 1800 SERIES - Compaq Presario 1800 | Presario 1800XL Series Maintenance and Service Guide - Page 118
-001 8 System I/O Boards w/ 64 Mb SDRAM 171813-001 158804-001 (Mobility-P) 9 Fan Assembly 138162-001 - PCI Ethernet 10/100T LAN Card (not shown) 138164-001 PRESARIO NOTEBOOK MAINTENANCE AND SERVICE GUIDE 1800 SERIES ILLUSTRATED PARTS CATALOG 3 - Compaq Presario 1800 | Presario 1800XL Series Maintenance and Service Guide - Page 119
12.0GB 2 1.44-MB Diskette Drive 3 DVD Drives 6X 6X 8X 4 24X CD ROM Drive (not shown) 5 CD-R/W Drive (not shown) Part No. 170087-001 170086-001 138188-001 158165-001 192408-001 175326-001 143922-001 171377-001 4 ILLUSTRATED PARTS CATALOG PRESARIO NOTEBOOK MAINTENANCE AND SERVICE GUIDE 1800 SERIES - Compaq Presario 1800 | Presario 1800XL Series Maintenance and Service Guide - Page 120
-001 1 Hard Drive Cable 2 CD/DVD Drive Cable 3 Diskette Drive Cable 4 Status Panel Cable 5 DisqPlay LCD Cable 6 Modem Cable (not shown) 7 TouchPad Cable (not shown) *Kit includes one each of the above items unless quantity specified. PRESARIO NOTEBOOK MAINTENANCE AND SERVICE GUIDE 1800 SERIES - Compaq Presario 1800 | Presario 1800XL Series Maintenance and Service Guide - Page 121
, XL191, XL192 Miscellaneous Hardware Kit # Description Part No. Miscellaneous Hardware Kit 138160-001 1 Hard Drive Mounting Bracket (right) 2 Hard Drive Mounting Bracket (left) 3 Reinforcement Bracket 6 ILLUSTRATED PARTS CATALOG PRESARIO NOTEBOOK MAINTENANCE AND SERVICE GUIDE 1800 SERIES - Compaq Presario 1800 | Presario 1800XL Series Maintenance and Service Guide - Page 122
1800 Series Models: XL180, XL181, XL182, XL183, XL185, and XL190, XL191, XL192 Miscellaneous Plastics # Description Part No. Miscellaneous Plastics Kit* 138190-001 1 Battery Pack Door 2 Memory Module Cover 3 PCMCIA Door 4 Display Hinge Cover (Right) 5 Display Hinge Cover (Left) 6 CD Drive Guide - Compaq Presario 1800 | Presario 1800XL Series Maintenance and Service Guide - Page 123
) 138161-001 4 Logo Kit (not shown) 169610-001 5 Return Kit (not shown) 138166-001 6 AC Power Cords (not shown) N.America Int'l (3-Wire) UK (3-Wire) IT (3-Wire) 293831-001 170513-002 170513-031 170513-061 8 ILLUSTRATED PARTS CATALOG PRESARIO NOTEBOOK MAINTENANCE AND SERVICE GUIDE 1800 SERIES - Compaq Presario 1800 | Presario 1800XL Series Maintenance and Service Guide - Page 124
-DVD Drive Part No. 175324-001 171814-001 203698-001 175321-001 175320-001 173755-001 175319-001 175322-001 175323-001 179454-001 122699-001 122700-001 123930-001 175325-001 171813-001 158804-001 TBD TBD TBD TBD 175326-001 TBD 171377-001 TBD TBD TBD PRESARIO NOTEBOOK MAINTENANCE AND SERVICE GUIDE - Compaq Presario 1800 | Presario 1800XL Series Maintenance and Service Guide - Page 125
, 64M, 56K, ATI8M-US Battery Li-ON 3.6 AHr Software Windows 98 Windows 2000 Word 2000 Software Bundle FHC Package SBE Package PRO Package Part No. TBD TBD 161544-001 TBD TBD 177458-001 TBD TBD TBD TBD TBD TBD 10 ILLUSTRATED PARTS CATALOG PRESARIO NOTEBOOK MAINTENANCE AND SERVICE GUIDE 1800 SERIES
-
 1
1 -
 2
2 -
 3
3 -
 4
4 -
 5
5 -
 6
6 -
 7
7 -
8
-
9
-
10
-
11
-
12
-
13
-
14
-
15
-
16
-
17
-
18
-
19
-
20
-
21
-
22
-
23
-
24
-
25
-
26
-
27
-
28
-
29
-
30
-
31
-
32
-
33
-
34
-
35
-
36
-
37
-
38
-
39
-
40
-
41
-
42
-
43
-
44
-
45
-
46
-
47
-
48
-
49
-
50
-
51
-
52
-
53
-
54
-
55
-
56
-
57
-
58
-
59
-
60
-
61
-
62
-
63
-
64
-
65
-
66
-
67
-
68
-
69
-
70
-
71
-
72
-
73
-
74
-
75
-
76
-
77
-
78
-
79
-
80
-
81
-
82
-
83
-
84
-
85
-
86
-
87
-
88
-
89
-
90
-
91
-
92
-
93
-
94
-
95
-
96
-
97
-
98
-
99
-
100
-
101
-
102
-
103
-
104
-
105
-
106
-
107
-
108
-
109
-
110
-
111
-
112
-
113
-
114
-
115
-
116
-
117
-
118
-
119
-
120
-
121
-
122
-
123
-
124
-
125
 |
 |

P
RESARIO
N
OTEBOOK
M
AINTENANCE
AND
S
ERVICE
G
UIDE
1800 S
ERIES
B
EFORE
Y
OU
B
EGIN
1
Presario 1800 Series
Models: XL180, XL181, XL182, XL183, XL185,
and XL190, XL191, XL192
Before You Begin
Notice
The information in this guide is subject to change without notice.
COMPAQ COMPUTER CORPORATION SHALL NOT BE LIABLE FOR TECHNICAL OR EDITORIAL
ERRORS OR OMISSIONS CONTAINED HEREIN, NOR FOR INCIDENTAL OR CONSEQUENTIAL
DAMAGES RESULTING FROM THE FURNISHING, PERFORMANCE, OR USE OF THIS
MATERIAL.
This guide contains information protected by copyright. No part of this guide may be
photocopied or reproduced in any form without prior written consent from Compaq
Computer Corporation.
© 2000 Compaq Computer Corporation. All rights reserved. Printed in the U.S.A.
Compaq, Presario 1800 Series Registered U. S. Patent and Trademark Office.
Microsoft, MS-DOS, and Windows are registered trademarks of Microsoft Corporation.
Windows 98 and Windows 2000 are trademarks of Microsoft Corporation.
The software described in this guide is furnished under a license agreement or
nondisclosure agreement. The software may be used or copied only in accordance with the
terms of the agreement.
Product names mentioned herein may be trademarks and/or registered trademarks of their
respective companies.
Maintenance and Service Guide
Compaq Presario 1800 Series Notebook Computer
First Edition (July 2000) Compaq Computer Corporation