Craftsman 22124 Owners Manual - Page 16
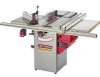
Tools, Required, Leveling, Assembly, - cabinet saw
 |
View all Craftsman 22124 manuals
Add to My Manuals
Save this manual to your list of manuals |
Page 16 highlights
TOOLS REQUIRED The following tools are needed for assembly and alignment. Note: Two blade wrenches and five hex wrenches are provided with your table saw. The remaining tools are typical shop tools and are not included withyour table saw. 18mm wrench 3/16-in. hex wrench 13mm wrench 10mm wrench #2 Phillips screwdriver #3 Phillips screwdriver 8mm wrench 1/2-in. wrench Pipe clamp C-clamp (2) 7/16-in. wrench Power drill with 5/16-in. drill bit • The table saw is a heavy machine; two people may be required for certain assembly operations. DO NOT assemble the table saw until you are sure the tool is unplugged. • DO NOT assemble the table saw until you are sure the power switch is in the "OFF" position. • For your own safety, DO NOT connect the machine to the power source until the machine is completely assembled and you read and understand this entire Owner's Manual. LEVELING FEET ASSEMBLY NOTE: If you will be permanently attaching your table saw to the floor, DO NOT assemble leveling feet and go on to the next step. 1. With two people, tip the front of the table saw (A) back and block the table saw up using two small blocks of scrap 2x4 lying horizontal (B). CAUTION: The table saw is heavy; two people are required for this operation. Make sure the table saw is sturdily supported before proceeding. See figure 4-1. 2. Make sure M8 hex nut (C) is completely threaded down on each of the four leveling feet (D). See figure 4-1. 3. Thread one leveling foot with hex nut to the bottom of both front corners of the cabinet (E). See figure 4-1. 4. Remove the scrap 2x4 blocks under the front of the table saw and place them under the back of the saw. Repeat these steps to attach two leveling feet to the rear corners of the cabinet. DUST PORT ASSEMBLY MAKE CERTAIN the table saw is disconnected from the power source. Figure 5=1 MAKE CERTAIN the table saw is disconnected from the power source. Figure 44 1. Attach the dust port (A) to the opening (B) in the bottom rear of the cabinet with four 1/4-20 x 3/8" round head tap screws, not shown. See figure 5-1. 16
-
 1
1 -
2
-
3
-
4
-
5
-
6
-
7
-
8
-
9
-
10
-
 11
11 -
 12
12 -
 13
13 -
 14
14 -
 15
15 -
 16
16 -
 17
17 -
 18
18 -
 19
19 -
 20
20 -
 21
21 -
22
-
23
-
24
-
25
-
26
-
27
-
28
-
29
-
30
-
31
-
32
-
33
-
34
-
35
-
36
-
37
-
38
-
39
-
40
-
41
-
42
-
43
-
44
-
45
-
46
-
47
-
48
-
49
-
50
-
51
-
52
-
53
-
54
-
55
-
56
-
57
-
58
-
59
-
60
-
61
-
62
-
63
-
64
-
65
-
66
-
67
-
68
-
69
-
70
-
71
-
72
-
73
-
74
-
75
-
76
-
77
-
78
-
79
-
80
-
81
-
82
-
83
-
84
-
85
-
86
-
87
-
88
 |
 |
