Craftsman 22124 Owners Manual - Page 29
Biesemeyer
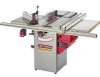 |
View all Craftsman 22124 manuals
Add to My Manuals
Save this manual to your list of manuals |
Page 29 highlights
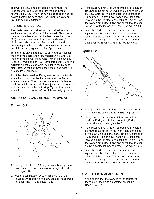
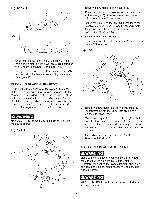
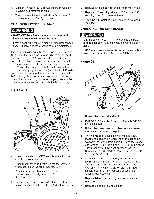
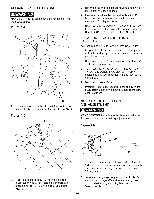
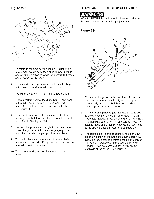
Fig. 17B=1 ® [ BIESEMEYER BIESEMEYER ® T=SQUARE ® COMMERCIAL RiP FENCE SYSTEM ASSEMBLY OPERATIONS AND ADJUSTMENTS A B To align the blade parallel to the miter slot, first loosen two hex head screws (A) under the left side of the table saw. This is the same side as the bevel handwheel (B). See figure 17B-1. Fig. 17B=2 C C MAKE CERTAIN the table saw is disconnected from the power source when making adjustments. Figure 18=1 A G B 1. To move the rip fence (A) along the guide tube (B), simply lift up on lock handle (C). See figure 18-1. 2. Slide the rip fence to a desired position on the guide tube and push down on the fence lock handle to lock the rip fence. NOTE: A magnet is assembled to the fence body to hold the lock handle in the up position when moving the rip fence. See figure 18-1. 2. Open motor cover located on the right side of the table saw. Loosen two hex head screws (C) located directly above the opening. See figure 17B-2. 3. The saw table is now loose and can be repositioned until the blade is parallel to the miter slot. Repeat steps in "CHECKING BLADE AMGNMENT." 4. When blade is parallel to miter slot, tighten all four hex head screws. 3. The thin black line located on the cursor (D) indicates the distance the rip fence is positioned away from the saw blade. It may be necessary to adjust one or both cursors. Make a test cut with the rip fence locked in position. See figure 18-1. 4. Measure the width of the finished cut and adjust the cursor by loosening the two screws (E). Adjust the cursor until the thin black line is aligned with the same marking on the scale (F) as the finished cut. Retighten the two screws. See figure 18-1. 5. Recheck blade alignment. 6. Tilt the blade to 45 degrees, and rotate the saw blade by hand. Make sure the blade does not contact the table insert. 29
-
 1
1 -
2
-
3
-
4
-
5
-
6
-
7
-
8
-
9
-
10
-
11
-
12
-
13
-
14
-
15
-
16
-
17
-
18
-
19
-
20
-
21
-
22
-
23
-
 24
24 -
 25
25 -
 26
26 -
 27
27 -
 28
28 -
 29
29 -
 30
30 -
 31
31 -
 32
32 -
 33
33 -
 34
34 -
35
-
36
-
37
-
38
-
39
-
40
-
41
-
42
-
43
-
44
-
45
-
46
-
47
-
48
-
49
-
50
-
51
-
52
-
53
-
54
-
55
-
56
-
57
-
58
-
59
-
60
-
61
-
62
-
63
-
64
-
65
-
66
-
67
-
68
-
69
-
70
-
71
-
72
-
73
-
74
-
75
-
76
-
77
-
78
-
79
-
80
-
81
-
82
-
83
-
84
-
85
-
86
-
87
-
88
 |
 |
