Craftsman 22124 Owners Manual - Page 25
Bolting, Table, To The, Floor, A=3, 13a-1, 13a-2, 13a=4
 |
View all Craftsman 22124 manuals
Add to My Manuals
Save this manual to your list of manuals |
Page 25 highlights
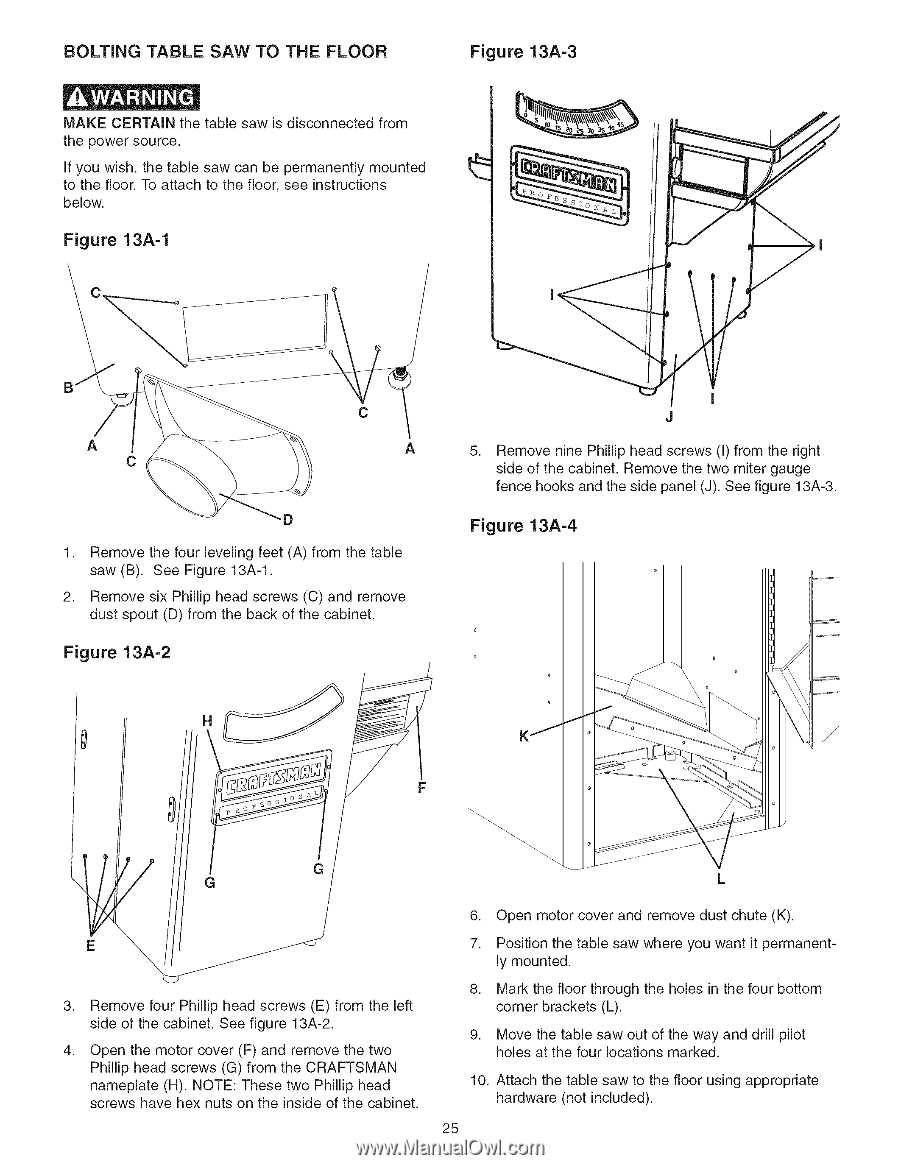
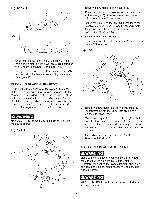
BOLTING TABLE SAW TO THE FLOOR Figure 13A=3 MAKE CERTAIN the table saw is disconnected from the power source. If you wish, the table saw can be permanently mounted to the floor. To attach to the floor, see instructions below. Figure 13A-1 A C C A D 1. Remove the four leveling feet (A) from the table saw (B). See Figure 13A-1. 2. Remove six Phillip head screws (C) and remove dust spout (D) from the back of the cabinet. Figure 13A-2 5. Remove nine Phillip head screws ([) from the right side of the cabinet. Remove the two miter gauge fence hooks and the side panel (J). See figure 13A-3. Figure 13A=4 H F / G G E \ 3. Remove four Phillip head screws (E) from the left side of the cabinet. See figure 13A-2. 4. Open the motor cover (F) and remove the two Phillip head screws (G) from the CRAFTSMAN nameplate (H). NOTE: These two Phillip head screws have hex nuts on the inside of the cabinet. 6. Open motor cover and remove dust chute (K). 7. Position the table saw where you want it permanently mounted. 8. Mark the floor through the holes in the four bottom corner brackets (L). 9. Move the table saw out of the way and drill pilot holes at the four locations marked. 10. Attach the table saw to the floor using appropriate hardware (not included). 25
-
 1
1 -
2
-
3
-
4
-
5
-
6
-
7
-
8
-
9
-
10
-
11
-
12
-
13
-
14
-
15
-
16
-
17
-
18
-
19
-
 20
20 -
 21
21 -
 22
22 -
 23
23 -
 24
24 -
 25
25 -
 26
26 -
 27
27 -
 28
28 -
 29
29 -
 30
30 -
31
-
32
-
33
-
34
-
35
-
36
-
37
-
38
-
39
-
40
-
41
-
42
-
43
-
44
-
45
-
46
-
47
-
48
-
49
-
50
-
51
-
52
-
53
-
54
-
55
-
56
-
57
-
58
-
59
-
60
-
61
-
62
-
63
-
64
-
65
-
66
-
67
-
68
-
69
-
70
-
71
-
72
-
73
-
74
-
75
-
76
-
77
-
78
-
79
-
80
-
81
-
82
-
83
-
84
-
85
-
86
-
87
-
88
 |
 |