Craftsman 22124 Owners Manual - Page 32
Aligning, Leitz, Adjustment, 21a-2
 |
View all Craftsman 22124 manuals
Add to My Manuals
Save this manual to your list of manuals |
Page 32 highlights
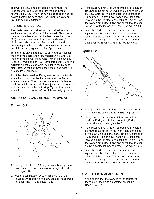
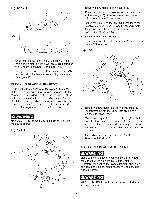
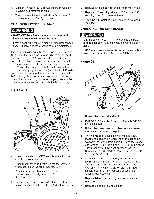
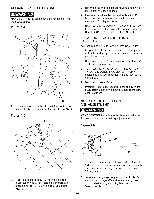
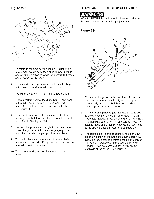
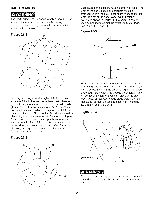
ALiGNiNG SPLITTER BRACKET MAKE CERTAIN the table saw is disconnected from the power source. Fig. 21A=1 A B To adjust front splitter bracket (A), loosen the two hex socket head cap screws (B). See figure 21A-1. Fig. 21A-2 D 3. Retighten the two hex socket head cap screws after the splitter has been aligned. 4. If necessary, adjust the rear splitter bracket (F). Make certain that entire splitter is in line with the saw blade. See figure 21A-2. 5. Recheck to make certain the splitter is still square to the saw table. If adjustments are necessary, see BLADE GUARD AND SPLITTER ASSEMBLY. LEITZ 10=INCH VARIABLE TOOTH SAW BLADE Key features of the Leitz Variable Pitch Saw Blade: 1. Longer blade life: Combining variable tooth patterns with noise reducing laser ornamentation can extend tool life 25% to 50%. 2. High cut quality: 41% improvement over standard blades in most materials. 3. Quiet Running: Noise reduction of 5dB to lOdB compared to standard saw blades. A lOdB is equivalent to a 50% reduction in noise level to the human ear. 4. Best Performance Value 5. Precision, laser cut steel body, best quality micrograin carbide, hand hammered (tuned) to industrybest tolerances. MITER GAUGE OPERATION AND ADJUSTMENT MAKE CERTAIN the table saw is disconnected from the power source when making adjustments. Figure 22=1 A B 2. Place a straight edge (C) along the left side of blade (D) and adjust the front splitter bracket to align the splitter (E) with the blade. See figure 21A-2. C 1. The miter gauge has adjustable positive stops at O-degree and plus or minus 45-degrees or it can be manually set at any angle between plus or minus 60-degrees. 2. To rotate miter gauge body (A), loosen knob (B) and pull out plunger (C) and rotate miter gauge body to desired angle and tighten knob. See figure 22-1. 32
-
 1
1 -
2
-
3
-
4
-
5
-
6
-
7
-
8
-
9
-
10
-
11
-
12
-
13
-
14
-
15
-
16
-
17
-
18
-
19
-
20
-
21
-
22
-
23
-
24
-
25
-
26
-
 27
27 -
 28
28 -
 29
29 -
 30
30 -
 31
31 -
 32
32 -
 33
33 -
 34
34 -
 35
35 -
 36
36 -
 37
37 -
38
-
39
-
40
-
41
-
42
-
43
-
44
-
45
-
46
-
47
-
48
-
49
-
50
-
51
-
52
-
53
-
54
-
55
-
56
-
57
-
58
-
59
-
60
-
61
-
62
-
63
-
64
-
65
-
66
-
67
-
68
-
69
-
70
-
71
-
72
-
73
-
74
-
75
-
76
-
77
-
78
-
79
-
80
-
81
-
82
-
83
-
84
-
85
-
86
-
87
-
88
 |
 |
