Craftsman 22124 Owners Manual - Page 35
Note:Thisblockallowsthecut-off
 |
View all Craftsman 22124 manuals
Add to My Manuals
Save this manual to your list of manuals |
Page 35 highlights
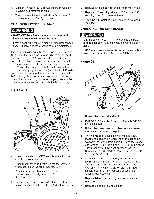
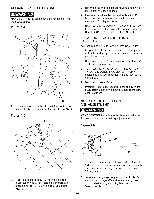
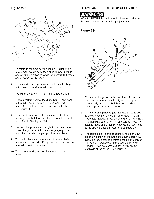
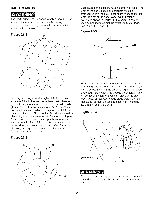
Whencross-cuttinagnumbeor f piecestothesame length,a blockofwoodcanbeclampedtothefence andusedas a cut-ofgf augeas shown.It is important thatthisblockof woodalwaysbepositionedinfrontof thesawbladeas shown.Oncethecut-offlengthis determineds,ecurethefenceandusethemitergauge tofeedtheworkintotheblade.Thisblockof wood allowsthecut-offpieceto movefreelyalongthetable surfacewithoutbindingbetweenthefenceandthesaw table,therebylesseningthepossibilitoyf kickbackand injuryto theoperator. Note:Thisblockallowsthecut-ofsf crappiecetomove freelyalongthetablesurfacewithoutbindingbetween thefenceandtheblade,therebylesseningthepossibilityofkickbackandinjuryto theoperator. 2. Oncethecut-offlengthis determinedlo, ckthe fenceandslidetheworkpieceacrossthetable surfaceuntilit contactstheblock.Usethe miter gauge(K)to feedtheworkpieceintotheblade. Toavoidkickbackwhenusingtheblock(F)asa cut-off gauge,it is veryimportantthatthe rearendoftheblock (G)bepositionedso theworkpiece(H)is clearofthe blockbeforeit entersthe bladed). Neverusethefence (J)as a cut-ofgf augewhencrosscuttingS.ee figure24-3 RIPPING NEVER stand in the line of the saw blade path when ripping. • ALWAYS keep hands and fingers away from the saw blade. Figure 25=1 1, With the workpiece clear of the saw blade, start the motor. 2. Place the workpiece on the saw table with the straight edge against the fence. 3. Advance the workpiece slowly, holding it down and against the fence, then into the saw blade. Note: The workpiece can be fed through the saw blade with one or two hands depending on the size. 4. Affter the workpiece is beyond the saw blade and anti-kickback fingers, you can remove your hand from the workpiece. When this is done, the workpiece will either stay on the table, tilt up slightly and be caught by the rear end of the guard, or slide off the table to the floor. Alternately, the feed can continue to the end of the table, after which the workpiece is lifted and brought back along the outside edge of the fence. 5. The cut-off part of the workpiece remains on the table and is not touched until the saw blade has come to a complete stop. CAUTION When ripping a workpiece longer than three feet, it is recommended that the workpiece be supported at the rear of the table saw to keep it from falling. A roller stand can be purchased to support long workpieces to the rear of a table saw. CAUTION If the workpiece is to be cut less than 4-inches wide, a push stick (E) or guide should always be used to keep your hands away from the saw blade. See figure 25-2. Figure 25=2 A C Ripping is the operation of making a cut with the grain of the workpiece; the rip fence (A) is used to position and guide the workpiece. Since the workpiece is pushed along the fence, it must have a straight edge and make solid contact with the saw table. The blade guard (B) and splitter assembly (C) must be used. The splitter has anti-kickback fingers (D) to prevent the workpiece from kicking back, and the splitter assembly to prevent the wood kerf from closing and binding on the blade. See figure 25-1. An accessory Craftsman Fence Guide can be purchased to assist when making narrow cuts. See "ACCESSORIES AND ATTACHMENTS" section in this manual. 35
-
 1
1 -
2
-
3
-
4
-
5
-
6
-
7
-
8
-
9
-
10
-
11
-
12
-
13
-
14
-
15
-
16
-
17
-
18
-
19
-
20
-
21
-
22
-
23
-
24
-
25
-
26
-
27
-
28
-
29
-
 30
30 -
 31
31 -
 32
32 -
 33
33 -
 34
34 -
 35
35 -
 36
36 -
 37
37 -
 38
38 -
 39
39 -
 40
40 -
41
-
42
-
43
-
44
-
45
-
46
-
47
-
48
-
49
-
50
-
51
-
52
-
53
-
54
-
55
-
56
-
57
-
58
-
59
-
60
-
61
-
62
-
63
-
64
-
65
-
66
-
67
-
68
-
69
-
70
-
71
-
72
-
73
-
74
-
75
-
76
-
77
-
78
-
79
-
80
-
81
-
82
-
83
-
84
-
85
-
86
-
87
-
88
 |
 |
