Craftsman 22124 Owners Manual - Page 22
Cursor, Outfeed, Table,
 |
View all Craftsman 22124 manuals
Add to My Manuals
Save this manual to your list of manuals |
Page 22 highlights
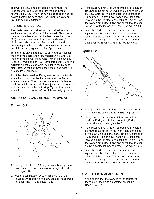
KNOB AND CURSOR ASSEMBLY OUTFEED TABLE ASSEMBLY Figure 11=9 D Figure 11=10 K K F I E D C F E G H G H Thread knob (A) onto fence locking handle (B). Turn knob clockwise to screw it onto threads of fence locking handle. See figure 11-9. 2, Align left fence side (C) at a distance from the right side (D) of the right miter gauge groove and lock the fence. 3, Use a measuring tape to measure the distance from the saw blade right side to the left fence side. 4, Assemble the cursor (E) to the right side of the fence cross arm (F) with two #10-32 x 3/8" round head screws and #10 flat washers (I). Do not completely tighten screws. 5, Align cursor with the guide tube measuring scale (H) so that the thin black line (G) is on the same number as the distance measured in Step 3. Tighten the cursor screws. 6, Remove fence from table and reposition it on left side of saw blade. Align right fence side at a distance from the left side of left miter gauge groove and lock the fence. 1, Attach support retainer (A) to the lower rear of the cabinet with two M6 x 25mm hex head screws, M6 lock washers and M6 flat washers. Do not completely tighten hardware. See figure 11-10. 2, Assemble the lower support (B) to the support retainer with one M6 x 35mm hex head screw and M6 Nylok hex nut. Be sure that the notch (H) in the lower support is facing up. Do not completely tighten hex nut. Allow lower support to move freely. See Figure 11-10 and 11-11. Figure 11=11 C G 7. Use a measuring tape to measure the distance from the saw blade left side to the right fence side. 8. Assemble the second cursor to left side of fence cross arm with two #10-32 x 3/8" round head screws and #10 flat washers. Do not completely tighten screws. / E 9. Align cursor with the guide tube measuring scale so that the thin black line is on the same number as the distance measured in Step 7. Tighten the cursor screws. 3, 22 Place clamp knob (C) through slot (D) of upper support assembly (E), making sure that the rounded corner (M) of the upper support is facing towards notch (H) in lower support. Thread clamp knob into threaded hole of lower support.
-
 1
1 -
2
-
3
-
4
-
5
-
6
-
7
-
8
-
9
-
10
-
11
-
12
-
13
-
14
-
15
-
16
-
 17
17 -
 18
18 -
 19
19 -
 20
20 -
 21
21 -
 22
22 -
 23
23 -
 24
24 -
 25
25 -
 26
26 -
 27
27 -
28
-
29
-
30
-
31
-
32
-
33
-
34
-
35
-
36
-
37
-
38
-
39
-
40
-
41
-
42
-
43
-
44
-
45
-
46
-
47
-
48
-
49
-
50
-
51
-
52
-
53
-
54
-
55
-
56
-
57
-
58
-
59
-
60
-
61
-
62
-
63
-
64
-
65
-
66
-
67
-
68
-
69
-
70
-
71
-
72
-
73
-
74
-
75
-
76
-
77
-
78
-
79
-
80
-
81
-
82
-
83
-
84
-
85
-
86
-
87
-
88
 |
 |
