Craftsman 24838 Operation Manual - Page 24
Tray To Tractor - snow blower
 |
View all Craftsman 24838 manuals
Add to My Manuals
Save this manual to your list of manuals |
Page 24 highlights
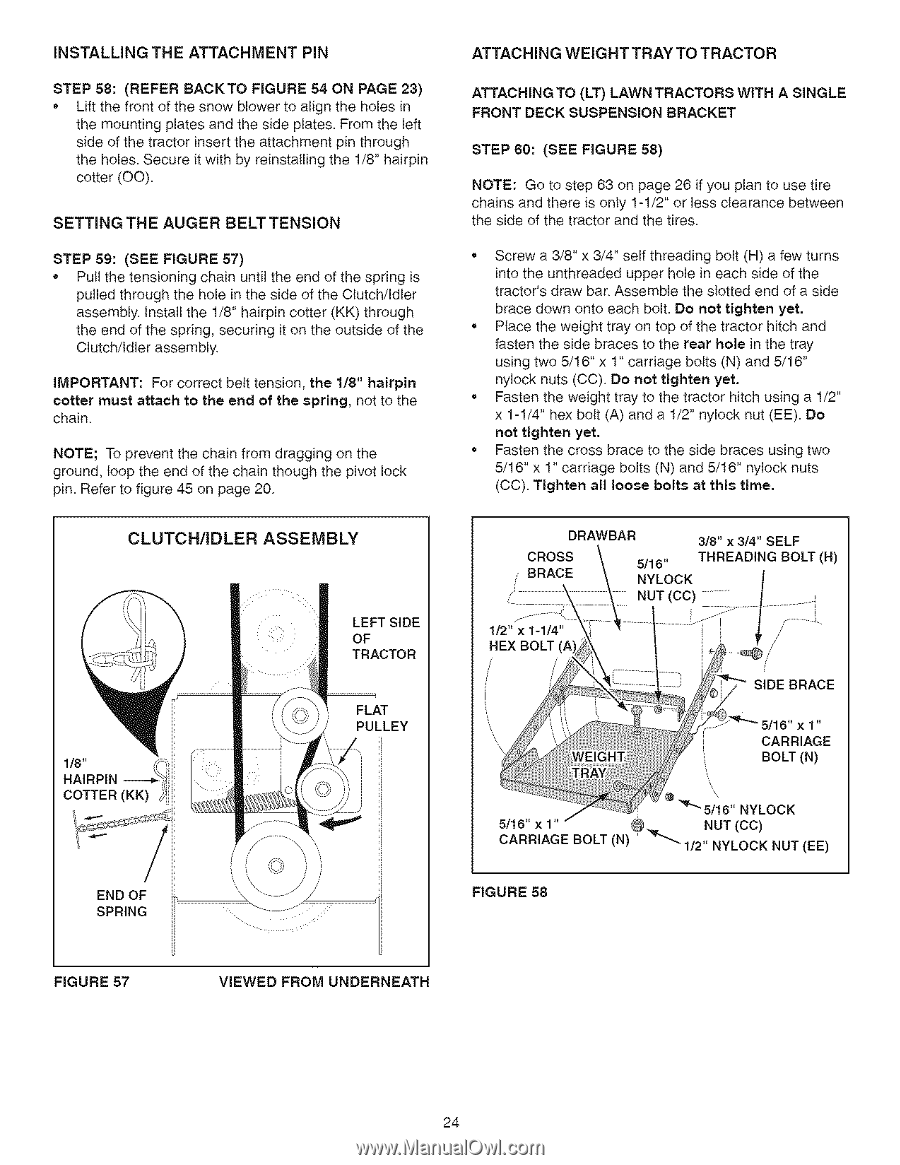
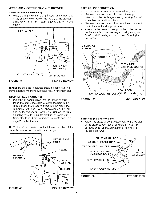
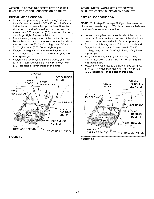
INSTALLING THE ATTACHMENT PIN STEP 88: (REFER SACKTO FIGURE 54 ON PAGE 23) * Lift the front of the snow blower to align the holes in the mounting plates and the side plates. From the left side of the tractor insert the attachment pin through the holes. Secure it with by reinstalling the 1/8" hairpin cotter (OO). SETTING THE AUGER BELT TENSION STEP 89: (SEE FIGURE 87) * Pull the tensioning chain until the end of the spring is pulled through the hole in the side of the C{utch/Idbr assembly install the 1/8" hairpin cotter (KK) through the end of the spring, securing it on the outside of the Clutch/Idler assembly IMPORTANT: For correct belt tension, the 1/8" hairpin cotter must attach to the end of the spring, not to the chain NOTE; To prevent the chain from dragging on the ground, loop the end of the chain though the pivot lock pin. Refer to figure 45 on page 20. CLUTCH/IDLER ASSEMBLY ATTACHING WEIGHT TRAY TO TRACTOR ATTACHING TO (LT) LAWN TRACTORS WITH A SINGLE FRONT DECK SUSPENSION BRACKET STEP 60: (SEE FIGURE 88) NOTE: Go to step 63 on page 28 if you plan to use tire chains and there is only 1-1/2" or less clearance between the side of the tractor and the tires. • Screw a 3/8" x 3/4" self threading bolt (H) a few turns into the unthreaded upper hob in each side of the tractor's draw bar Assemble the slotted end of a side brace down onto each bolt. Do not tighten yet. • Place the weight tray on top of the tractor hitch and fasten the side braces to the rear hole in the tray using two 5/16" x 1" carriage bolts (N) and 5/16" nylock nuts (CO) Do not tighten yet. • Fasten the weight tray to the tractor hitch using a 1/2" x 1-1/4" hex bolt (A) and a 1/2" nylock nut (EE). Do not tighten yet, • Fasten the cross brace to the side braces using two 5/16" x 1" carriage bolts (N) and 5/16" nylock nuts (CO). Tighten all loose bolts at this time, DRAWBAR 318" x 3/4" SELF 118" 2i; HA RP N ----_ ; COTTER (KK) [ LEFT SIDE OF TRACTOR FLAT PULLEY END OF SPRING FIGURE 57 VIEWED FROM UNDERNEATH CARRIAGE BOLT FIGURE 58 NUT (CC) 1/2" NYLOCK NUT (EE) 24
-
 1
1 -
2
-
3
-
4
-
5
-
6
-
7
-
8
-
9
-
10
-
11
-
12
-
13
-
14
-
15
-
16
-
17
-
18
-
 19
19 -
 20
20 -
 21
21 -
 22
22 -
 23
23 -
 24
24 -
 25
25 -
 26
26 -
 27
27 -
 28
28 -
 29
29 -
30
-
31
-
32
-
33
-
34
-
35
-
36
-
37
-
38
-
39
-
40
 |
 |