Dell 962 All In One Photo Printer Dell™ Photo Printer 540 Owner's Ma - Page 23
Examples, Choosing a Layout Option
 |
View all Dell 962 All In One Photo Printer manuals
Add to My Manuals
Save this manual to your list of manuals |
Page 23 highlights
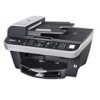
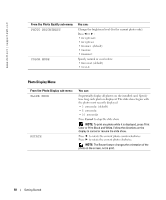
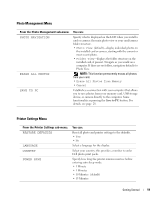
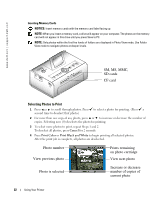
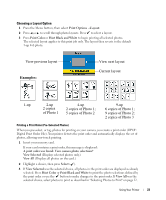
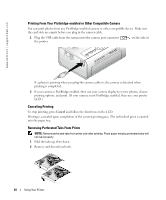
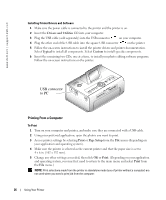
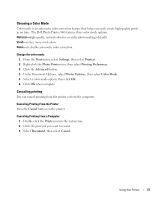
Choosing a Layout Option 1 Press the Menu button, then select Print Options →Layout. 2 Press or to scroll through photo layouts. Press to select a layout. 3 Press Print Color or Print Black and White to begin printing all selected photos. The selected layout applies to this print job only. The layout then reverts to the default 1-up 4x6 photo. View previous layout Examples: View next layout Current layout 1-up 2-up 4-up 9-up 2 copies 2 copies of Photo 1; 6 copies of Photo 1; of Photo 1 5 copies of Photo 2 9 copies of Photo 2; 2 copies of Photo 3 Printing a Print Order (Pre-Selected Photos) When you pre-select, or tag, photos for printing on your camera, you create a print order (DPOF: Digital Print Order File). Your printer detects the print order and automatically displays the set of photos, allowing one-touch printing. 1 Insert your memory card. If your card contains a print order, this message is displayed: A print order was found. View camera photo selections? View Selected (Displays selected photos only.) View All (Displays all photos on the card.) 2 Highlight a choice, then press Select ( ). 3 If View Selected was the selected choice, all photos in the print order are displayed as already selected. Press Print Color or Print Black and White to print the photo selections defined by the print order or use the button to make changes to the print order. If View All was the selected choice, select photos to print as described in "Selecting Photos to Print" on page 22. Using Your Printer 23
-
 1
1 -
2
-
3
-
4
-
5
-
6
-
7
-
8
-
9
-
10
-
11
-
12
-
13
-
14
-
15
-
16
-
17
-
 18
18 -
 19
19 -
 20
20 -
 21
21 -
 22
22 -
 23
23 -
 24
24 -
 25
25 -
 26
26 -
 27
27 -
 28
28 -
29
-
30
-
31
-
32
-
33
-
34
-
35
-
36
-
37
-
38
-
39
-
40
-
41
-
42
-
43
-
44
-
45
-
46
-
47
-
48
-
49
-
50
-
51
-
52
-
53
-
54
-
55
-
56
-
57
-
58
-
59
-
60
-
61
-
62
-
63
-
64
-
65
-
66
-
67
-
68
-
69
-
70
-
71
-
72
-
73
-
74
-
75
-
76
 |
 |