Dell B2360d Mono Laser Printer User Guide - Page 16
options in the printer driver to make them available for print jobs. For more information - drivers
 |
View all Dell B2360d Mono Laser Printer manuals
Add to My Manuals
Save this manual to your list of manuals |
Page 16 highlights
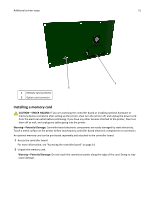
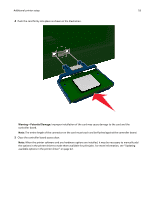
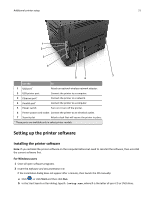
Additional printer setup 16 3 Align the notch (1) on the memory card with the ridge (2) on the connector. 1 2 4 Push the memory card straight into the connector, and then push the card toward the controller board wall until it clicks into place. 1 2 5 Close the controller board access door. Note: When the printer software and any hardware options are installed, it may be necessary to manually add the options in the printer driver to make them available for print jobs. For more information, see "Updating available options in the printer driver" on page 22.
-
 1
1 -
2
-
3
-
4
-
5
-
6
-
7
-
8
-
9
-
10
-
 11
11 -
 12
12 -
 13
13 -
 14
14 -
 15
15 -
 16
16 -
 17
17 -
 18
18 -
 19
19 -
 20
20 -
 21
21 -
22
-
23
-
24
-
25
-
26
-
27
-
28
-
29
-
30
-
31
-
32
-
33
-
34
-
35
-
36
-
37
-
38
-
39
-
40
-
41
-
42
-
43
-
44
-
45
-
46
-
47
-
48
-
49
-
50
-
51
-
52
-
53
-
54
-
55
-
56
-
57
-
58
-
59
-
60
-
61
-
62
-
63
-
64
-
65
-
66
-
67
-
68
-
69
-
70
-
71
-
72
-
73
-
74
-
75
-
76
-
77
-
78
-
79
-
80
-
81
-
82
-
83
-
84
-
85
-
86
-
87
-
88
-
89
-
90
-
91
-
92
-
93
-
94
-
95
-
96
-
97
-
98
-
99
-
100
-
101
-
102
-
103
-
104
-
105
-
106
-
107
-
108
-
109
-
110
-
111
-
112
-
113
-
114
-
115
-
116
-
117
-
118
-
119
-
120
-
121
-
122
-
123
-
124
-
125
-
126
-
127
-
128
-
129
-
130
-
131
-
132
-
133
-
134
-
135
-
136
-
137
-
138
-
139
-
140
-
141
-
142
-
143
-
144
-
145
-
146
-
147
-
148
-
149
-
150
-
151
-
152
-
153
-
154
-
155
-
156
-
157
-
158
 |
 |

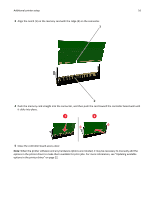
3
Align the notch (1) on the memory card with the ridge (2) on the connector.
1
2
4
Push the memory card straight into the connector, and then push the card toward the controller board wall until
it
clicks
into place.
1
2
5
Close the controller board access door.
Note:
When the printer software and any hardware options are installed, it may be necessary to manually add the
options in the printer driver to make them available for print jobs. For more information, see “Updating available
options in the printer driver” on page 22.
Additional printer setup
16