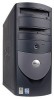
Dell GX260 Service Manual - Page 2
Before You Begin: Dell OptiPlex GX260 Service Manual, Getting Started, Precautionary Measures
 |
UPC - 683728163389
View all Dell GX260 manuals
Add to My Manuals
Save this manual to your list of manuals |
Page 2 highlights
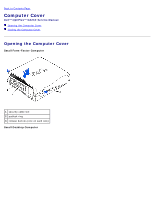
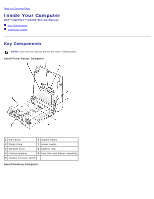
Back to Contents Page Before You Begin Dell™ OptiPlex™ GX260 Service Manual Getting Started Recommended Tools Precautionary Measures Protecting Against Electrostatic Discharge Getting Started This section provides procedures for removing and replacing the components, assemblies, and subassemblies in the Dell™ OptiPlex™ GX260 small form-factor, small desktop, and small mini-tower computers. Unless otherwise noted, each procedure assumes that the following conditions exist: You have performed the steps in "Precautionary Measures." You have opened the computer cover. Recommended Tools The GX260 computer is primarily a tool-less one, but certain procedures (such as removing the heat-sink blower or the control panel) require the use of one or more of the following tools: Small flat-blade screwdriver #1 and #2 Phillips-head screwdrivers An 8-inch, #2 Phillips-head screwdriver Also, Dell recommends that you use a wrist grounding strap as explained in "Precautionary Measures." Precautionary Measures Use the following safety guidelines to help protect your computer from potential damage and to ensure your own personal safety. CAUTION: Do not attempt to service the computer yourself, except as explained in your online Dell documentation or otherwise provided to you. Always follow installation and service instructions closely. NOTICE: To help avoid possible damage to the system board, wait 5 seconds (or wait until the standby light is extinguished) after turning off the computer and unplugging the power cord before removing a component from the system board or disconnecting a device from the computer. Before you start to work on the computer, perform the following steps in the sequence listed: 1. Perform an orderly computer shutdown using the operating system menu. 2. Turn off the computer and all attached devices. 3. Ground yourself by touching an unpainted metal surface on the chassis, such as the metal around the card-slot openings at the back of the computer, before touching anything inside your computer. While you work, periodically touch an unpainted metal surface on the computer chassis to dissipate any static electricity
-
 1
1 -
 2
2 -
 3
3 -
 4
4 -
 5
5 -
 6
6 -
 7
7 -
 8
8 -
9
-
10
-
11
-
12
-
13
-
14
-
15
-
16
-
17
-
18
-
19
-
20
-
21
-
22
-
23
-
24
-
25
-
26
-
27
-
28
-
29
-
30
-
31
-
32
-
33
-
34
-
35
-
36
-
37
-
38
-
39
-
40
-
41
-
42
-
43
-
44
-
45
-
46
-
47
-
48
-
49
-
50
-
51
-
52
-
53
-
54
-
55
-
56
-
57
-
58
-
59
-
60
-
61
-
62
-
63
-
64
-
65
-
66
-
67
-
68
-
69
-
70
-
71
-
72
-
73
-
74
-
75
-
76
-
77
-
78
-
79
-
80
-
81
-
82
-
83
-
84
-
85
-
86
-
87
-
88
-
89
-
90
-
91
-
92
-
93
-
94
-
95
-
96
-
97
-
98
-
99
-
100
 |
 |