Dell GX260 Service Manual - Page 82
board and drives. It is important to route these cables properly when you replace them to prevent them from being
 |
UPC - 683728163389
View all Dell GX260 manuals
Add to My Manuals
Save this manual to your list of manuals |
Page 82 highlights
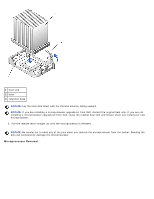
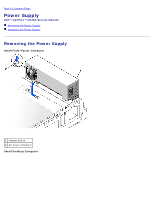
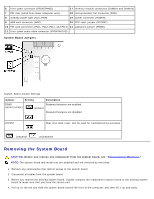
1 release button 2 AC power connector Small Mini-Tower Computer 1. Disconnect the AC power cable from the back of the power supply. 2. Disconnect the DC power cables from the system board and the drives. Note the routing of the DC power cables underneath the clips in the computer as you remove them from the system board and drives. It is important to route these cables properly when you replace them to prevent them from being
-
 1
1 -
2
-
3
-
4
-
5
-
6
-
7
-
8
-
9
-
10
-
11
-
12
-
13
-
14
-
15
-
16
-
17
-
18
-
19
-
20
-
21
-
22
-
23
-
24
-
25
-
26
-
27
-
28
-
29
-
30
-
31
-
32
-
33
-
34
-
35
-
36
-
37
-
38
-
39
-
40
-
41
-
42
-
43
-
44
-
45
-
46
-
47
-
48
-
49
-
50
-
51
-
52
-
53
-
54
-
55
-
56
-
57
-
58
-
59
-
60
-
61
-
62
-
63
-
64
-
65
-
66
-
67
-
68
-
69
-
70
-
71
-
72
-
73
-
74
-
75
-
76
-
 77
77 -
 78
78 -
 79
79 -
 80
80 -
 81
81 -
 82
82 -
 83
83 -
 84
84 -
 85
85 -
 86
86 -
 87
87 -
88
-
89
-
90
-
91
-
92
-
93
-
94
-
95
-
96
-
97
-
98
-
99
-
100
 |
 |

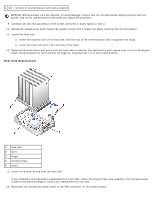
1
release button
2
AC power connector
Small Mini-Tower Computer
1. Disconnect the AC power cable from the back of the power supply.
2. Disconnect the DC power cables from the system board and the drives.
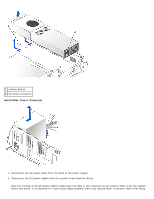
Note the routing of the DC power cables underneath the clips in the computer as you remove them from the system
board and drives. It is important to route these cables properly when you replace them to prevent them from being