Dell GX260 Service Manual - Page 40
Installing a Floppy Drive, Removing the Floppy Drive, Attaching the Floppy-Drive Cable
 |
UPC - 683728163389
View all Dell GX260 manuals
Add to My Manuals
Save this manual to your list of manuals |
Page 40 highlights
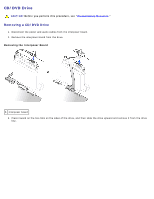
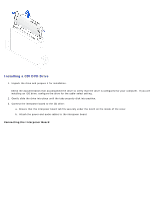
out of the sled. Removing the Floppy Drive 1 sled tab 2 sled Installing a Floppy Drive 1. Snap the replacement drive into the sled and ensure that it is secure in the sled. 2. Connect the interposer board to the floppy drive. a. Slide the floppy-drive cable into the connector. b. Close the lever so that the cable is secure in the connector. c. Line up the hole on the bottom of the interposer board with the notch on the connector, and snap the interposer board onto the drive. 3. Gently slide the drive into the computer until the tabs securely click into position. Attaching the Floppy-Drive Cable
-
 1
1 -
2
-
3
-
4
-
5
-
6
-
7
-
8
-
9
-
10
-
11
-
12
-
13
-
14
-
15
-
16
-
17
-
18
-
19
-
20
-
21
-
22
-
23
-
24
-
25
-
26
-
27
-
28
-
29
-
30
-
31
-
32
-
33
-
34
-
 35
35 -
 36
36 -
 37
37 -
 38
38 -
 39
39 -
 40
40 -
 41
41 -
 42
42 -
 43
43 -
 44
44 -
 45
45 -
46
-
47
-
48
-
49
-
50
-
51
-
52
-
53
-
54
-
55
-
56
-
57
-
58
-
59
-
60
-
61
-
62
-
63
-
64
-
65
-
66
-
67
-
68
-
69
-
70
-
71
-
72
-
73
-
74
-
75
-
76
-
77
-
78
-
79
-
80
-
81
-
82
-
83
-
84
-
85
-
86
-
87
-
88
-
89
-
90
-
91
-
92
-
93
-
94
-
95
-
96
-
97
-
98
-
99
-
100
 |
 |

out of the sled.
Removing the Floppy Drive
1
sled tab
2
sled
Installing a Floppy Drive
1. Snap the replacement drive into the sled and ensure that it is secure in the sled.
2. Connect the interposer board to the floppy drive.
a. Slide the floppy-drive cable into the connector.
b. Close the lever so that the cable is secure in the connector.
c. Line up the hole on the bottom of the interposer board with the notch on the connector, and snap the interposer
board onto the drive.
3. Gently slide the drive into the computer until the tabs securely click into position.
Attaching the Floppy-Drive Cable