Dell GX260 Service Manual - Page 43
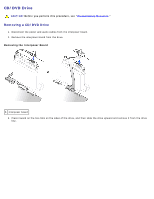
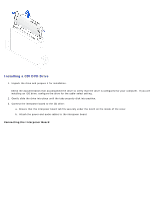
Installing a CD/DVD Drive, Connecting the Interposer Board
 |
UPC - 683728163389
View all Dell GX260 manuals
Add to My Manuals
Save this manual to your list of manuals |
Page 43 highlights
Installing a CD/DVD Drive 1. Unpack the drive and prepare it for installation. Check the documentation that accompanied the drive to verify that the drive is configured for your computer. If you are installing an IDE drive, configure the drive for the cable-select setting. 2. Gently slide the drive into place until the tabs securely click into position. 3. Connect the interposer board to the CD drive: a. Ensure that the interposer board tab fits securely under the notch on the inside of the cover. b. Attach the power and audio cables to the interposer board. Connecting the Interposer Board
-
 1
1 -
2
-
3
-
4
-
5
-
6
-
7
-
8
-
9
-
10
-
11
-
12
-
13
-
14
-
15
-
16
-
17
-
18
-
19
-
20
-
21
-
22
-
23
-
24
-
25
-
26
-
27
-
28
-
29
-
30
-
31
-
32
-
33
-
34
-
35
-
36
-
37
-
 38
38 -
 39
39 -
 40
40 -
 41
41 -
 42
42 -
 43
43 -
 44
44 -
 45
45 -
 46
46 -
 47
47 -
 48
48 -
49
-
50
-
51
-
52
-
53
-
54
-
55
-
56
-
57
-
58
-
59
-
60
-
61
-
62
-
63
-
64
-
65
-
66
-
67
-
68
-
69
-
70
-
71
-
72
-
73
-
74
-
75
-
76
-
77
-
78
-
79
-
80
-
81
-
82
-
83
-
84
-
85
-
86
-
87
-
88
-
89
-
90
-
91
-
92
-
93
-
94
-
95
-
96
-
97
-
98
-
99
-
100
 |
 |

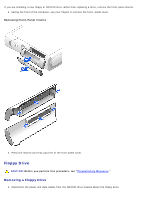
Installing a CD/DVD Drive
1. Unpack the drive and prepare it for installation.
Check the documentation that accompanied the drive to verify that the drive is configured for your computer. If you are
installing an IDE drive, configure the drive for the cable-select setting.
2. Gently slide the drive into place until the tabs securely click into position.
3. Connect the interposer board to the CD drive:
a. Ensure that the interposer board tab fits securely under the notch on the inside of the cover.
b. Attach the power and audio cables to the interposer board.
Connecting the Interposer Board