Dell Latitude XT User's Guide - Page 157
Main Battery - hard drive replacement
 |
View all Dell Latitude XT manuals
Add to My Manuals
Save this manual to your list of manuals |
Page 157 highlights
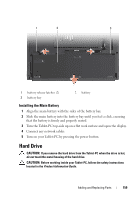
3 If the Tablet-PC is connected to a docking device (docked), undock it. See "Undocking Your Tablet-PC From the Media Base" on page 212, or "Undocking Your Tablet-PC From the Battery Slice" on page 220. NOTICE: To disconnect a network cable, first unplug the cable from your Tablet-PC and then unplug the cable from the network device. 4 Disconnect all network cables from the Tablet-PC. 5 Disconnect your Tablet-PC and all attached devices from their electrical outlets. 6 Close the display and turn the Tablet-PC upside-down on a flat work surface. NOTICE: To avoid damaging the system board, you must remove the main battery before you service the Tablet-PC. 7 Remove the main battery (see "Removing the Main Battery" on page 158). 8 Turn the Tablet-PC top-side up. 9 Open the display. 10 Press the power button to ground the system board. CAUTION: To guard against electrical shock, always unplug your Tablet-PC from the electrical outlet before opening the display. NOTICE: Before touching anything inside your Tablet-PC, ground yourself by touching an unpainted metal surface, such as the metal at the back of the Tablet-PC. While you work, periodically touch an unpainted metal surface to dissipate static electricity, which could harm internal components. 11 Remove any installed ExpressCards or Smart Cards from the appropriate slots (see "Removing an ExpressCard" on page 91). 12 Remove the hard drive (see "Removing the Hard Drive" on page 160). Main Battery CAUTION: Before you begin any of the procedures in this section, follow the safety instructions in the Product Information Guide. NOTICE: Only a certified service technician should perform repairs on your Tablet-PC. Damage due to servicing that is not authorized by Dell is not covered by your warranty. Adding and Replacing Parts 157
-
 1
1 -
2
-
3
-
4
-
5
-
6
-
7
-
8
-
9
-
10
-
11
-
12
-
13
-
14
-
15
-
16
-
17
-
18
-
19
-
20
-
21
-
22
-
23
-
24
-
25
-
26
-
27
-
28
-
29
-
30
-
31
-
32
-
33
-
34
-
35
-
36
-
37
-
38
-
39
-
40
-
41
-
42
-
43
-
44
-
45
-
46
-
47
-
48
-
49
-
50
-
51
-
52
-
53
-
54
-
55
-
56
-
57
-
58
-
59
-
60
-
61
-
62
-
63
-
64
-
65
-
66
-
67
-
68
-
69
-
70
-
71
-
72
-
73
-
74
-
75
-
76
-
77
-
78
-
79
-
80
-
81
-
82
-
83
-
84
-
85
-
86
-
87
-
88
-
89
-
90
-
91
-
92
-
93
-
94
-
95
-
96
-
97
-
98
-
99
-
100
-
101
-
102
-
103
-
104
-
105
-
106
-
107
-
108
-
109
-
110
-
111
-
112
-
113
-
114
-
115
-
116
-
117
-
118
-
119
-
120
-
121
-
122
-
123
-
124
-
125
-
126
-
127
-
128
-
129
-
130
-
131
-
132
-
133
-
134
-
135
-
136
-
137
-
138
-
139
-
140
-
141
-
142
-
143
-
144
-
145
-
146
-
147
-
148
-
149
-
150
-
151
-
 152
152 -
 153
153 -
 154
154 -
 155
155 -
 156
156 -
 157
157 -
 158
158 -
 159
159 -
 160
160 -
 161
161 -
 162
162 -
163
-
164
-
165
-
166
-
167
-
168
-
169
-
170
-
171
-
172
-
173
-
174
-
175
-
176
-
177
-
178
-
179
-
180
-
181
-
182
-
183
-
184
-
185
-
186
-
187
-
188
-
189
-
190
-
191
-
192
-
193
-
194
-
195
-
196
-
197
-
198
-
199
-
200
-
201
-
202
-
203
-
204
-
205
-
206
-
207
-
208
-
209
-
210
-
211
-
212
-
213
-
214
-
215
-
216
-
217
-
218
-
219
-
220
-
221
-
222
-
223
-
224
-
225
-
226
-
227
-
228
-
229
-
230
-
231
-
232
-
233
-
234
-
235
-
236
-
237
-
238
-
239
-
240
-
241
-
242
-
243
-
244
-
245
-
246
-
247
-
248
 |
 |
