Dell Latitude XT User's Guide - Page 162
Subscriber Identity Module (SIM) Card, Removing the SIM Card
 |
View all Dell Latitude XT manuals
Add to My Manuals
Save this manual to your list of manuals |
Page 162 highlights
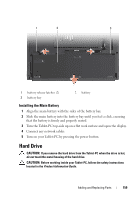
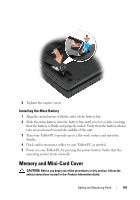
NOTICE: When the hard drive is not in the Tablet-PC, store it in protective antistatic packaging. See "Protecting Against Electrostatic Discharge" in the Product Information Guide. 2 Remove the new drive from its packaging. Save the original packaging for storing or shipping the hard drive. NOTICE: Use firm and even pressure to slide the drive into place. If you use excessive force, you may damage the connector. 3 Place the hard drive into the hard drive bay, seating it firmly between the hard drive alignment ribs in the base. 4 Connect the hard drive cable to the system board connector. 5 Insert the two metal tabs of the metal bracket under the metal clips in the hard drive bay, then lower the bracket down over the hard drive. 6 Tighten the two captive screws on the metal bracket. 7 Use the Operating System media to install the operating system for your Tablet-PC. (See "Using the Operating System Media" on page 151.) 8 Use the Drivers and Utilities media to install the drivers and utilities for your Tablet-PC. (See "Using the Drivers and Utilities Media" on page 147). Subscriber Identity Module (SIM) Card NOTICE: To protect the SIM card from electrostatic discharge (ESD), do not touch the SIM card connector. Also, take care when removing the card to slide the card completely out of the metal tabs before lifting the card out of the slot. The card is brittle and may easily break. NOTE: The SIM card is located in the battery bay. You must remove the main battery before you can access the SIM card. Removing the SIM Card 1 Follow the procedures in "Before You Begin" on page 155. 2 Push in the SIM card, then release the card. 3 Pull the SIM card from the SIM card slot and place it to one side. 162 Adding and Replacing Parts
-
 1
1 -
2
-
3
-
4
-
5
-
6
-
7
-
8
-
9
-
10
-
11
-
12
-
13
-
14
-
15
-
16
-
17
-
18
-
19
-
20
-
21
-
22
-
23
-
24
-
25
-
26
-
27
-
28
-
29
-
30
-
31
-
32
-
33
-
34
-
35
-
36
-
37
-
38
-
39
-
40
-
41
-
42
-
43
-
44
-
45
-
46
-
47
-
48
-
49
-
50
-
51
-
52
-
53
-
54
-
55
-
56
-
57
-
58
-
59
-
60
-
61
-
62
-
63
-
64
-
65
-
66
-
67
-
68
-
69
-
70
-
71
-
72
-
73
-
74
-
75
-
76
-
77
-
78
-
79
-
80
-
81
-
82
-
83
-
84
-
85
-
86
-
87
-
88
-
89
-
90
-
91
-
92
-
93
-
94
-
95
-
96
-
97
-
98
-
99
-
100
-
101
-
102
-
103
-
104
-
105
-
106
-
107
-
108
-
109
-
110
-
111
-
112
-
113
-
114
-
115
-
116
-
117
-
118
-
119
-
120
-
121
-
122
-
123
-
124
-
125
-
126
-
127
-
128
-
129
-
130
-
131
-
132
-
133
-
134
-
135
-
136
-
137
-
138
-
139
-
140
-
141
-
142
-
143
-
144
-
145
-
146
-
147
-
148
-
149
-
150
-
151
-
152
-
153
-
154
-
155
-
156
-
 157
157 -
 158
158 -
 159
159 -
 160
160 -
 161
161 -
 162
162 -
 163
163 -
 164
164 -
 165
165 -
 166
166 -
 167
167 -
168
-
169
-
170
-
171
-
172
-
173
-
174
-
175
-
176
-
177
-
178
-
179
-
180
-
181
-
182
-
183
-
184
-
185
-
186
-
187
-
188
-
189
-
190
-
191
-
192
-
193
-
194
-
195
-
196
-
197
-
198
-
199
-
200
-
201
-
202
-
203
-
204
-
205
-
206
-
207
-
208
-
209
-
210
-
211
-
212
-
213
-
214
-
215
-
216
-
217
-
218
-
219
-
220
-
221
-
222
-
223
-
224
-
225
-
226
-
227
-
228
-
229
-
230
-
231
-
232
-
233
-
234
-
235
-
236
-
237
-
238
-
239
-
240
-
241
-
242
-
243
-
244
-
245
-
246
-
247
-
248
 |
 |