Dell OptiPlex GX240 User's Guide - Page 125
Adding a Second Hard Drive - Small Mini-Tower Computer
 |
View all Dell OptiPlex GX240 manuals
Add to My Manuals
Save this manual to your list of manuals |
Page 125 highlights
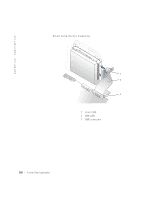
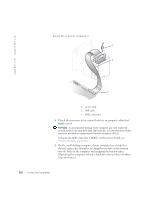
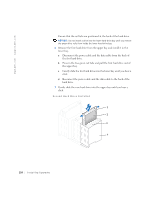
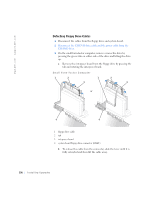
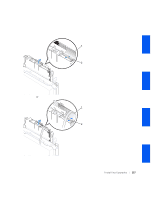
4 Close the computer cover, reconnect your computer and devices to their electrical outlets, and turn them on. 5 If the drive you just installed is the primary drive, insert a bootable floppy into drive A. 6 Turn on the computer. 7 Enter system setup, and update the appropriate Primary Drive option (0 or 1). 8 Exit system setup, and reboot the computer. 9 Partition and logically format your drive before you proceed to the next step. See the documentation for your operating system for instructions. 10 Test the hard drive by running the Dell Diagnostics. 11 If the drive you just installed is the primary drive, install your operating system on the hard drive. For instructions, see the documentation that came with your operating system. Adding a Second Hard Drive - Small Mini-Tower Computer NOTICE: Ground yourself by touching an unpainted metal surface on the back of the chassis. NOTICE: When you unpack the drive, do not set it on a hard surface, which may damage the drive. Instead, set the drive on a surface, such as a foam pad, that sufficiently cushions it. 1 Unpack the drive, and prepare it for installation. 2 Check the documentation for the drive to verify that it is configured for your computer. 3 Open the computer cover. 4 Remove the two green plastic drive rails inside the lower hard-drive bay. These rails are not attached to the inside of the hard-drive bay with screws. To remove the rails, gently pull the rails up and out of the bay. 5 Attach the rails to the hard drive using the two screws attached to the rails. Installing Upgrades 123
-
 1
1 -
2
-
3
-
4
-
5
-
6
-
7
-
8
-
9
-
10
-
11
-
12
-
13
-
14
-
15
-
16
-
17
-
18
-
19
-
20
-
21
-
22
-
23
-
24
-
25
-
26
-
27
-
28
-
29
-
30
-
31
-
32
-
33
-
34
-
35
-
36
-
37
-
38
-
39
-
40
-
41
-
42
-
43
-
44
-
45
-
46
-
47
-
48
-
49
-
50
-
51
-
52
-
53
-
54
-
55
-
56
-
57
-
58
-
59
-
60
-
61
-
62
-
63
-
64
-
65
-
66
-
67
-
68
-
69
-
70
-
71
-
72
-
73
-
74
-
75
-
76
-
77
-
78
-
79
-
80
-
81
-
82
-
83
-
84
-
85
-
86
-
87
-
88
-
89
-
90
-
91
-
92
-
93
-
94
-
95
-
96
-
97
-
98
-
99
-
100
-
101
-
102
-
103
-
104
-
105
-
106
-
107
-
108
-
109
-
110
-
111
-
112
-
113
-
114
-
115
-
116
-
117
-
118
-
119
-
 120
120 -
 121
121 -
 122
122 -
 123
123 -
 124
124 -
 125
125 -
 126
126 -
 127
127 -
 128
128 -
 129
129 -
 130
130 -
131
-
132
-
133
-
134
-
135
-
136
-
137
-
138
-
139
-
140
-
141
-
142
-
143
-
144
-
145
-
146
-
147
-
148
-
149
-
150
-
151
-
152
-
153
-
154
-
155
-
156
-
157
-
158
-
159
-
160
-
161
-
162
-
163
-
164
-
165
-
166
-
167
-
168
-
169
-
170
-
171
-
172
-
173
-
174
-
175
-
176
-
177
-
178
-
179
-
180
-
181
-
182
-
183
-
184
-
185
-
186
-
187
-
188
-
189
-
190
-
191
-
192
-
193
-
194
-
195
-
196
-
197
-
198
-
199
-
200
-
201
-
202
-
203
-
204
-
205
-
206
-
207
-
208
-
209
-
210
-
211
-
212
-
213
-
214
-
215
-
216
-
217
-
218
-
219
-
220
-
221
-
222
-
223
-
224
-
225
-
226
-
227
-
228
-
229
-
230
-
231
-
232
-
233
-
234
-
235
-
236
-
237
-
238
-
239
-
240
-
241
-
242
-
243
-
244
-
245
-
246
-
247
-
248
-
249
-
250
-
251
-
252
-
253
-
254
-
255
-
256
-
257
-
258
-
259
-
260
-
261
-
262
-
263
-
264
-
265
-
266
-
267
-
268
-
269
-
270
-
271
-
272
-
273
-
274
-
275
-
276
-
277
-
278
-
279
-
280
-
281
-
282
-
283
-
284
-
285
-
286
-
287
-
288
-
289
-
290
-
291
-
292
-
293
-
294
-
295
-
296
-
297
-
298
 |
 |