Dell PowerConnect OpenManage Network Manager Quick Reference Guide 4.4 - Page 17
New / Edit Authentication, Options, Select Devices for Discovery. Click
 |
View all Dell PowerConnect OpenManage Network Manager manuals
Add to My Manuals
Save this manual to your list of manuals |
Page 17 highlights
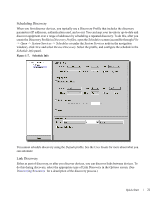
and click Apply. Then click Add to add the address(es) to the processing queue, or click Remove to delete a previously created range you selected. You can add several such criteria. NOTE: If you are managing in a DNS / DHCP environment, be sure to select Manage by Hostname in the Options tab. For this to be effective, however, the association between hostname and the correct IP address for the discovered equipment must be accurate. 2. New / Edit Authentication. You can select authentication(s) to go with a selected discovery target with the checkboxes that appear in the list of existing authentications in the Select Authentication panel. In addition, you can Add or Edit authentications to associate with that target. When you Add an authentication, or Edit an existing one, an authentication editor opens in the bottom of the screen. Select or create the Name for the authentication, and select the Type from the pick list. See the Administration Section for details about what to expect for the different types. NOTE: Ensure the type selected matches the management interface on the equipment you want to discover. You can use some single authentications in different types, for example: Telnet and SSH. Notice that you can also alter the Timeout, Retries, and Port for the authentication at the bottom of this screen, so the authentication fits with your network's connection speed. 3. Select Devices for Discovery. Click Apply to accept your authentication, then click Apply on the initial screen to accept the combination of device(s) and authentications. The screen then displays the discovery target devices and authentications you have selected and configured. You can Add more devices with that button to the right of the list, or Edit a selected target to reconfigure the authentication. Doing so opens the Select Network Type and Address screen again. Click Remove to delete a listed target, and use the up/down/top/bottom buttons to re-order selected targets. After you have configured this tab, you can configure global discovery Options with that tab, click the Inspect button or click the Discover button 4. Options. This screen lets you configure a variety of global discovery options for the targets configured in the Discovery tab. NOTE: In addition to discovering devices by themselves, you can now discover links between them as an activity that follows discovering the devices. Click the checkbox next to the link discovery task appropriate to your network in the lower part of this screen to do link discovery too. (See Link Discovery for an alternative) Consult the User Guide or online help for details about the options available in the upper portion of this screen. Quick Start 17
-
 1
1 -
2
-
3
-
4
-
5
-
6
-
7
-
8
-
9
-
10
-
11
-
 12
12 -
 13
13 -
 14
14 -
 15
15 -
 16
16 -
 17
17 -
 18
18 -
 19
19 -
 20
20 -
 21
21 -
 22
22 -
23
-
24
-
25
-
26
-
27
-
28
-
29
-
30
-
31
-
32
-
33
-
34
-
35
-
36
-
37
-
38
-
39
-
40
-
41
-
42
-
43
-
44
-
45
-
46
-
47
-
48
-
49
-
50
 |
 |