Dell PowerConnect OpenManage Network Manager Quick Reference Guide 4.4 - Page 24
ICMP Monitor, Custom Monitor, Creating a Custom Monitor, Show Performance
 |
View all Dell PowerConnect OpenManage Network Manager manuals
Add to My Manuals
Save this manual to your list of manuals |
Page 24 highlights
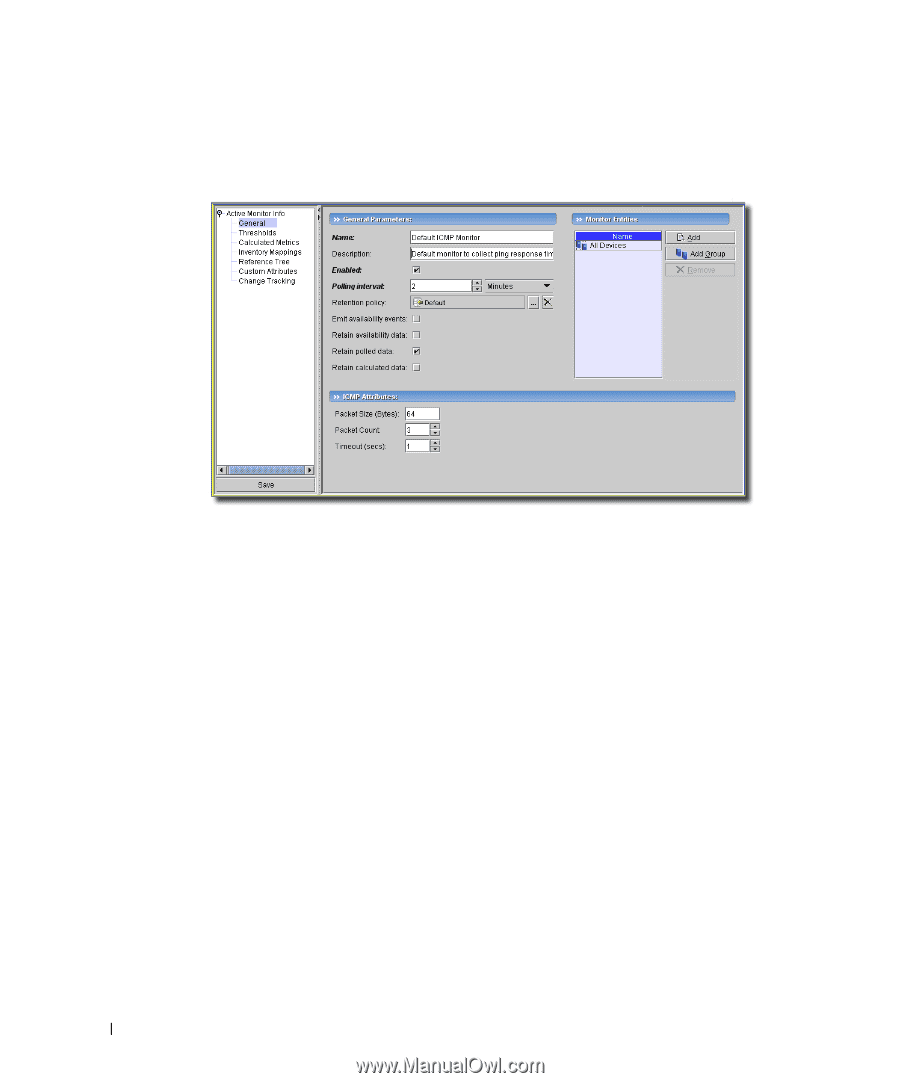
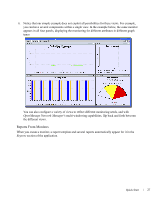
ICMP Monitor The default ICMP Monitor reports on ping response times for all devices. Figure 1:9. Default ICMP Monitor The default sends three 64 byte packets every second to the All Devices group. Custom Monitor To set up a custom performance monitor, follow these steps: 1. Creating a Custom Monitor 2. Show Performance 3. Install a Monitor in the View Creating a Custom Monitor 1. Open the Active Monitoring -> Monitor manager, and create a new monitor with action -> New. 2. Select the type of monitor in the next screen. For this example, we create an SNMP Interfaces: Performance Monitor - All monitor. Consult the online help for more specific instructions about other types of monitors. This type comes with the application, and can be modified. 3. In the General screen, enter a name (here "TestMonitor"), check Enabled, enter a polling interval (here 1 minute, the default). For this example, check Retain polled data and accept the remaining defaults for checkboxes and the retention policy. You can accept the default SNMP Attributes, or alter them to include fewer or more attributes (click Add or Remove next to the attributes). For the sake of this example, we accept the default list of attributes to monitor. 24 Quick Start
-
 1
1 -
2
-
3
-
4
-
5
-
6
-
7
-
8
-
9
-
10
-
11
-
12
-
13
-
14
-
15
-
16
-
17
-
18
-
 19
19 -
 20
20 -
 21
21 -
 22
22 -
 23
23 -
 24
24 -
 25
25 -
 26
26 -
 27
27 -
 28
28 -
 29
29 -
30
-
31
-
32
-
33
-
34
-
35
-
36
-
37
-
38
-
39
-
40
-
41
-
42
-
43
-
44
-
45
-
46
-
47
-
48
-
49
-
50
 |
 |