Dell PowerConnect W Clearpass 100 Software Cisco WLC Integration Guide - Page 11
Step 5, Create PreAuthentication Access Control List Pre Auth ACL
 |
View all Dell PowerConnect W Clearpass 100 Software manuals
Add to My Manuals
Save this manual to your list of manuals |
Page 11 highlights
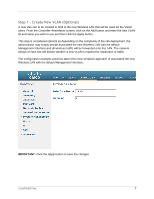
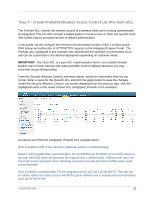
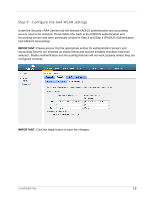
Step 5 - Create PreAuthentication Access Control List (Pre Auth ACL) The PreAuth ACL controls the network access of a wireless visitor prior to being authenticated by Amigopod. This can often include a walled garden of local servers or other site specific hosts that Guests may be permitted access to without authentication. In this guide, we will configure the minimum recommended number of ACLs to allow proper DNS lookup and redirection of HTTP/HTTPS requests to the Amigopod Captive Portal. The PreAuth ACL configured in this example only represented the minimum recommended ACLs and can be customized to the desired deployment depending on customer needs. IMPORTANT: The Cisco ACL is a pure ACL implementation and is not a stateful firewall. Explicit rules for both inbound and outbound traffic must be defined otherwise you may encounter issues during testing. From the SecurityAccess Control Lists menu option, select the New button from the top corner. Enter a name for the PreAuth ACL and click the Apply button to save the changes. Under the SecurityAccess Control Lists screen displayed from the previous step, click the highlighted name of the newly created ACL (Amigopod_PreAuth in the example). As can be seen from the Amigopod_PreAuth ACL example above: Rule 1 enables ICMP in any direction (Optional, good for troubleshooting) Rules 2 and 3 enable DNS communication TO and FROM port 53 (DNS) of your DNS server to any port (the DNS client will generate the request from a random port). Without both rules, the client will receive a browser error indicating a timeout occurred and that the DNS name could not be resolved. Rule 4 enables communication TO the amigopod server (10.162.110.13) NOTE: This rule can be further refined to restrict access FROM the guest network and or include protocol restrictions such as HTTP/HTTPS. CONFIDENTIAL 11
-
 1
1 -
2
-
3
-
4
-
5
-
 6
6 -
 7
7 -
 8
8 -
 9
9 -
 10
10 -
 11
11 -
 12
12 -
 13
13 -
 14
14 -
 15
15 -
 16
16 -
17
-
18
-
19
-
20
-
21
-
22
-
23
-
24
-
25
-
26
-
27
-
28
 |
 |
