Dell PowerConnect W-Series FIPS Dell PowerConnect W-600 Controller Series Secu - Page 41
Setup and Configuration, Setting Up Your Controller, Enabling FIPS Mode - compliance
 |
View all Dell PowerConnect W-Series FIPS manuals
Add to My Manuals
Save this manual to your list of manuals |
Page 41 highlights
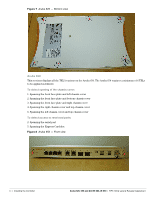
Chapter 5 Setup and Configuration The Aruba 620 and 650 Mobility Controllers meet FIPS 140-2 Level 2 requirements. The sections below describe how to place and keep the switch in FIPS-approved mode of operation. The Crypto Officer (CO) must ensure that the switch is kept in a FIPS-approved mode of operation. The switch can operate in two modes: the FIPS-approved mode, and the standard non-FIPS mode. By default, the switch operates in non-FIPS mode. Setting Up Your Controller To set up your controller: 1. Make sure that the controller is not connected to any device on your network. 2. Boot up the controller. 3. Connect your PC or workstation to a line port on the controller. For further details, see the ArubaOS 6.1 Quick Start Guide. Enabling FIPS Mode For FIPS compliance, users cannot be allowed to access the switch until the CO changes the mode of operation to FIPS mode. There are two ways to enable FIPS mode: Use the WebUI Use the Setup Wizard Enabling FIPS with the Setup Wizard The Setup Wizard allows you to configure access to the controller, install software licenses, and configure wireless local area networks (WLANs) for internal or guest users. The Setup Wizard is available the first time you connect to and log into the controller or whenever the controller is reset to its factory default configuration. After you complete the Setup Wizard, the controller reboots using the new configuration information you entered. For details on running the Setup Wizard, see the ArubaOS 6.1 Quick Start Guide. Enabling FIPS with the WebUI The default IP address of the controller is 172.16.0.254. When you connect a PC or workstation to a line port on the controller, you can connect to this IP address through a Web browser. The system must be configured to either obtain its IP address via DHCP or have a static IP address on the 172.16.0.0/24 subnetwork. To log in with the WebUI: 1. Open a Web browser and connect to http://172.16.0.254. 2. Log in. 3. Go to the Configuration > Network > Controller > System Settings page (the default page when you click the Configuration tab). Aruba 620, 650 and Dell W-620, W-650 | FIPS 140-2 Level 2 Release Supplement Setup and Configuration | 39
-
 1
1 -
2
-
3
-
4
-
5
-
6
-
7
-
8
-
9
-
10
-
11
-
12
-
13
-
14
-
15
-
16
-
17
-
18
-
19
-
20
-
21
-
22
-
23
-
24
-
25
-
26
-
27
-
28
-
29
-
30
-
31
-
32
-
33
-
34
-
35
-
 36
36 -
 37
37 -
 38
38 -
 39
39 -
 40
40 -
 41
41 -
 42
42
 |
 |
