Dell PowerEdge 4350 Dell PowerEdge 4350 System Upgrade Installation Guide - Page 10
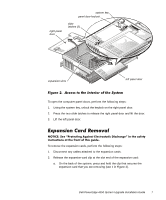
provides access to the expansion slots; the left panel door opens to the processor
 |
View all Dell PowerEdge 4350 manuals
Add to My Manuals
Save this manual to your list of manuals |
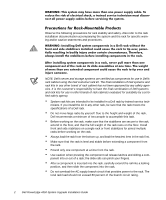
Page 10 highlights
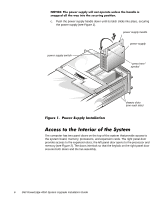
c. Push the power supply handle down until its latch clicks into place, securing the power supply (see Figure 1). power supply handle power supply power supply switch "press here" symbol chassis slots (one each side) The computer has two panel doors on the top of the system that provide access to the system board, memory, processors, and expansion cards. The right panel door provides access to the expansion slots; the left panel door opens to the processor and memory (see Figure 2). The doors interlock so that the keylock on the right panel door secures both doors and the fan assembly. 6 Dell PowerEdge 4350 System Upgrade Installation Guide
-
 1
1 -
2
-
3
-
4
-
 5
5 -
 6
6 -
 7
7 -
 8
8 -
 9
9 -
 10
10 -
 11
11 -
 12
12 -
 13
13 -
 14
14 -
 15
15 -
16
-
17
-
18
-
19
-
20
-
21
-
22
-
23
-
24
-
25
-
26
-
27
-
28
-
29
-
30
-
31
-
32
-
33
-
34
 |
 |

6
Dell PowerEdge 4350 System Upgrade Installation Guide
127,&(±²7KH²SRZHU²VXSSO\²ZLOO²QRW²RSHUDWH²XQOHVV²WKH²KDQGOH²LV²
VQDSSHG²DOO²WKH²ZD\²LQWR²WKH²VHFXULQJ²SRVLWLRQ³
c.
Push the power supply handle down until its latch clicks into place, securing
the power supply (see Figure 1).
)LJXUH²º»²²3RZHU²6XSSO\²,QVWDOODWLRQ²
$FFHVV²WR²WKH²,QWHULRU²RI²WKH²6\VWHP
The computer has two panel doors on the top of the system that provide access to
the system board, memory, processors, and expansion cards. The right panel door
provides access to the expansion slots; the left panel door opens to the processor and
memory (see Figure 2). The doors interlock so that the keylock on the right panel door
secures both doors and the fan assembly.
power supply handle
power supply
chassis slots
(one each side)
power supply switch
“press here”
symbol