Dell PowerEdge 4350 Dell PowerEdge 4350 System Upgrade Installation Guide - Page 19
Dell PowerEdge 4350 System Upgrade Installation Guide
 |
View all Dell PowerEdge 4350 manuals
Add to My Manuals
Save this manual to your list of manuals |
Page 19 highlights
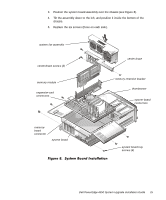
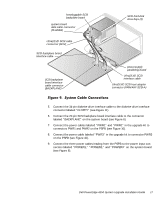
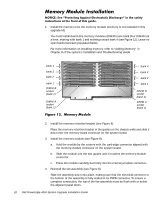
3. Position the system board assembly over the chassis (see Figure 8). 4. Tilt the assembly down to the left, and position it inside the bottom of the chassis. 5. Replace the six screws (three on each side). system fan assembly center-brace screws (3) memory module expansion-card connectors center brace memory retention bracket thumbscrew system-board connectors memoryboard connector system board system board tray screws (6) Dell PowerEdge 4350 System Upgrade Installation Guide 15
-
 1
1 -
2
-
3
-
4
-
5
-
6
-
7
-
8
-
9
-
10
-
11
-
12
-
13
-
 14
14 -
 15
15 -
 16
16 -
 17
17 -
 18
18 -
 19
19 -
 20
20 -
 21
21 -
 22
22 -
 23
23 -
 24
24 -
25
-
26
-
27
-
28
-
29
-
30
-
31
-
32
-
33
-
34
 |
 |

Dell PowerEdge 4350 System Upgrade Installation Guide
15
3.
Position the system board assembly over the chassis (see Figure 8).
4.
Tilt the assembly down to the left, and position it inside the bottom of the
chassis.
5.
Replace the six screws (three on each side).
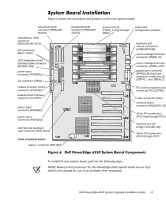
)LJXUH²À»²²6\VWHP²%RDUG²,QVWDOODWLRQ
system board
memory module
memory retention bracket
thumbscrew
center brace
system fan assembly
center-brace screws (3)
system board tray
screws (6)
system-board
connectors
expansion-card
connectors
memory-
board
connector