Dell PowerEdge 4350 Dell PowerEdge 4350 System Upgrade Installation Guide - Page 27
NOTE: Install a filler bracket over an empty expansion slot to maintain Federal Com
 |
View all Dell PowerEdge 4350 manuals
Add to My Manuals
Save this manual to your list of manuals |
Page 27 highlights
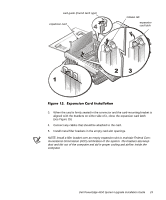
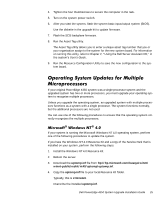
card guide (thumb latch type) expansion card release tab expansion card latch 3. When the card is firmly seated in the connector and the card-mounting bracket is aligned with the brackets on either side of it, close the expansion card latch (see Figure 15). 4. Connect any cables that should be attached to the card. 5. Install metal filler brackets in the empty card-slot openings. NOTE: Install a filler bracket over an empty expansion slot to maintain Federal Communications Commission (FCC) certification of the system. The brackets also keep dust and dirt out of the computer and aid in proper cooling and airflow inside the computer. Dell PowerEdge 4350 System Upgrade Installation Guide 23
-
 1
1 -
2
-
3
-
4
-
5
-
6
-
7
-
8
-
9
-
10
-
11
-
12
-
13
-
14
-
15
-
16
-
17
-
18
-
19
-
20
-
21
-
 22
22 -
 23
23 -
 24
24 -
 25
25 -
 26
26 -
 27
27 -
 28
28 -
 29
29 -
 30
30 -
 31
31 -
 32
32 -
33
-
34
 |
 |

Dell PowerEdge 4350 System Upgrade Installation Guide
23
)LJXUH²º¶»²²([SDQVLRQ²&DUG²,QVWDOODWLRQ²
3.
When the card is firmly seated in the connector and the card-mounting bracket is
aligned with the brackets on either side of it, close the expansion card latch
(see Figure 15).
4.
Connect any cables that should be attached to the card.
5.
Install metal filler brackets in the empty card-slot openings.
NOTE: Install a filler bracket over an empty expansion slot to maintain Federal Com-
munications Commission (FCC) certification of the system. The brackets also keep
dust and dirt out of the computer and aid in proper cooling and airflow inside the
computer.
expansion card
release tab
expansion
card latch
card guide (thumb latch type)