Dell PowerEdge 4350 Dell PowerEdge 4350 System Upgrade Installation Guide - Page 11
Sdqvlrq²&dug²5hprydo²
 |
View all Dell PowerEdge 4350 manuals
Add to My Manuals
Save this manual to your list of manuals |
Page 11 highlights
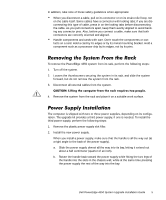
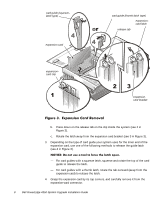
right panel door system key panel door keylock slide latches (2) expansion slots left panel door To open the computer panel doors, perform the following steps: 1. Using the system key, unlock the keylock on the right panel door. 2. Press the two slide latches to release the right panel door and lift the door. 3. Lift the left panel door. To remove the expansion cards, perform the following steps: 1. Disconnect any cables attached to the expansion cards. 2. Release the expansion-card clip at the slot end of the expansion card: a. On the back of the system, press and hold the clip that secures the expansion card that you are removing (see 1 in Figure 3). Dell PowerEdge 4350 System Upgrade Installation Guide 7
-
 1
1 -
2
-
3
-
4
-
5
-
 6
6 -
 7
7 -
 8
8 -
 9
9 -
 10
10 -
 11
11 -
 12
12 -
 13
13 -
 14
14 -
 15
15 -
 16
16 -
17
-
18
-
19
-
20
-
21
-
22
-
23
-
24
-
25
-
26
-
27
-
28
-
29
-
30
-
31
-
32
-
33
-
34
 |
 |

Dell PowerEdge 4350 System Upgrade Installation Guide
7
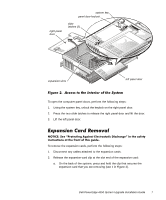
)LJXUH²¼»²²$FFHVV²WR²WKH²,QWHULRU²RI²WKH²6\VWHP²
To open the computer panel doors, perform the following steps:
1.
Using the system key, unlock the keylock on the right panel door.
2.
Press the two slide latches to release the right panel door and lift the door.
3.
Lift the left panel door.
([SDQVLRQ²&DUG²5HPRYDO²
127,&(±²6HH²·3URWHFWLQJ²$JDLQVW²(OHFWURVWDWLF²’LVFKDUJHΜ²LQ²WKH²VDIHW\²
LQVWUXFWLRQV²DW²WKH²IURQW²RI²WKLV²JXLGH³
To remove the expansion cards, perform the following steps:
1.
Disconnect any cables attached to the expansion cards.
2.
Release the expansion-card clip at the slot end of the expansion card:
a.
On the back of the system, press and hold the clip that secures the
expansion card that you are removing (see 1 in Figure 3).
left panel door
panel door keylock
slide
latches (2)
right panel
door
expansion slots
system key