Dell Precision R7610 Dell Precision Workstation R7610 Owner's Manual - Page 97
Installing the System Board
 |
View all Dell Precision R7610 manuals
Add to My Manuals
Save this manual to your list of manuals |
Page 97 highlights
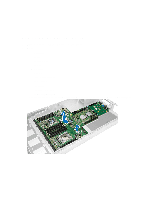
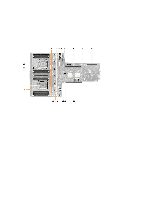
Installing the System Board 1. Place the system board on the chassis. 2. Slide the system board towards the back of the computer. 3. Press the blue release tab. 4. Install: - power distribution unit - expansion card cages - fan bracket - memory - processor - heat sink - front-chassis assembly - cooling shroud - cover - front bezel 5. Follow the procedures in After Working Inside Your Computer. 44 97
-
 1
1 -
2
-
3
-
4
-
5
-
6
-
7
-
8
-
9
-
10
-
11
-
12
-
13
-
14
-
15
-
16
-
17
-
18
-
19
-
20
-
21
-
22
-
23
-
24
-
25
-
26
-
27
-
28
-
29
-
30
-
31
-
32
-
33
-
34
-
35
-
36
-
37
-
38
-
39
-
40
-
41
-
42
-
43
-
44
-
45
-
46
-
47
-
48
-
49
-
50
-
51
-
52
-
53
-
54
-
55
-
56
-
57
-
58
-
59
-
60
-
61
-
62
-
63
-
64
-
65
-
66
-
67
-
68
-
69
-
70
-
71
-
72
-
73
-
74
-
75
-
76
-
77
-
78
-
79
-
80
-
81
-
82
-
83
-
84
-
85
-
86
-
87
-
88
-
89
-
90
-
91
-
 92
92 -
 93
93 -
 94
94 -
 95
95 -
 96
96 -
 97
97 -
 98
98 -
 99
99 -
 100
100 -
 101
101 -
 102
102 -
103
-
104
-
105
-
106
-
107
-
108
-
109
-
110
-
111
-
112
-
113
-
114
-
115
-
116
-
117
-
118
-
119
-
120
-
121
-
122
-
123
 |
 |

44
Installing the System Board
1.
Place the system board on the chassis.
2.
Slide the system board towards the back of the computer.
3.
Press the blue release tab.
4.
Install:
–
power distribution unit
–
expansion card cages
–
fan bracket
–
memory
–
processor
–
heat sink
–
front-chassis assembly
–
cooling shroud
–
cover
–
front bezel
5.
Follow the procedures in
After Working Inside Your Computer
.
97