Dell S4112F EMC S4112–ON Series Installation Guide October 2021 - Page 21
Half RU front-rack installation
 |
View all Dell S4112F manuals
Add to My Manuals
Save this manual to your list of manuals |
Page 21 highlights
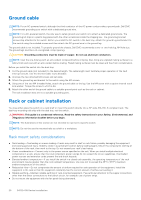
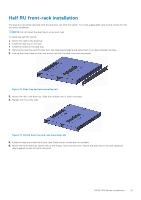
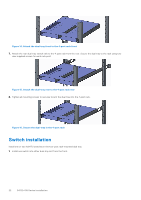
Half RU front-rack installation The dual-tray mounting rails ship with the dual tray, not with the switch. You must supply eight rack-mount screws for this four-post installation. NOTE: Do not install the dual tray in a two-post rack. To install the half-RU switch: ● Attach the rails to the dual tray. ● Install the dual tray in the rack. ● Install the switch in the dual tray. 1. Remove the dual tray and the rails from the shipping packaging and place them on a clean antistatic surface. 2. Line up the three holes on the inner switch rail with the dual-tray mounting heads. Figure 12. Dual-tray and rack mounting rail 3. Attach the rail to the dual tray. Slide the rail back until it locks into place. 4. Repeat with the other side. Figure 13. Attach dual-tray and rack mounting rails 5. Install the dual tray inside the 4-post rack. Rack mount screws are not included. 6. Attach the front dual-tray switch rails to the 4-post rack from the front. Secure the dual tray to the rack using two user-supplied screws for each rack post. S4112-ON Series installation 21
-
 1
1 -
2
-
3
-
4
-
5
-
6
-
7
-
8
-
9
-
10
-
11
-
12
-
13
-
14
-
15
-
 16
16 -
 17
17 -
 18
18 -
 19
19 -
 20
20 -
 21
21 -
 22
22 -
 23
23 -
 24
24 -
 25
25 -
 26
26 -
27
-
28
-
29
-
30
-
31
-
32
-
33
-
34
-
35
-
36
-
37
-
38
-
39
-
40
-
41
-
42
 |
 |
