Dell S4112F EMC S4112–ON Series Installation Guide October 2021 - Page 23
Switch removal, Install an S4112-ON Series switch, Dual-tray stop feature
 |
View all Dell S4112F manuals
Add to My Manuals
Save this manual to your list of manuals |
Page 23 highlights
Figure 17. Install an S4112-ON Series switch The switch is fully inserted when it hits the stop feature on the dual tray. The front switch latch snaps the switch into place. Figure 18. Dual-tray stop feature 2. If you are installing two switches, insert the second switch in the open dual-tray slot. Switch removal Remove the switch from the dual tray from the front of the four-post rack. Push in the front switch latches according to the latch arrows and pull out the switch. Figure 19. S4112-ON Series release latches S4112-ON Series installation 23
-
 1
1 -
2
-
3
-
4
-
5
-
6
-
7
-
8
-
9
-
10
-
11
-
12
-
13
-
14
-
15
-
16
-
17
-
 18
18 -
 19
19 -
 20
20 -
 21
21 -
 22
22 -
 23
23 -
 24
24 -
 25
25 -
 26
26 -
 27
27 -
 28
28 -
29
-
30
-
31
-
32
-
33
-
34
-
35
-
36
-
37
-
38
-
39
-
40
-
41
-
42
 |
 |

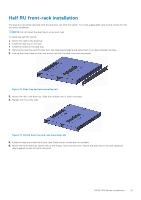
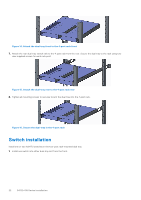
Figure 17. Install an S4112-ON Series switch
The switch is fully inserted when it hits the stop feature on the dual tray. The front switch latch snaps the switch into place.
Figure 18. Dual-tray stop feature
2.
If you are installing two switches, insert the second switch in the open dual-tray slot.
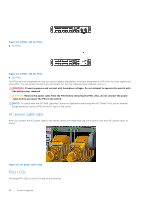
Switch removal
Remove the switch from the dual tray from the front of the four-post rack.
Push in the front switch latches according to the latch arrows and pull out the switch.
Figure 19. S4112-ON Series release latches
S4112–ON Series installation
23