Dell XPS 400 Owner's Manual - Page 104
Installing a CD/DVD Drive, If you are installing a new drive
 |
View all Dell XPS 400 manuals
Add to My Manuals
Save this manual to your list of manuals |
Page 104 highlights
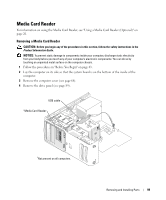
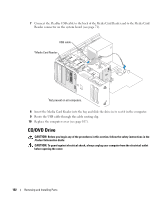
4 Slide the drive release mechanism to the right to release the shoulder screw and slide the drive out to remove it from the drive bay. Installing a CD/DVD Drive 1 If you are installing a new drive, unpack the drive and prepare it for installation. Check the documentation that accompanied the drive to verify that the drive is configured for your computer. If you are installing an IDE drive, configure the drive for the cable select setting. 2 If you are installing a new drive, remove the three shoulder screws from the inside of the drivepanel insert and attach the screws to the new drive. CD/DVD drive 104 Removing and Installing Parts shoulder screws (3)
-
 1
1 -
2
-
3
-
4
-
5
-
6
-
7
-
8
-
9
-
10
-
11
-
12
-
13
-
14
-
15
-
16
-
17
-
18
-
19
-
20
-
21
-
22
-
23
-
24
-
25
-
26
-
27
-
28
-
29
-
30
-
31
-
32
-
33
-
34
-
35
-
36
-
37
-
38
-
39
-
40
-
41
-
42
-
43
-
44
-
45
-
46
-
47
-
48
-
49
-
50
-
51
-
52
-
53
-
54
-
55
-
56
-
57
-
58
-
59
-
60
-
61
-
62
-
63
-
64
-
65
-
66
-
67
-
68
-
69
-
70
-
71
-
72
-
73
-
74
-
75
-
76
-
77
-
78
-
79
-
80
-
81
-
82
-
83
-
84
-
85
-
86
-
87
-
88
-
89
-
90
-
91
-
92
-
93
-
94
-
95
-
96
-
97
-
98
-
 99
99 -
 100
100 -
 101
101 -
 102
102 -
 103
103 -
 104
104 -
 105
105 -
 106
106 -
 107
107 -
 108
108 -
 109
109 -
110
-
111
-
112
-
113
-
114
-
115
-
116
-
117
-
118
-
119
-
120
-
121
-
122
-
123
-
124
-
125
-
126
-
127
-
128
-
129
-
130
-
131
-
132
-
133
-
134
-
135
-
136
-
137
-
138
-
139
-
140
-
141
-
142
-
143
-
144
-
145
-
146
-
147
-
148
 |
 |

104
Removing and Installing Parts
4
Slide the drive release mechanism to the right to release the shoulder screw and slide the drive
out to remove it from the drive bay.
Installing a CD/DVD Drive
1
If you are installing a new drive, unpack the drive and prepare it for installation.
Check the documentation that accompanied the drive to verify that the drive is configured
for your computer. If you are installing an IDE drive, configure the drive for the cable select
setting.
2
If you are installing a new drive, remove the three shoulder screws from the inside of the drive-
panel insert and attach the screws to the new drive.
CD/DVD drive
shoulder screws (3)