Dell XPS 400 Owner's Manual - Page 91
Replacing the Drive Panel, Align the drive panel tabs with the side-door hinges.
 |
View all Dell XPS 400 manuals
Add to My Manuals
Save this manual to your list of manuals |
Page 91 highlights
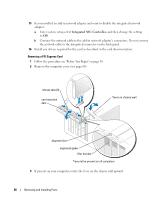
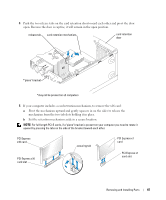
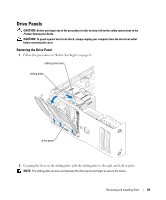
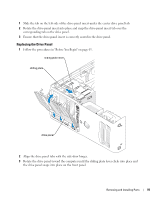
1 Slide the tab on the left side of the drive-panel insert under the center drive panel tab. 2 Rotate the drive-panel insert into place and snap the drive-panel insert tab over the corresponding tab on the drive panel. 3 Ensure that the drive-panel insert is correctly seated in the drive panel. Replacing the Drive Panel 1 Follow the procedures in "Before You Begin" on page 63. sliding plate lever sliding plate drive panel 2 Align the drive panel tabs with the side-door hinges. 3 Rotate the drive panel toward the computer until the sliding plate lever clicks into place and the drive panel snaps into place on the front panel. Removing and Installing Parts 91
-
 1
1 -
2
-
3
-
4
-
5
-
6
-
7
-
8
-
9
-
10
-
11
-
12
-
13
-
14
-
15
-
16
-
17
-
18
-
19
-
20
-
21
-
22
-
23
-
24
-
25
-
26
-
27
-
28
-
29
-
30
-
31
-
32
-
33
-
34
-
35
-
36
-
37
-
38
-
39
-
40
-
41
-
42
-
43
-
44
-
45
-
46
-
47
-
48
-
49
-
50
-
51
-
52
-
53
-
54
-
55
-
56
-
57
-
58
-
59
-
60
-
61
-
62
-
63
-
64
-
65
-
66
-
67
-
68
-
69
-
70
-
71
-
72
-
73
-
74
-
75
-
76
-
77
-
78
-
79
-
80
-
81
-
82
-
83
-
84
-
85
-
 86
86 -
 87
87 -
 88
88 -
 89
89 -
 90
90 -
 91
91 -
 92
92 -
 93
93 -
 94
94 -
 95
95 -
 96
96 -
97
-
98
-
99
-
100
-
101
-
102
-
103
-
104
-
105
-
106
-
107
-
108
-
109
-
110
-
111
-
112
-
113
-
114
-
115
-
116
-
117
-
118
-
119
-
120
-
121
-
122
-
123
-
124
-
125
-
126
-
127
-
128
-
129
-
130
-
131
-
132
-
133
-
134
-
135
-
136
-
137
-
138
-
139
-
140
-
141
-
142
-
143
-
144
-
145
-
146
-
147
-
148
 |
 |

Removing and Installing Parts
91
1
Slide the tab on the left side of the drive-panel insert under the center drive panel tab.
2
Rotate the drive-panel insert into place and snap the drive-panel insert tab over the
corresponding tab on the drive panel.
3
Ensure that the drive-panel insert is correctly seated in the drive panel.
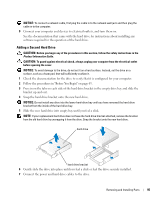
Replacing the Drive Panel
1
Follow the procedures in "Before You Begin" on page63.
2
Align the drive panel tabs with the side-door hinges.
3
Rotate the drive panel toward the computer until the sliding plate lever clicks into place and
the drive panel snaps into place on the front panel.
drive panel
sliding plate
sliding plate lever