Electrolux EI30EF4CQS Complete Owner's Guide (English) - Page 35
Setting self-clean, IMPORTANT
 |
View all Electrolux EI30EF4CQS manuals
Add to My Manuals
Save this manual to your list of manuals |
Page 35 highlights
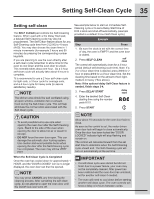
Setting Self-Clean Cycle 35 Setting self-clean The SELF CLEAN pad controls the Self-Cleaning feature. When used with a the Delay Start pad, a delayed Self-Cleaning cycle may also be programmed. The Self Clean feature allows for any Self-Cleaning cycle time from 2 (2:00) to 4 hours (4:00). You may also choose the clean time in 1 minute increments (for example 2 hours and 50 minutes) by pressing the corresponding number keypads. If you are planning to use the oven directly after a self-clean cycle remember to allow time for the oven to cool down and the oven door to unlock. This normally takes about one hour. So a 3 hour self-clean cycle will actually take about 4 hours to complete. *It is recommend to use a 2 hour self-clean cycle for light soils, a 3 hour cycle for average soils, and a 4 hour cycle for heavy soils (to assure satisfactory results). NOTE The kitchen area should be well ventilated using an open window, ventilation fan or exhaust hood during the Self-Clean cycle. This will help eliminate the normal odors associated with the Self-Clean cycle. • To avoid possible burns use care when opening the oven door after the Self-Cleaning cycle. Stand to the side of the oven when opening the door to allow hot air or steam to escape. • DO NOT force the oven door open. This can damage the automatic door locking system. Use caution and avoid possible burns when opening the door after the Self-Cleaning cycle has completed. The oven may still be VERY HOT. When the Self-Clean Cycle is Completed Once the oven has cooled down for approximately 1 HOUR, and the "DOOR LOCKED" icon is no longer displayed, the oven door can then be opened. NOTE You may press CANCEL any time during the cleaning process. After cancelling the self-clean cycle, do not attempt to open the oven door until the DOOR lock icon turns off. See example below to start an immediate SelfCleaning cycle or to set a Delay Start time of 8:00 o'clock and shut-off automatically (example provided is a default 3 hour Self-Clean cycle) Example Step Press 1. Be sure the clock is set with the correct time of day, the oven is EMPTY and the oven door is closed. 2. Press SELF CLEAN The control will automatically clean for a 3 hour period (default self-cleaning cycle time). Note: If a 2 or 4 hour clean time is desired, press 2 0 0 for 2 hour or press 4 0 0 for a 4 hour clean time. Set the cleaning time based on the amount of soil: light, medium or heavy (*See above). Note: If the optional delay Self-Clean feature is needed, finish steps 3-4. 3. Press DELAY START 4. Enter the desired Self-Clean starting time using the number pads 8 0 0. 5. Press START NOTE Allow about 15 seconds for the oven door lock to close. As soon as the control is set, the motor driven oven door lock will begin to close automatically. Once the door has been locked the "DOOR LOCKED" indicator light will stop flashing and remain on. The control will calculate forward from the set start time to determine when the Self-Cleaning cycle should end. The Self-Cleaning cycle will turn on automatically at the set time. IMPORTANT • If a self-clean cycle was started but did not finish due to a power failure, your oven may not be completely cleaned. After power has been restored and the oven door has unlocked, set for another self-clean if needed. • The oven will need to cool down before starting another self-clean cycle. The oven controls will force a delay of 4 hours between cycles.
-
 1
1 -
2
-
3
-
4
-
5
-
6
-
7
-
8
-
9
-
10
-
11
-
12
-
13
-
14
-
15
-
16
-
17
-
18
-
19
-
20
-
21
-
22
-
23
-
24
-
25
-
26
-
27
-
28
-
29
-
 30
30 -
 31
31 -
 32
32 -
 33
33 -
 34
34 -
 35
35 -
 36
36 -
 37
37 -
 38
38 -
 39
39 -
 40
40 -
41
-
42
-
43
-
44
-
45
-
46
-
47
-
48
 |
 |
