Electrolux EI30IF40LS Complete Owner's Guide (English) - Page 14
Before Setting Oven Controls
 |
View all Electrolux EI30IF40LS manuals
Add to My Manuals
Save this manual to your list of manuals |
Page 14 highlights
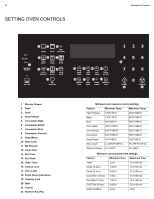
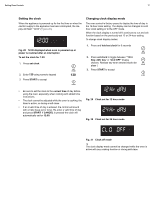
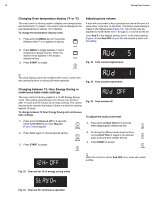
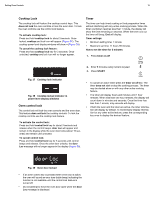
14 BEFORE SETTING OVEN CONTROLS Oven racks Always use potholders or oven mitts when removing food or adjusting the oven racks. Wait until the oven has completely cooled if possible. Oven racks may be very hot and may cause burns. Air circulation in the oven For best air circulation when baking, allow a space of 2-4 inches (5-10 cm) around the cookware for proper air circulation. Be sure pans and cookware do not touch each other, the oven door, sides or back of the oven cavity. Hot air must be able to circulate around cookware for even heat to reach the food. The oven vent is located under the left side of the control panel. When the oven is operational, warm air will pass through this vent for proper air circulation and provide good baking results in the upper oven. Do not block this vent. Types of oven racks Your appliance may be equipped with any one or more of the following rack types. flat oven rack Figure 21: Flat rack for most baking oven vent location offset oven rack Figure 20: Oven vent Removing and replacing flat or offset oven racks • To remove - pull the oven rack straight forward until it reaches the stop position. Lift up front of oven rack slightly and slide out. • To replace - place the oven rack on the rack guides on the oven walls. Tilt the front of the rack upward slightly and slide the oven rack back into place. Flat oven racks may be used for most cooking needs and may be placed in most oven rack positions.(Figure 21) The offset oven rack (Figure 22) provides additional step down positions from the standard flat rack design. The offset design positions the base of the rack about 1/2 of a rack position lower than the flat rack and may be used in most oven rack positions. The fully extendable Luxury-Glide™ oven rack (Figure 23) allows you to effortlessly extend your food away from the oven. See Removing and Replacing the Luxury-Glide™ Oven Racks for instructions. The bottom oven rack (Figure 24) is used on the lowest rack position to maximize space for baking or roasting large cuts of meat. Figure 22: Offset to provide extra space for some foods Fully extendable Luxury-Glide™ oven rack Figure 23: Luxury Glide rack bottom oven rack Figure 24: Bottom oven rack for extra large food items
-
 1
1 -
2
-
3
-
4
-
5
-
6
-
7
-
8
-
 9
9 -
 10
10 -
 11
11 -
 12
12 -
 13
13 -
 14
14 -
 15
15 -
 16
16 -
 17
17 -
 18
18 -
 19
19 -
20
-
21
-
22
-
23
-
24
-
25
-
26
-
27
-
28
-
29
-
30
-
31
-
32
-
33
-
34
-
35
-
36
-
37
-
38
-
39
-
40
-
41
-
42
-
43
-
44
-
45
-
46
-
47
 |
 |
