Electrolux EI30IF40LS Complete Owner's Guide (English) - Page 25
Broil, Recommended broiling times
 |
View all Electrolux EI30IF40LS manuals
Add to My Manuals
Save this manual to your list of manuals |
Page 25 highlights
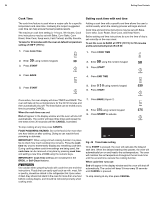
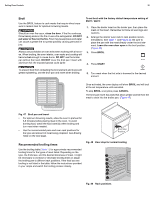
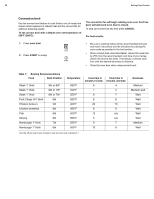
Setting Oven Controls 25 Broil Use the BROIL feature to cook meats that require direct exposure to radiant heat for optimum browning results. Should an oven fire occur, close the door. If the fire continues, throw baking soda on the fire or use a fire extinguisher. DO NOT put water or flour on the fire. Flour may be explosive and water can cause a grease fire to spread possibly causing personal injury. Always use pot holders or oven mitts when working with a hot oven. When broiling, the oven interior, oven racks and cooktop will become hot enough to cause burns. DO NOT use the broiler pan without the insert. DO NOT cover the broil pan / insert with aluminum foil; the exposed grease could ignite. To set broil with the factory default temperature setting of 550°F / 288°C: 1. Place the broiler insert on the broiler pan, then place the meat on the insert. Remember to follow all warnings and cautions. 2. Arrange the interior oven rack to rack position recommendations. See Table 1 and Figure 49. Be sure to place the pan with the meat directly under the broil element. Leave the oven door open in the broil position. (Figure 48) 3. Press BROIL 4. Press START To prevent food from contacting the broil element and to prevent grease splattering, use the broil pan and insert when broiling. START 5. Turn meat when the first side is browned to the desired amount. Once activated, the oven display will show BROIL and will broil at the set temperature until cancelled. To stop BROIL at anytime press CANCEL. The broil pan insert has slots that allow grease and fat from the meat to drain into the broiler pan. (Figure 47) Fig. 47 Broil pan and insert • For optimum browning results, allow the oven to preheat for 5-6 minutes before placing meat in the oven. To avoid burning food, watch the food carefully when broiling and turn meat when needed. • Use the recommended pans and oven rack positions for the type and amount of meat being prepared. See Broiling Table on the next page. Recommended broiling times Use the broiling table (Table 1 ) for approximate recommended broiling times for the types of meat listed. Depending on the type, the thickness, and the desired doneness of meat, it might be necessary to increase or decrease broiling times or adjust the broiling pan to different rack positions. If the food you are broiling is not listed in the table, follow the instructions provided in your recipe and watch the broiling process closely. Fig. 48 Door stop for normal broiling 7 6 5 4 3 2 1 Fig. 49 Rack positions
-
 1
1 -
2
-
3
-
4
-
5
-
6
-
7
-
8
-
9
-
10
-
11
-
12
-
13
-
14
-
15
-
16
-
17
-
18
-
19
-
 20
20 -
 21
21 -
 22
22 -
 23
23 -
 24
24 -
 25
25 -
 26
26 -
 27
27 -
 28
28 -
 29
29 -
 30
30 -
31
-
32
-
33
-
34
-
35
-
36
-
37
-
38
-
39
-
40
-
41
-
42
-
43
-
44
-
45
-
46
-
47
 |
 |
