Epson 4880 User's Guide - Page 136
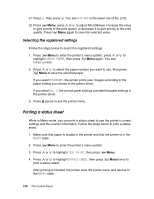
Printing a status sheet, Selecting the registered settings
 |
UPC - 010343866898
View all Epson 4880 manuals
Add to My Manuals
Save this manual to your list of manuals |
Page 136 highlights
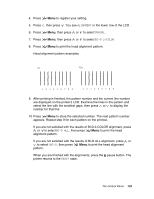
21. Press , then press . You see M/W ADJ in the lower row of the LCD. 22. Press Menu, press or to adjust MicroWeave. Increase the value to give priority to the print speed, or decrease it to give priority to the print quality. Press Menu again to save the selected value. Selecting the registered settings Follow the steps below to select the registered settings. 1. Press Menu to enter the printer's menu system, press or to highlight CUSTOM PAPER, then press Menu again. You see PAPER NUMBER. 2. Press or to select the paper number you want to use, then press Menu to save the selected paper. If you select STANDARD, the printer prints your images according to the paper setting you choose in the printer driver. If you select No. X, the control panel settings override the paper settings in the printer driver. 3. Press pause to exit the printer menu. Printing a status sheet While in Menu mode, you can print a status sheet to see the printer's current settings and life counter information. Follow the steps below to print a status sheet. 1. Make sure that paper is loaded in the printer and that the printer is in the READY state. 2. Press Menu to enter the printer's menu system. 3. Press or to highlight TEST PRINT, then press Menu. 4. Press or to highlight STATUS CHECK, then press print a status sheet. Menu twice to After printing is finished, the printer exits the printer menu and returns to the READY state. 136 The Control Panel
-
 1
1 -
2
-
3
-
4
-
5
-
6
-
7
-
8
-
9
-
10
-
11
-
12
-
13
-
14
-
15
-
16
-
17
-
18
-
19
-
20
-
21
-
22
-
23
-
24
-
25
-
26
-
27
-
28
-
29
-
30
-
31
-
32
-
33
-
34
-
35
-
36
-
37
-
38
-
39
-
40
-
41
-
42
-
43
-
44
-
45
-
46
-
47
-
48
-
49
-
50
-
51
-
52
-
53
-
54
-
55
-
56
-
57
-
58
-
59
-
60
-
61
-
62
-
63
-
64
-
65
-
66
-
67
-
68
-
69
-
70
-
71
-
72
-
73
-
74
-
75
-
76
-
77
-
78
-
79
-
80
-
81
-
82
-
83
-
84
-
85
-
86
-
87
-
88
-
89
-
90
-
91
-
92
-
93
-
94
-
95
-
96
-
97
-
98
-
99
-
100
-
101
-
102
-
103
-
104
-
105
-
106
-
107
-
108
-
109
-
110
-
111
-
112
-
113
-
114
-
115
-
116
-
117
-
118
-
119
-
120
-
121
-
122
-
123
-
124
-
125
-
126
-
127
-
128
-
129
-
130
-
 131
131 -
 132
132 -
 133
133 -
 134
134 -
 135
135 -
 136
136 -
 137
137 -
 138
138 -
 139
139 -
 140
140 -
 141
141 -
142
-
143
-
144
-
145
-
146
-
147
-
148
-
149
-
150
-
151
-
152
-
153
-
154
-
155
-
156
-
157
-
158
-
159
-
160
-
161
-
162
-
163
-
164
-
165
-
166
-
167
-
168
-
169
-
170
-
171
-
172
-
173
-
174
-
175
-
176
-
177
-
178
-
179
-
180
-
181
-
182
-
183
-
184
-
185
-
186
-
187
-
188
-
189
-
190
-
191
-
192
-
193
-
194
-
195
-
196
-
197
-
198
-
199
-
200
-
201
-
202
-
203
-
204
-
205
-
206
-
207
-
208
-
209
-
210
-
211
-
212
-
213
-
214
-
215
-
216
-
217
-
218
-
219
-
220
-
221
-
222
-
223
-
224
-
225
-
226
-
227
-
228
-
229
-
230
-
231
-
232
-
233
-
234
-
235
-
236
-
237
-
238
-
239
-
240
-
241
-
242
-
243
-
244
-
245
-
246
-
247
-
248
-
249
-
250
-
251
-
252
 |
 |