Epson 4880 User's Guide - Page 59
Paper Configuration, detailed paper settings.
 |
UPC - 010343866898
View all Epson 4880 manuals
Add to My Manuals
Save this manual to your list of manuals |
Page 59 highlights
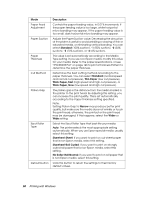
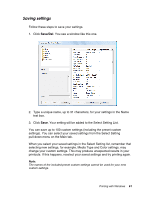
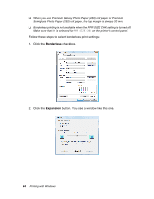
Paper Configuration If you are using non-Epson paper and are experiencing problems with print quality when using Epson Media Type settings, click the Paper Config button, and then select settings as necessary. The following settings in the Paper Configuration window let you select detailed paper settings. Mode Color Density Drying Time per Print Head Pass Description Adjusts the saturation of Colors. Use a value between -50% and +50%. Drag the slider to the right (+) to deepen the color saturation of your printout or left (-) to lighten the color saturation. You can also type a number (-50 to +50) in the text box next to the slider. Use this setting when you print on non-Epson papers. Set the slider to the 0 position when you print on Epson media. Note: Adjusting the color saturation of a printout may not be possible, depending on the printing mode. Pauses the print head for a specified period of time between passes. Set this value using the slider or text box. To improve print quality by using slow ink absorption on the media, set a higher value. The drying time per print head pass can be set from 0 to 5 seconds, in 0.1 second increments. Note: If you use this setting, printing will take longer. Printing with Windows 59
-
 1
1 -
2
-
3
-
4
-
5
-
6
-
7
-
8
-
9
-
10
-
11
-
12
-
13
-
14
-
15
-
16
-
17
-
18
-
19
-
20
-
21
-
22
-
23
-
24
-
25
-
26
-
27
-
28
-
29
-
30
-
31
-
32
-
33
-
34
-
35
-
36
-
37
-
38
-
39
-
40
-
41
-
42
-
43
-
44
-
45
-
46
-
47
-
48
-
49
-
50
-
51
-
52
-
53
-
 54
54 -
 55
55 -
 56
56 -
 57
57 -
 58
58 -
 59
59 -
 60
60 -
 61
61 -
 62
62 -
 63
63 -
 64
64 -
65
-
66
-
67
-
68
-
69
-
70
-
71
-
72
-
73
-
74
-
75
-
76
-
77
-
78
-
79
-
80
-
81
-
82
-
83
-
84
-
85
-
86
-
87
-
88
-
89
-
90
-
91
-
92
-
93
-
94
-
95
-
96
-
97
-
98
-
99
-
100
-
101
-
102
-
103
-
104
-
105
-
106
-
107
-
108
-
109
-
110
-
111
-
112
-
113
-
114
-
115
-
116
-
117
-
118
-
119
-
120
-
121
-
122
-
123
-
124
-
125
-
126
-
127
-
128
-
129
-
130
-
131
-
132
-
133
-
134
-
135
-
136
-
137
-
138
-
139
-
140
-
141
-
142
-
143
-
144
-
145
-
146
-
147
-
148
-
149
-
150
-
151
-
152
-
153
-
154
-
155
-
156
-
157
-
158
-
159
-
160
-
161
-
162
-
163
-
164
-
165
-
166
-
167
-
168
-
169
-
170
-
171
-
172
-
173
-
174
-
175
-
176
-
177
-
178
-
179
-
180
-
181
-
182
-
183
-
184
-
185
-
186
-
187
-
188
-
189
-
190
-
191
-
192
-
193
-
194
-
195
-
196
-
197
-
198
-
199
-
200
-
201
-
202
-
203
-
204
-
205
-
206
-
207
-
208
-
209
-
210
-
211
-
212
-
213
-
214
-
215
-
216
-
217
-
218
-
219
-
220
-
221
-
222
-
223
-
224
-
225
-
226
-
227
-
228
-
229
-
230
-
231
-
232
-
233
-
234
-
235
-
236
-
237
-
238
-
239
-
240
-
241
-
242
-
243
-
244
-
245
-
246
-
247
-
248
-
249
-
250
-
251
-
252
 |
 |
